These are the best VPNs to use with Apple TV
A VPN is a pretty useful thing to have if you're a regular internet user. They allow you to unblock streaming services that aren't available in your location so you can stream content from around the world on your Apple TV. Unfortunately, you aren't able to download a VPN service directly onto your Apple TV, which means there are a few extra steps that you need to take in order to get it set up and working.
In this guide, we show you three ways to set up a VPN with your Apple TV. These include using a VPN router, sharing your computer's internet connection with Apple TV, or through the use of Smart DNS.
How to set up a VPN with Apple TV
There are several popular methods for using a VPN with an Apple TV device. You can use whichever method suits you best. However, some methods are easier than others. To help you out, we will explain this as we go along.
Unfortunately, Apple doesn't let you install any VPN software directly onto your Apple TV. This rules out the easiest possible method of using a VPN with Apple TV. Luckily, at ProPrivacy we have discovered three methods that will let you get a VPN working with your Apple TV.
Use a VPN router
One of the easiest methods to get a VPN working with Apple TV is to install the VPN on a router. Nowadays, many routers are VPN compatible, so you should check your router's model to see if it accepts VPN connections. If your router does not come pre-set to connect to a VPN, you may need to flash the router with the DD-WRT firmware yourself. This will only be possible if it is compatible, so you will need to check with the router's manufacturer.
Loading a VPN onto a router is the easiest way to set up an Apple TV to work with a VPN – but it can be more costly. The simplest method is to purchase a pre-flashed and pre-configured Tomato router or DD-WRT router from a company like FlashRouters. This guarantees that the VPN router will work right out of the box, saving you from running the risk of damaging (bricking) your router, as can sometimes happen when you install alternative firmware.
Alternatively, many medium to high-end routers feature a built-in VPN client that can be manually configured to work with most VPN providers. If you do not already have a router like this, you can purchase a cheap, easy to set up option like the Vilfo.
If you're more tech-savvy and aren't afraid to get stuck in, you can flash your existing router with DD-WRT or Tomato firmware (after you check to make sure it's compatible). Every router is different, and we recommend that you check with the manufacturer to find a specific guide for your device. However, the basic steps are outlined below:
- Using a laptop or computer, download the DD-WRT or Tomato firmware for your router.
Please note, using the wrong file during this process can permanently damage your router!
- Ensure your router is powered on and insert an ethernet cable into any available port.
- Connect the other end of the ethernet cable into the laptop or computer where you downloaded the firmware file.
- Using your chosen device, head to your router's IP address (this is usually 192.168.1.1 or 192.168.0.1). You might be prompted for your username and password. If you have never updated these yourself, then it will be the default details - which you can check with your manufacturer.
- Navigate into the Admin panel, sometimes found under Advanced and select Upgrade or Router Upgrade. Alternatively, some routers might have a CFE bootloader that requires you to enter a sequence to bring you to the same menu.
- Click Upload. You might be presented with a warning message. Only continue once you are absolutely certain that you are using the correct file.
- Once the upload has completed, restart your router.
- Log back into the router and enter the new login credentials, remembering to save things as you go.
It is important to remember that this process is not meant to be followed to the letter. It is loosely based on what you should do when flashing a router and is not a one-size-fits-all guide.
Connect to VPN with Mac
Share a VPN with Apple TV with an ethernet cable (MacOS)
For this method to work, you must connect your Mac to the internet. The MacBook Pro comes with two native Ethernet ports, while other models have none. USB-C and Thunderbolt accessories can provide you with additional Ethernet ports.
If you have more than one Ethernet port available to you on your machine, then you can use the second port to connect to the internet instead of Wi-Fi if you prefer. Otherwise you will need to connect via Wi-Fi, to leave the single Ethernet port available.
All Apple TV models, including the Apple TV 4K, come with an Ethernet port that you can use to connect directly to your Mac computer to share its internet connection.
This method for connecting your Apple TV to a VPN service uses the built-in macOS VPN client. For this reason, it only works using the PPTP, L2TP, or IKEv2 VPN protocols. You must be subscribed to a VPN that has one of these protocols to set up the VPN successfully with your Apple TV.
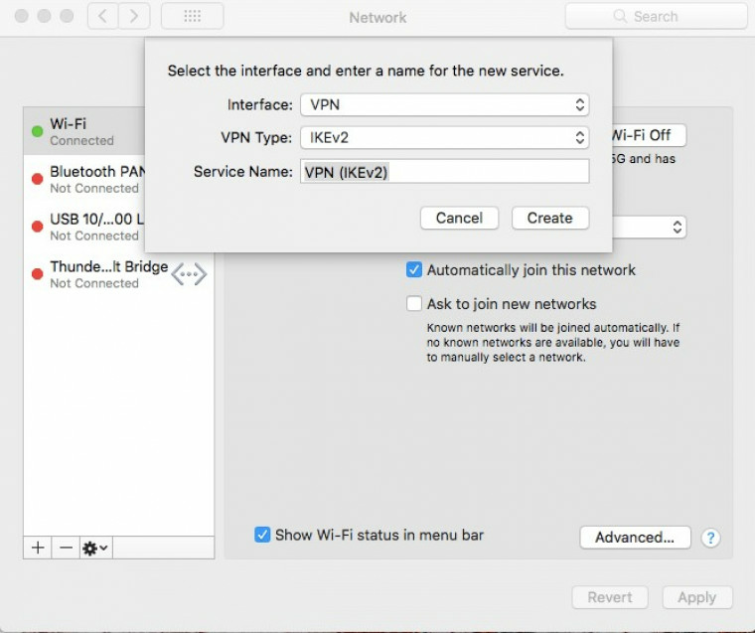
- Sign-up for one of the VPN services listed in our 5 best VPNs for Apple TV and manually configure the native macOS VPN client to use it. Your specific VPN provider will have a guide for setting up the VPN manually on your Mac. Alternatively, you can use our guide here.
![VPN setup on Mac]()
- Connect to a VPN server in your chosen location.
- Connect your Apple TV to your computer using an Ethernet cable.
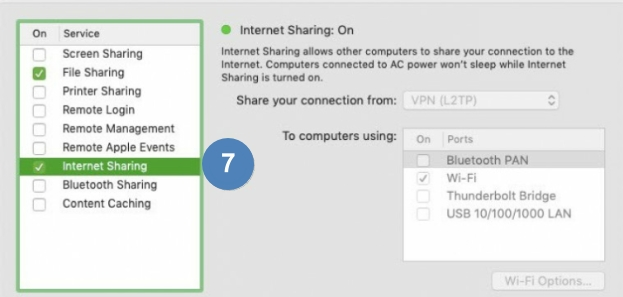
- On your macOS computer, go to System Preferences > Sharing, and then select Internet Sharing.
- Click Share your connection from in the pop-up menu, then choose the internet connection you want to share (this is the VPN connection you just setup).
![turn on internet sharing]()
- Select how you want to share your connection in the "To computers using" list. You will be using an Ethernet cable, so select your Ethernet interface. (In the example image below we used a MacBook, which is why the ethernet cable is plugged into our USB using an adapter).
- Ensure Internet Sharing is switched on by checking the box.
Share a VPN With Apple TV over Wi-Fi (macOS)
This method requires your Mac be connected to the internet via Ethernet cable or a second Wi-Fi adapter (such as a USB dongle). You can then connect to your macOS computer from your Apple TV using Wi-Fi and enjoy the VPN connection.
Unlike Windows 10, macOS cannot create a Wi-Fi hotspot using a single Wi-Fi adapter, which is why you must connect to the router over ethernet to use this method.
This method will only work using the native macOS VPN client, which supports either the PPTP, L2TP, or IKEv2 clients (not OpenVPN).
- Sign-up for one of the VPN services listed in our 5 best VPN for Apple TV, and then manually configure the macOS VPN client to use it. Connect to a VPN server in the location where you need it.
- Connect your Apple TV to your computer using an Ethernet cable. On our macOS computer, head to System Preferences > Sharing.
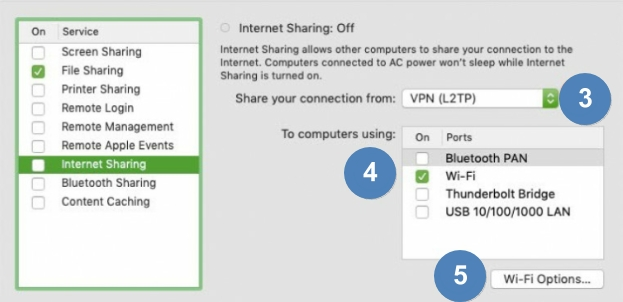
- Choose Share your connection from: [the VPN connection you just set up manually]
- Choose To computers using and select Wi-Fi.
- Click on Wi-Fi Options.
![internet sharing settings]()
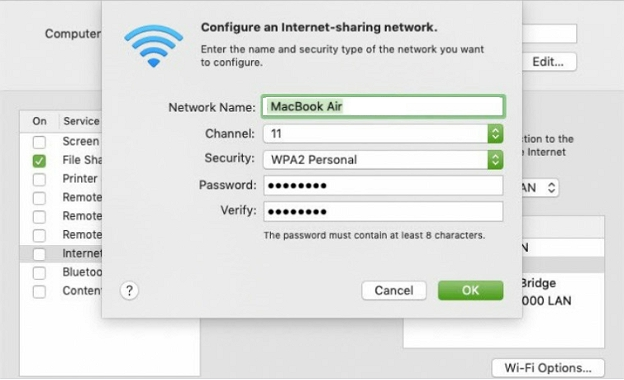
- Check your network settings and select an SSID password for your new hotspot. Click "OK" when you are done. (In the example below, we used a MacBook Air).
![configure your sharing network]()
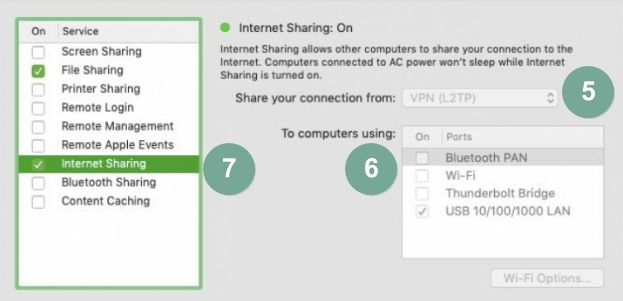
- Turn on Internet Sharing by selecting its checkbox.
![turn on internet sharing]()
Connect to VPN with a Windows PC
Connect a VPN to Apple TV With an ethernet cable (Windows 10)
To carry out this method, you will need to make sure your PC is connected to the internet via Wi-Fi unless you have two or more Ethernet ports on your PC. If so, then you can use the second port to connect to the internet instead. This will provide even better speeds for your PC and Apple TV.
- Sign-up for one of our recommended VPNs for Apple TV.
- Install the VPN app on your Windows machine and connect to the VPN..
- Connect your Apple TV to your computer using an Ethernet cable. Modern laptops rarely feature a dedicated Ethernet port, so you may need to purchase a USB-C to Ethernet adapter cable or similar. All Apple TV models, including the Apple TV 4K, feature an Ethernet port that you can use to connect to your Windows PC.
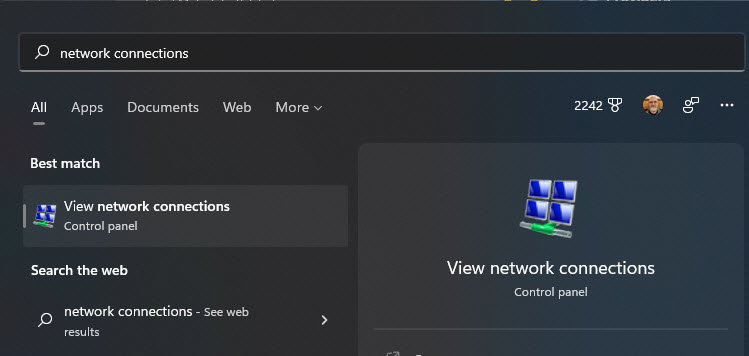
- Go to Start and search for View Network Connections.
![network connections]()
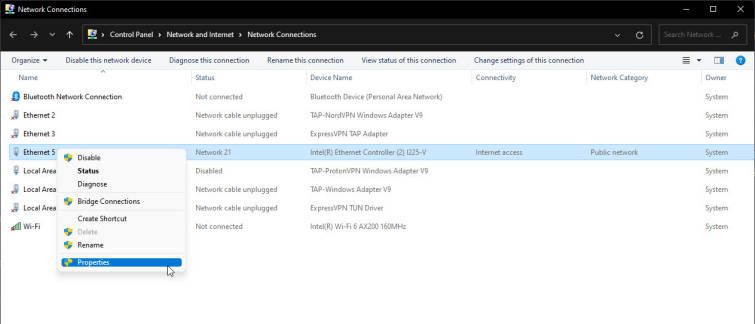
- Right click on the active Internet connection and select "Properties".
![network connections 2]()
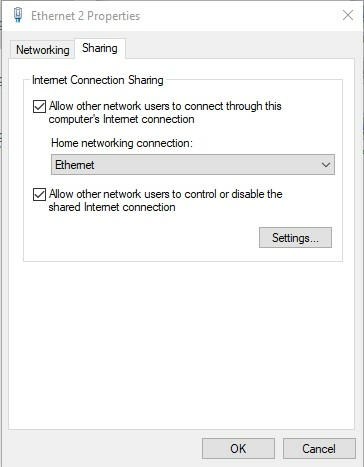
- Click on the Sharing tab and:
a) Check Allow Other Network users to connect through this computer's Internet connection.
b) In the Home networking connection drop-down menu, select your Ethernet connection from the list and hit OK.![internet connection sharing options]()
- Your Apple TV should now be sharing your Windows VPN connection, but it never hurts to reboot both devices just to be sure they're talking to each other properly.
Share a VPN with Apple TV over Wi-Fi (Windows 10)
Windows 10 now has the ability to create a Wi-Fi hotspot. This allows you to share your VPN connection with an Apple TV using a single Wi-Fi adapter (whether it be a USB dongle, a Wi-Fi card, or Wi-Fi chip soldered onto your laptop's motherboard).
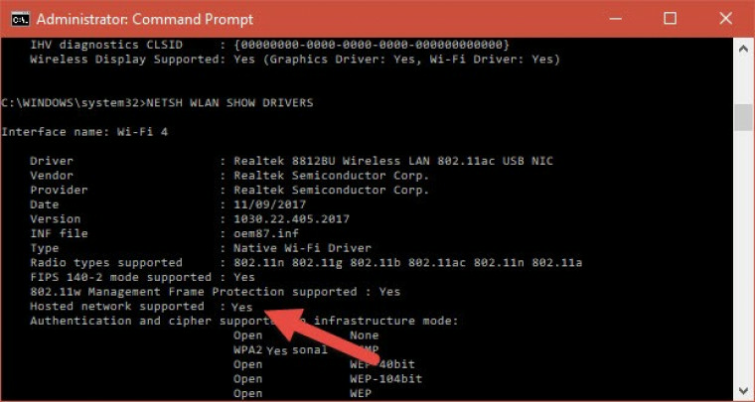
- For this to work, though, you need a compatible Wi-Fi adapter. Right-click Start -> Command Prompt and type (or copy and paste in):
netsh wlan show drivers. - Look for the line saying Hosted network supported:
a) If it says "yes" then you can proceed with these setup instructions.
b) If it says "no" then you can try updating your Wi-Fi drivers, although it may be easier to just get a new Wi-Fi dongle. Alternatively, you can use the Ethernet method outlined above.![admin command prompt]()
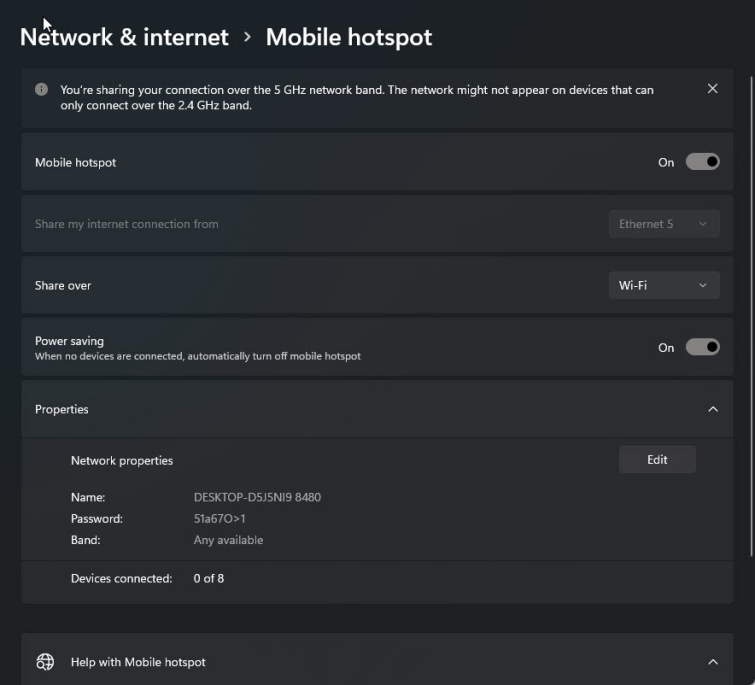
- Go to Start > Settings > Network & Internet > Mobile hotspot. Turn Mobile hotspot On and make a note of its SSID settings (Network name and Network password).
![network connections 3]()
- Turn on your VPN.
- Go to
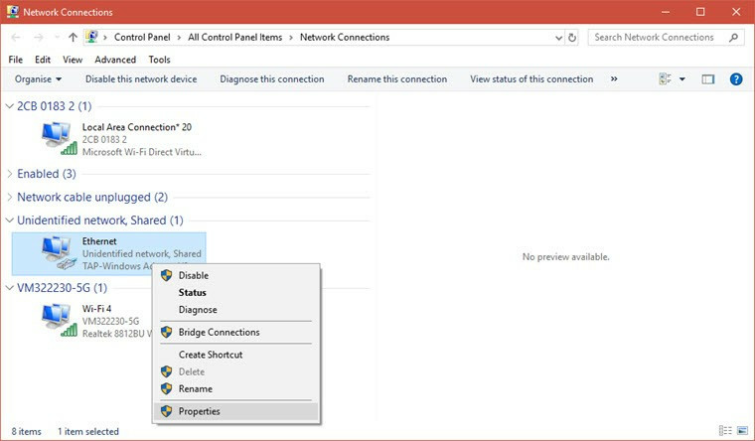
- Go to Start and search for "View Network Connections". Note that you can now see your hotspot connection. It will be called "Local Area Connection* xx", and labeled "Microsoft Wi-Fi Direct Virtual Adapter".
- Find your VPN connection. If it is an OpenVPN connection, then it may be named after your VPN provider or it may use the generic "TAP-Windows-Adapter VPN" label. Right-click on it and select Properties.
![TAP properties]()
- Click on the Sharing tab and:
a) Check "Allow Other Network users to connect through this computer's Internet connection.
b) In the "Select your private internet connection" drop-down menu select your hotspot connection (Local Area Connection* xx"). Leave Allow other network users to control or disable shared Internet connection enabled and click OK. - Connect your Apple TV to the Windows hotspot you created via Wi-Fi using the SSID details you noted earlier.
Use your VPNs Smart DNS service
Some VPN providers include a Smart DNS feature with their subscription plans. This provides you with an alternative method to configure your VPN service to work with your Apple TV. To use this method, you will first need to find out the correct DNS server address from your VPN provider (of course it will only be able to provide this if it actually offers the feature). ExpressVPN, for example, has this excellent add-on.

- On your Apple TV, navigate to Settings > General > Language and Region > Apple TV Language.
- Change your "iTunes Store Location" to the same country as the DNS server you wish to connect to. In many cases, this will be the United States (for Netflix US, Hulu. HBO Max, etc), but it might also be the UK if you want to watch BBC iPlayer, or Ireland for RTE Player.
- Navigate to Settings > Network > Wi-Fi > [name of your Wi-Fi connection] ->
![Select country]() a) Change Configure DNS from Automatic to Manual.
a) Change Configure DNS from Automatic to Manual. ![manual configure DNS]() b) Click on "DNS" and then enter the address for the DNS server from your VPN provider.
b) Click on "DNS" and then enter the address for the DNS server from your VPN provider. - Restart your Apple TV and you should now be able to access US Netflix (or any other services in the country that you require).
 a) Change Configure DNS from Automatic to Manual.
 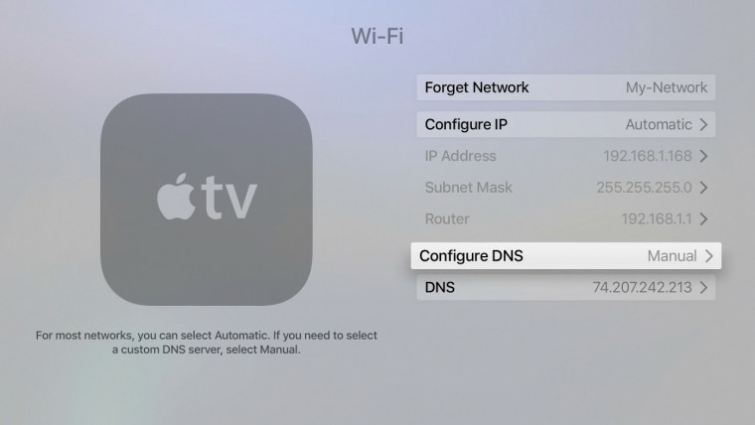 b) Click on "DNS" and then enter the address for the DNS server from your VPN provider.