In addition to VPN connection failures, the other significant threat to your anonymity when using a trusted VPN service is that of DNS leaks.
This can result in your ISP being able to ‘see’ and monitor your online activity even though you think an encrypted VPN tunnel safely protects you.
In the following article, we are going to discuss what a DNS is, what it means when it leaks, how you can fix DNS leaks, and DNS leak protection.
Please note that is article has been largely superseded by A Complete Guide to IP Leaks. However, the DNS Leak Protection information contained here is still up to date and useful!
What is a DNS?
The Dynamic Name System (DNS) is used to translate domain names into numerical IP addresses (34.233.235.248). This translation service is usually performed by your ISP, using its DNS servers.
What is a DNS leak?
A DNS Leak is when, due to software issues, your ISP is able to track your internet movements, regardless of whether you're using a VPN or not!
When you use a VPN service, the DNS request should be routed through the VPN tunnel to your VPN provider’s DNS servers rather than those of your ISP.
However, it is quite common for Windows (the main culprit for this problem, although never say never for OSX and Linux) to instead use its default settings, and send the request to the ISP’s DNS server rather than through the VPN tunnel.
DNS Leak Test
To perform a DNS leak test simply go to dnsleaktest.com
Check the results to make sure that you recognize the IP numbers. In particular, any result that shows your ‘real’ location or that belongs to your ISP means that you have a DNS leak.
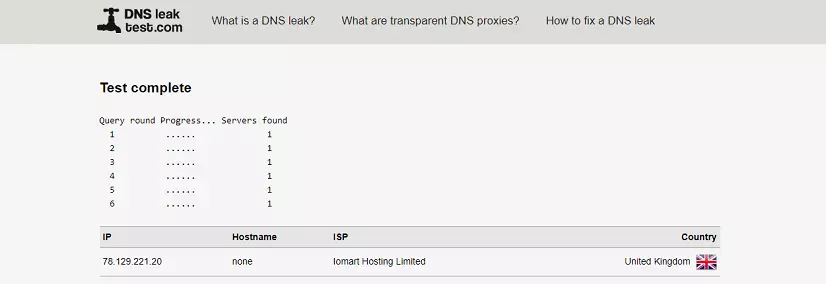
These results all look ok to us, so we know we don’t have a DNS leak. Phew!
DNS Leak Fix
If you want to plug a DNS leak, or just want to prevent the possibility of one happening, there are a number of approaches you can take.
1. Use a VPN client with built-in DNS leak protection
It is by far the simplest way, but unfortunately, only a few VPN providers supply this option. Those that do include:
Private Internet Access – Settings/DNS Leak Protection*
Mullvad -Settings/Stop DNS leaks*
TorGuard – Automatic
*These clients also feature an ‘internet kill switch’.
2. Use VPNCheck (Pro version)
The pro version of VPNCheck includes DNS Leak Protection.
Here's how to go about setting it up.
- Download, install and run VPNCheck.
- On the main screen click ‘Config’.
- Then ensure that the ‘DNS leak fix box’ is checked. It’s also probably worth specifying some programs (such as your favorite BitTorrent client) that you want to shut down in the event of a VPN disconnection while you are at it.
- To get everything started, go back to the main screen and click either Cycle IP: Task or Cycle IP: Network.
VPNCheck Pro costs $24.90 (at the time of writing there is a 20% discount, which brings the price down to $19.92), and comes with a 13-day free trial.
3. Change DNS Servers and Obtain a Static IP
Although not strictly speaking a fix, changing DNS servers makes sure that your ISP is not snooping on you. Most VPN providers will be happy to give you their DNS server details, or you can route your requests through a public DNS server such as those offered by Google Public DNS, OpenDNS, and Comodo Secure DNS.
Edit: I have now written How to Change your DNS Settings – A Complete Guide which explains in detail how to change your DNS settings in all major OSs. In that article, I recommend using OpenNIC over Google DNS, as Google DNS is a very poor choice when it comes to privacy.
Installation instructions for various platforms are provided on the respective websites, but as we are working in Windows 7, here is a rundown on how to do it there (the process is similar on all platforms).
- Open Network and Sharing Centre (from the Control Panel,) and click on ‘Change Adapter settings.’
- Right-click on your main connection and select ‘Properties’
- Look through the list and find ‘Internet Protocol Version 4 (TCP/IPv4). Highlight it and click on ‘Properties’
- Make a note of any existing DNS server addresses, in case you want to restore your system to its previous settings at some point in the future, then click on the ‘Use the following DNS server addresses’ radio button, enter the relevant addresses. Click ‘OK’ and restart the connection.
If you are using your VPN provider’s DNS server, then they will provide you with the DNS server addresses. If you are using a public server then you may find these addresses useful:
Google Public DNS
- Preferred DNS server: 8.8.8.8
- Alternate DNS server: 8.8.4.4
Open DNS
- Preferred DNS server: 208.67.222.222
- Alternate DNS server: 208.67.222.220
Comodo Secure DNS
- Preferred DNS server: 8.26.56.26
- Alternate DNS server: 8.20.247.20
Changing the DNS server is not only more secure as it moves the DNS translation service to a more trusted party, but it can bring speed benefits, as some services are faster than others. To find out how well a DNS server provider fares in this respect, you can download a free utility called DNS Benchmark.
A static IP address is a single fixed IP address. If configured to connect to a static IP, Windows (or other OSs) will always route your DNS requests to that static IP address, rather than assigning a random IP each time you connect to the internet (using DHCP).
In theory, when using a VPN with DHCP enabled, all DNS requests should be routed through the VPN tunnel (using a process known as address reservation). The VPN provider then handles these. Errors in the address reservation process, however, can result in DHCP defaulting to using the DNS servers specified by the OS settings, rather routing them through the VPN tunnel.
Although not critical, it is therefore probably also a good idea to clear any other DNS servers except those used by your VPN adaptor. Full instructions for doing so can be found here, along with the fix which only works with the ‘classic’ open-source OpenVPN client. It is effectively a 3 part batch file which:
- Switches from any active DHCP adaptors to a static IP (set by you)
- Clears all DNS servers except the TAP32 adaptor (used by OpenVPN)
- Returns your system to its original settings once you are disconnected from the VPN server
Author’s note, 14 January 2016: This three-year-old hack is a partial way to get around the fact that most VPN clients of the time did not properly route DNS requests through the VPN to be resolved by the VPN provider (as should happen.) Fortunately, the situation has significantly improved, and most good clients now offer robust DNS leak protection. Hopefully, VPN providers will now start to support full IPv6 routing (rather than simply disabling IPv6.)
DNS Leak Protection
As ensuring anonymity is the main reason most people use VPN, it makes sense to spend a few minutes to plug any potential areas where this anonymity may be compromised. It is also worth remembering that while Windows causes the most DNS leak problems, Linux and OSX are not immune, so it is still a good idea to follow a similar step to those outlines above if these are your platforms of choice.
Update: Following revelations of Google’s complicity in the recent NSA spying scandal, we now advise against using Google Public DNS servers.
Update: Although reliability can be an issue, using OpenNIC DNS servers is a decentralized, open, uncensored and democratic alternative to the DNS providers listed above. It is also possible to set your DNS settings to those of your VPN provider (ask it for details).
Important Update: A new "feature" in Windows 10 means that DNS requests are directed not just through your VPN tunnel, but also through your ISP and local network interface. It is because by default Windows 10 attempts to improve web performance by sending DNS requests in parallel to all available resources at once, and using the fastest one. Windows 10 users, in particular, should, therefore, disable "Smart Multi-Homed Name Resolution" immediately (although Windows 8.x users can benefit from doing this also.) See WARNING! Windows 10 VPN users at big risk of DNS leaks for more details.
DNS Leak Security Conclusion
You should now be able to carry out a DNS leak test, and DNS leak protection as well. If you've got any feedback on this guide, then let us know in the comments.
Related articles: