The Domain Name System (DNS) is used to translate the easy-to-understand and remember web addresses that we are familiar with, to their "true" numerical IP addresses that computers understand: for example translating the domain name proprivacy.com to its IP(v4) address of 104.20.10.58.
This DNS translation process is usually performed by your ISP, but when using a VPN, all DNS requests should be sent through your encrypted VPN tunnel, to be handled by your VPN provider instead.
There are a number of reasons why you might want, or need, to change your DNS settings (that is, change the default DNS server used by your Operating System to handle DNS requests). These include:
- Improving privacy by preventing your ISP from handling DNS requests. This can happen even when using a VPN (this is known as a DNS leak). Changing your DNS settings to a third-party provider is, therefore, a good safety precaution.
- Using a SmartDNS service.
- Fixing internet connection issues – in relation to VPN, when a VPN connection suddenly drops for some reason, it is common for the DNS settings to remain pointing at the VPN provider’s DNS server. To reconnect to the internet (including to reconnect the VPN!) it is sometimes necessary to change the DNS settings back to using a third party server).
- Evading censorship – changing DNS settings can effective at evading DNS level censorship / DNS poisoning by ISPs.
Fortunately, changing your DNS settings is pretty easy...
Back up your DNS settings
Before changing your DNS settings, it might be an idea to note down your existing settings and store them somewhere safe, so you can easily reset them should you need to. I can’t actually think of a reason why you might need to do this, but it is probably a sensible precaution, anyway.
What settings should I use?
If you are changing your DNS settings to something in particular, then you should already know the settings you require (for example a SmartDNS provider will tell you the settings you need in order to muse its service).
If you are changing DNS settings for a more general reason, then you can use a public DNS server such as those run by Google Public DNS, Open DNS or Comodo Secure DNS. Google DNS, in particular, can be useful for quick-and-dirty solutions, as its settings (DNS server addresses) are very easy to remember (8.8.8.8 and 8.8.4.4).
Google, however, is Google, and it will spy on your DNS requests in order to track what you get up to on the internet in order to target you with ads.
If you are at all interested in privacy, then a much better option to Google and the other US-based commercial providers listed above is OpenNIC. This is a non-profit, decentralized, open, uncensored and democratic DNS provider. Designed to take back power from governments and corporations, OpenNIC is run by volunteers, and provides a completely unfiltered DNS resolution service, with DNS servers located all across the world.
For more information about OpenNIC, please see here.
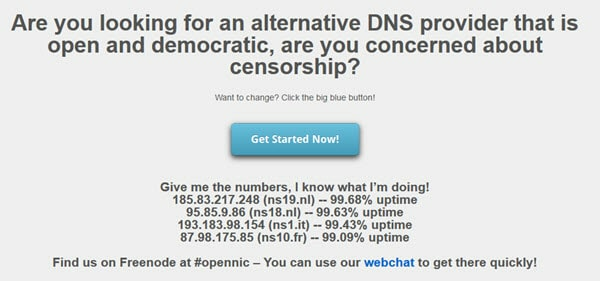
In this article we will use example DNS settings provided by OpenNIC. As I am connected to a VPN when visiting its website, the suggested settings are based on the IP address of my VPN server, which suits my privacy agenda just fine
Windows
- Right-click Start -> Control Panel (in Windows 7 and earlier, left-click Start instead).

- Go to "Network and Sharing" (or "View network status and tasks" if in Category mode).

- Click "Change adapter settings".

- Right-click on your internet connection -> Properties.

- Click on (highlight) "Internet Protocol Version 4 (TCP/IPv4)", then select "Properties".

- Ensure the "Use the following DNS server addresses" radio button is checked, and input your new DNS settings into the "Preferred DNS server" field (you can go ahead and fill in the "Alternate DNS server" field too, but this is just a backup server address, so is not strictly necessary). Click "OK".

Here I am using the Netherlands server addresses provided by OpenNIC - (Optional) Disable IPv6.
Now might be a good time to prevent IPv6 leaks by disabling IPv6 domain resolution (please see here for a full discussion on this subject). On the "[Internet connection] Properties" screen (see step 5), untick the box next to "Internet Protocol Version 6 (TCP/IPv6)", then hit "OK".
Windows users might also want to check out the DNS Jumper app discussed later in this article.![DNS Windows 5]()


MacOS
- Open "System Preferences".

- Click "Network".

- Select your internet connection, then click "Advanced".

- Switch to the DNS tab, and use the – symbol to remove existing servers and the + symbol to add new servers. OSX will preference servers from top to bottom of this list. When you are done, click "OK".

- (Optional) Disable IPv6.
Now might be a good time to prevent IPv6 leaks by disabling IPv6 domain resolution (please see here for a full discussion on this subject). To do this, switch to the TCP/IP tab and select "Link-local only" from the "Configure iPv6" dropdown menu.


Linux (Ubuntu)
- Go to System Settings -> Network.

- Select your internet connection, then click "Options..."

- Switch to the "IPv4 Settings" tab. Change "Method:" to "Automatic (DCHP) addresses only", then add your new DNS server address to the "Additional DNS Servers:" field, separated by a comma. Hit "Save". It may be necessary to disconnect then reconnect to your network and restart your browser before the new DNS settings take effect.

- Optional) Disable IPv6.
Now might be a good time to prevent IPv6 leaks by disabling IPv6 domain resolution. To this, switch to the "IPv6 Settings tab and change "Method:" to "Link-local only".


iOS (iPhones and iPads)
In iOS you can change the DNS settings for specific Wi-Fi networks (such as your home network), but this will have to be set up for each network you connect to. As far as I know, it is not possible to change the DNS settings for mobile networks.
- Open the Settings app -> Wi-Fi.

- Tap the Information ("i") button next to your Wi-Fi connection.

- Ensure the "DHCP" tab is selected, then scroll down to "DNS" and tap on the numbers to the right. When the keyboard appears, enter your new DNS settings. When you are done, press "Back". Note that a reboot may be required before the new DNS settings take effect.


Android
On unrooted Android devices you can change the DNS settings for specific Wi-Fi networks (such as your home network), but this will have to be set up for each network you connect to. There is no way to change DNS settings for mobile (3G and 4G) networks.
Users of rooted devices can download a number of apps such as DNSet Pro (a free version is also available, which is limited to Google Public DNS servers), which can dynamically change DNS settings across both Wi-Fi and mobile networks.
Note that some "no root" DNS changer apps also exist. These work by creating a local VPN on your device (not an external VPN), and might be useful for evading DNS-based censorship, but will conflict with a regular VPN.
Below are instructions for changing the DNS settings for Wi-Fi networks on unrooted devices. Note that Android devices run many different versions of the OS, and many are heavily skinned. Details may therefore differ slightly on your device.
- Open the Settings app and tap Wi-Fi.

- Long-press the active network, then tap Modify network config -> Show Advanced options.

- Scroll down until you see "IP settings", then change this to "Static" in the drop-down menu. If you scroll down a little further, you should now see "DNS 1" and "DNS 2" fields – enter your new DNS settings here, then touch "Save".


Routers (DD-WRT)
You can change the DNS settings of any router using its web interface. This is usually pretty intuitive, so for example purposes, I will show you how to change the DNS settings of a DD-WRT router.
- In your web browser, type in the IP address of your router in order to access its admin page. Netgear, D-Link, and most DD-WRT flashed routers usually have the default router IP address 192.168.0.1. Belkin routers usually have the default router address 192.168.2.1. If none of these work, please see here for more details on how to find your router’s IP address.
Ensure the Setup -> Basic Setup tab is selected.
- Scroll down to Network Setup -> Network Address Server Settings (DCHP) and enter your new DNS settings in the Static DNS 1 and Static DNS 2 fields. In the Static DNS 3 field you can enter another DNS address of your choice, use 0.0.0.0 (fallback to your ISP DNS), or 10.0.0.0 (a non-usable IP if you don't want to use any other servers).


Other devices
You can change the DNS settings for just about every internet-capable device, including smart TV’s, games consoles, streaming devices and IoT gizmos. Although this guide is intended to be "complete", I think it fair to say that there are far too many such devices to cover here and individual manufacturers will probably have their own specific setup/configuration guides.
Appendix
DNSCrypt
What SSL is to HTTP traffic (turning it into encrypted HTTPS traffic), DNSCrypt is to DNS traffic. Unfortunately, DNS was not built with security in mind, and it is vulnerable to a number of attacks, the most important of which is a "man-in-the-middle" attack known as DNS spoofing (or DNS cache poisoning), where the attacker intercepts and redirects a DNS request.
This could, for example, be used to redirect a legitimate request for a banking service to a "spoof" website designed to collect the account details and passwords for unsuspecting victims. The open source DNSCrypt protocol solves this problem by encrypting your DNS requests, and authenticating communications between your device and the DNS server.
DNSCrypt is available for most platforms (mobile devices must be rooted/jailbroken), but does require support from your chosen DNS server.
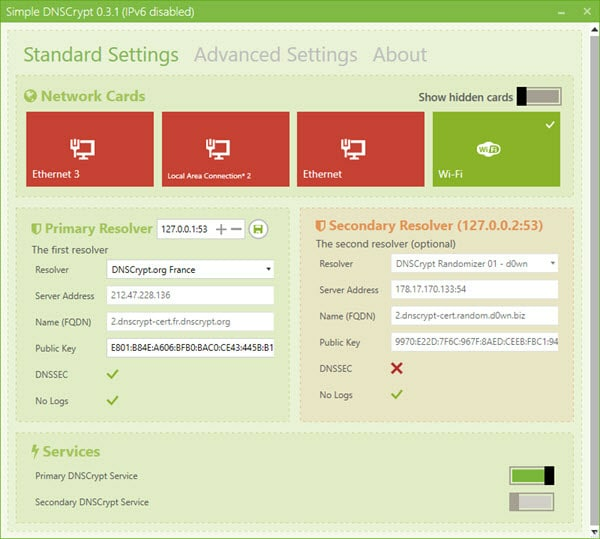
Note that DNSCrypt is not required if using a VPN, as all DNS requests should be sent through the encrypted VPN tunnel direct to your VPN provider’s DNS servers.
DNS Jumper (Windows)
Changing DNS settings regularly can be something of a pain (especially in Windows). Luckily, there’s an app for that! DNS Jumper is a lightweight utility (with no installation required) that makes changing your DNS settings a doddle.
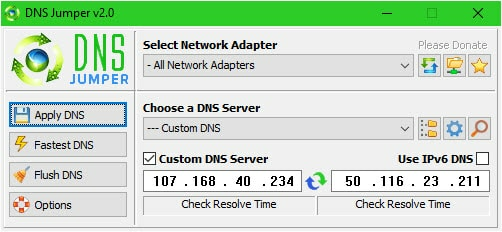
You can select from an extensive list of DNS providers, or specify custom servers
Using a Smart DNS service
With a Smart DNS service, you'll be able to unblock streaming content on pretty much any internet-enabled device, such as your smart TV or games console. A Smart DNS service isn't a VPN, and actually has more in common with a proxy that sends your traffic through a remote server in order to mask your original IP address.
And because Smart DNS services only redirect your DNS queries through its servers, they're particularly handy for folks who want access to international content libraries without impacting the traffic from all of their other devices!
Smart DNS services have plenty of other benefits, too:
- Unblocking power – Access geo-restricted content on any of your devices with a Smart DNS service, even ones that don't natively support VPNs!
- Low-impact – Unlike a VPN, a Smart DNS service doesn't encrypt your traffic, mimizing its impact on your connection speeds.
- Versatility – you'll be able to configure your Smart DNS service on any of your devices without having to run through a potentially complicated setup process.
A smart compromise
If you're interested in checking out a Smart DNS service, you'll want to bear in mind that they don't encrypt your traffic like a regular VPN service. As a result, they're better for unblocking streaming services on your Smart TV than they are at augmenting your online privacy.
How to use a Smart DNS service
Configuring a Smart DNS service might seem daunting if you're unfamiliar with the process, but there's really nothing to it!
First things first, pick a VPN provider that offers a Smart DNS service. I'm using ExpressVPN's MediaStreamer – it's a great service that's easy to use, quick to set up, and included free with your subscription!
Then, decide whether you're going to use MediaStreamer with your VPN router or Windows device.
Using MediaStreamer with your router
Accessing MediaStreamer via a router is quick, easy, and covers a whole household's worth of devices in one go! However, it's important to remember that you can't geo-hop from location to location whilst using MediaStreamer.
- First, you'll want to make sure you've set up ExpressVPN on the router your devices are connected to.
- Then sign in to the router running ExpressVPN.
- Once you've logged in, head to the home screen and select the ellipsis ("...") option on the device group you'd like to use MediaStreamer with.
- Click "All Locations".
- Then "MediaStreamer".
Voilà, the device group you selected is now using MediaStreamer!
Using MediaStreamer with your Windows device
You'll need to register your IP address on the ExpressVPN site before you access MediaStreamer via your laptop or PC. Luckily, this only takes a minute! Once you have, ExpressVPN will recognize your IP address and allow you to use MediaStreamer without a fuss.
- Once you've registered your device's IP address, head to the ExpressVPN setup page and enter your login details if prompted.
- Here you'll find the MediaStreamer DNS server IP addresses – and you'll need these details a bit later, so don't close the tab!
- Then, on your Windows device, press the Windows key and the R key at the same time to open Run prompt.
- Punch in "ncpa.cpl" and then "OK".
- You should see the Network Connections window – right-click the internet connection you're using.
- Click "Properties".
- Then, in the Properties menu, double-click the "Internet Protocol Version 4" option and uncheck the "Internet Protocol Version 6 (TCP/IPv6)" option.
- Next, navigate to the "General" tab and select "Use the following DNS server addresses".
- Remember the MediaStreamer IP addresses from earlier? Here's where you'll enter them – in the "Preferred DNS server" and "Alternate DNS server" boxes.
- Hit "OK", and you're all ready!
Smart DNS VPN alternatives
There are plenty of VPNs out there with their very own Smart DNS service – and it's not always easy to pick out your favorite. To make things easier, we've put together a list of our top VPN recommendations, which you'll find in the table below. In addition, our in-depth guide to VPN Smart DNS services covers each of these top-notch providers in more detail.
From $6.67/month
Has the best Smart DNS service. A lightning-fast service that can unblock virtually any streaming platform you point it at, from anywhere! Also offers a 30-day money-back guarantee.
- ProPrivacy TrustScore:
- 10 out of 10
- Simultaneous connections
- 8
- Server locations
- 160
- Free trial
- No
From $2.11/month
Has the best user-friendly Smart DNS service. With dedicated streaming servers and sleek apps for all platforms, as well as a generous 45-day money-back guarantee.
- ProPrivacy TrustScore:
- 9.9 out of 10
- Simultaneous connections
- 7
- Free trial
- Yes
- Server locations
- 126
From $2.19/month
Has the best value Smart DNS service. Offers unlimited simultaneous connections and access to a long list of streaming services, and a 30-day money-back guarantee.
- ProPrivacy TrustScore:
- 9.8 out of 10
- Simultaneous connections
- Unlimited
- Server locations
- 140
- Free trial
- Yes
From $3.66/month
Has the best budget Smart DNS service. With helpful guides and a week-long free trial, users have access to global streaming sites. Plus a 30-day money back-guarantee.
- ProPrivacy TrustScore:
- 9.7 out of 10
- Server locations
- 39
- Free trial
- No
- Simultaneous connections
- Unlimited
From $3.95/month
Has the best all-rounder Smart DNS service. A superb and secure service for streaming via Smart TV or torrenting, and also offers a 30-day money-back guarantee.
- ProPrivacy TrustScore:
- 9.6 out of 10
- Server locations
- 22
- Simultaneous connections
- Unlimited
- Free trial
- Yes