Devices such as games consoles, media streaming dongles, and smart TVs can all benefit from the geo-spoofing benefits of a VPN but are unable to run VPN software. In this guide, we'll show you how to share a VPN connection in a variety of ways.
How to share a VPN connection
1. Use a VPN router
This is by far the easiest method. Most medium to high-end routers feature a built-in VPN client these days, which should be configurable for almost any VPN service.
Another alternative is to flash your existing router with DD-WRT or Tomato firmware, although buying a pre-flashed and pre-configured DD-WRT or Tomato router from Flashrouters is easier and guarantees that you won't end up with a bricked router!
Note that low-end routers can often run a VPN client, but are not powerful enough to do so at speed. If you want to avoid buffering problems when streaming video content then you'll probably need to spend at least $100 USD or so on a decent VPN router.
2. Share a VPN connection with your Windows or Mac computer
You can share your Windows' or Mac VPN connection with your non-VPN capable device via either Wi-Fi or Ethernet cable – just follow along with the instructions below. This can be handy when you don't want (or can't afford) to splash out on a new router.
3. Change DNS settings
This method doesn't actually use a VPN at all as it relies on changing your device's DNS settings. A number of VPN services, however, include a free Smart DNS service as part of their standard VPN package.
If this is the case with your VPN service, then just about any internet-capable device will allow you to change its DNS settings to make it appear to be in another country.
How to share a VPN without a router
Share a VPN Connection in Windows 10 over Ethernet
1. For this method to work your PC must usually be connected to the internet via Wi-Fi. If you have two or more Ethernet PC ports on your PC, though, you can use the second port to connect to the internet instead.
2. Sign-up for one of the VPN services listed above, install it and connect to a VPN server. Connect your device to your computer using an Ethernet cable. Modern laptops often do not feature a dedicated Ethernet port, so you may need to purchase a USB-C to Ethernet adapter cable or similar.
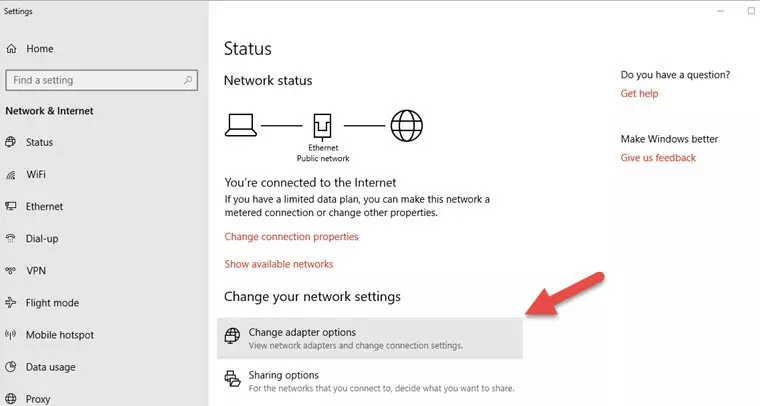
3. Go to Start -> Network & Internet -> Status -> Change your network settings -> Change adapter options.
4. Find your VPN connection. If it's an OpenVPN connection, then it may be named after your VPN provider or it may use the generic "TAP-Windows-Adapter VPN” label. Right-click on it -> Properties.
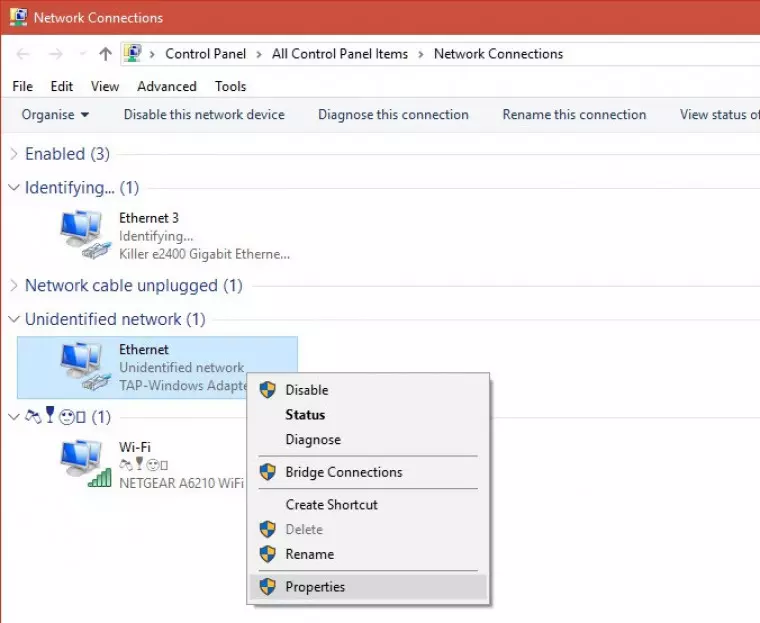
Click on the Sharing tab and:
a) Check "Allow Other Network users to connect through this computer's Internet connection.”
b) In the "Select your private internet connection” drop-down menu select your Ethernet connection.

Hit Ok.
Your non-VPN device should now be sharing your Windows VPN connection, but it never hurts to reboot just to be sure.
Share a VPN Connection in Windows 10 over Wi-Fi
Windows 10 now has the native ability to create a Wi-Fi hotspot with compatible Wi-Fi adapters. This allows you to share your VPN connection with any Wi-Fi-capable device using a single Wi-Fi adapter (whether it be a USB dongle, a Wi-Fi card, or Wi-Fi chip soldered onto your laptop's motherboard).
1. For this to work, though, you need a compatible Wi-Fi adapter. Right-click Start -> Command Prompt and type (or copy and paste in):
netsh wlan show drivers
Look for the line saying "Hosted network supported:”
- If it says "yes” then we can proceed with this guide.
- If it says "no” then we can't. You can try updating your Wi-Fi drivers, although it may be easier to just get a new Wi-Fi dongle. Alternatively, you can use the Ethernet method outlined above.
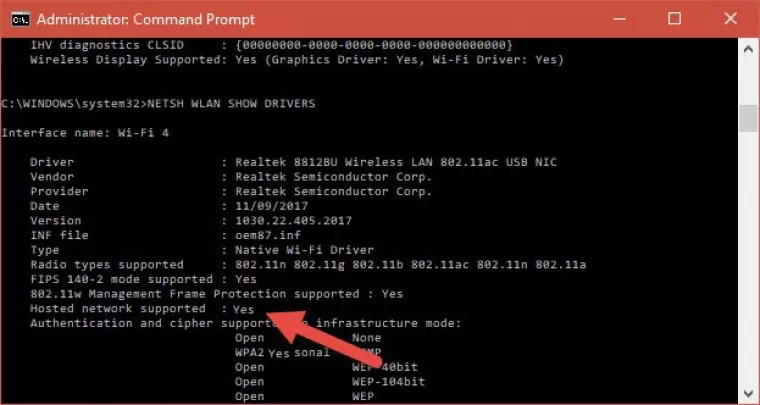
Lucky us! We're good to go.
2. Go to Start -> Network & Internet -> Status -> Change your network settings -> Mobile hotspot. Turn Mobile hotspot On and make a note of its SSID settings (Network name and Network password).
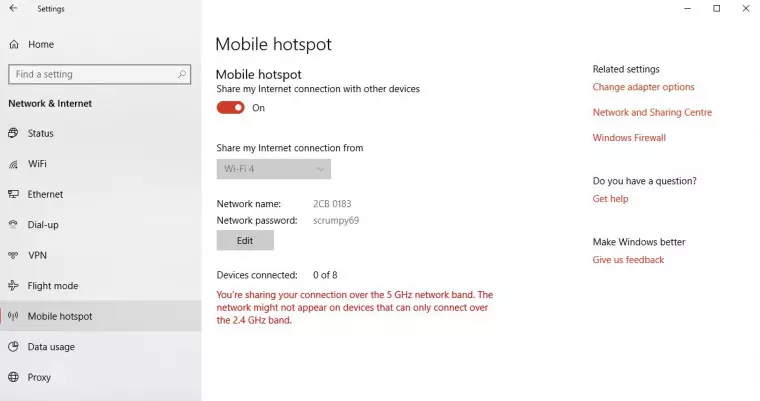
3. Turn on your VPN.
4. Go to Start -> Settings -> Network & Internet -> Status -> Change your network settings -> Change adapter options.

5. Note that you can now see your hotspot connection. It will be called "Local Area Connection* xx”, and labeled "Microsoft Wi-Fi Direct Virtual Adapter”.
Find your VPN connection. If it is an OpenVPN connection, then it may be named after your VPN provider or it may use the generic "TAP-Windows-Adapter VPN” label. Right-click on it -> Properties.
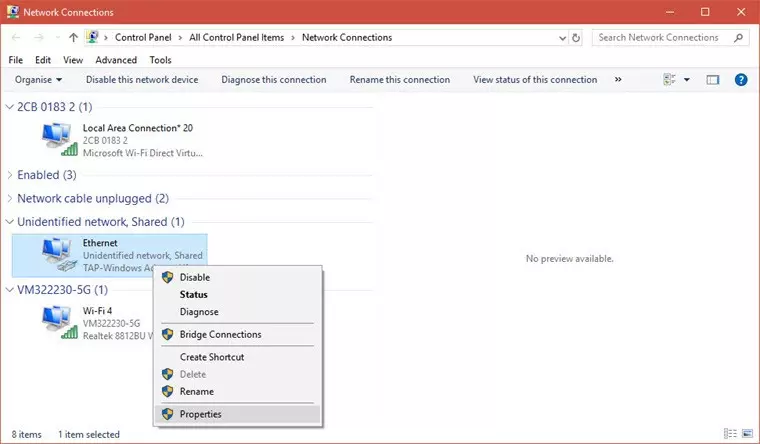
Click on the Sharing tab and:
a) Check "Allow Other Network users to connect through this computer's Internet connection.”
b) In the "Select your private internet connection” drop-down menu select your hotspot connection (Local Area Connection* xx”).
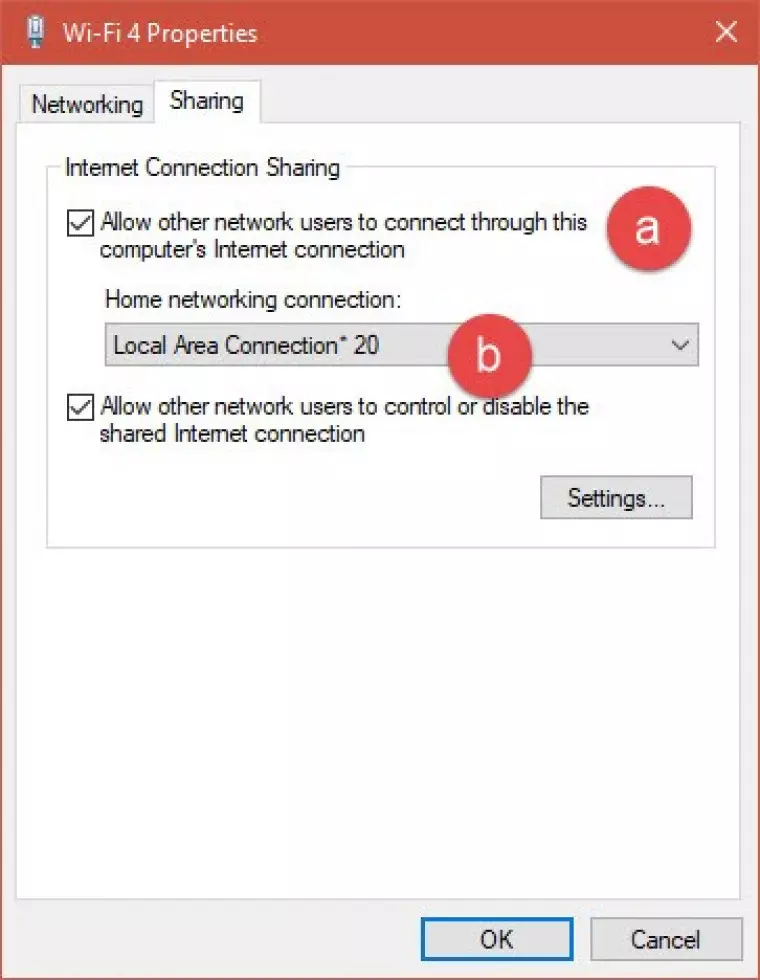
Leave "Allow other network users to control or disable shared Internet connection” enabled, and hit Ok.
6. Connect your non-VPN device to the Windows hotspot you created via Wi-Fi using the SSID details you noted in Step 2.2.
Share a VPN Connection in macOS over Ethernet
For this method to work your Mac must be usually connected to the internet via Wi-Fi.
MacBook Pros sport two Ethernet ports, while other models have none. USB-C and Thunderbolt accessories can provide additional Ethernet ports. If you have two more Ethernet ports available, then you can use a second port to connect to the internet instead of Wi-Fi.
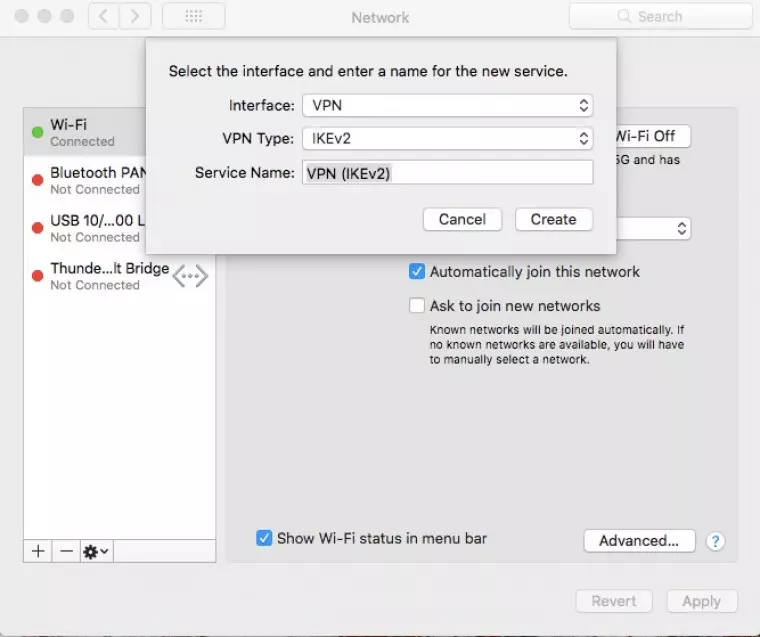
This method uses the built-in macOS VPN client, and therefore only works using the PPTP, L2TP, or IKEv2 VPN protocols.
1. Sign-up for one of the VPN services listed above, and then manually configure the macOS VPN client to use it. Connect to a VPN server.
2. Connect your non-VPN device to your computer using an Ethernet cable.
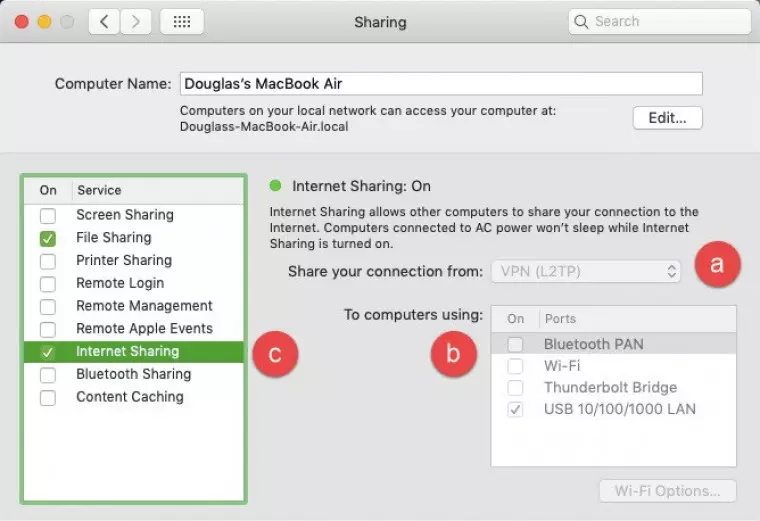
3. Go to System Preferences -> Sharing. Then:
a) Share your connection from: [the VPN connection you just manually setup].
b) To computers using: [your Ethernet interface]. In the example below, our MacBook is using a USB to Ethernet adapter.
c) Turn on Internet Sharing by clicking its checkbox (uncheck to turn off).
Share a VPN Connection in macOS using Wi-Fi
This method requires your Mac to be connected to the internet via Ethernet cable or second Wi-Fi adapter (such as a USB dongle). You can then connect to it over Wi-Fi and benefit from the VPN. Unlike Windows 10, macOS is not able to create Wi-Fi hotspot using a single Wi-Fi adapter unless it is connected to the internet via a separate adapter.
Again, this method only works with the built-in macOS PPTP. L2TP and IKEv2 client. Not OpenVPN.
1. Sign-up for one of the VPN service that works with macOS, and then manually configure the VPN client to use it. Connect to a VPN server.
2. Connect your non-VPN device to your computer using an Ethernet cable.
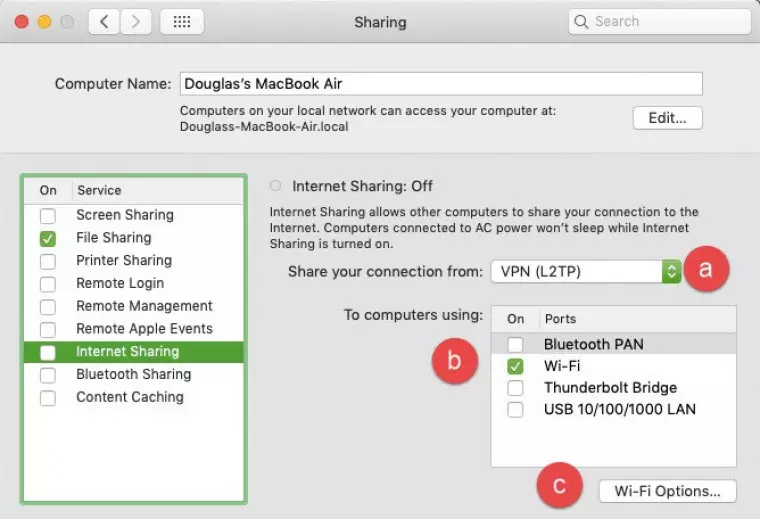
3. Go to System Preferences -> Sharing. Then:
a) Share your connection from: [the VPN connection you just manually setup].
b) To computers using: Wi-Fi.
c) Click on Wi-Fi Options…
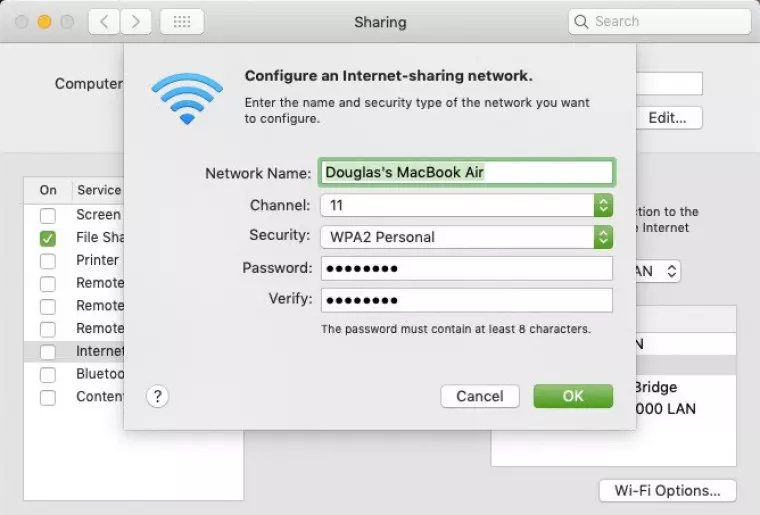
d) Check your network settings and select an SSID password for your new hotspot. Click "OK” when you're done.
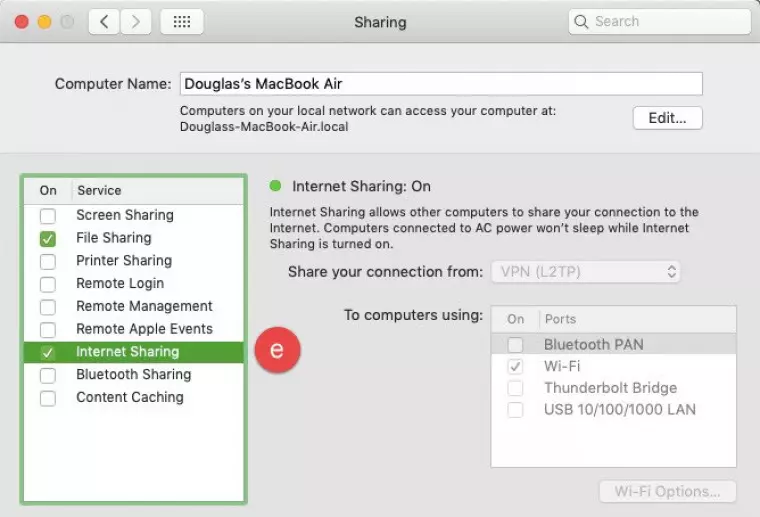
e) Turn on Internet Sharing by clicking its checkbox (uncheck to turn off).
Spoof your location using a VPN's Smart DNS Service
The details for this very much varies by device but is usually not hard. Most VPN services that offer smart DNS have detailed setup instructions for a variety of popular non-VPN devices.
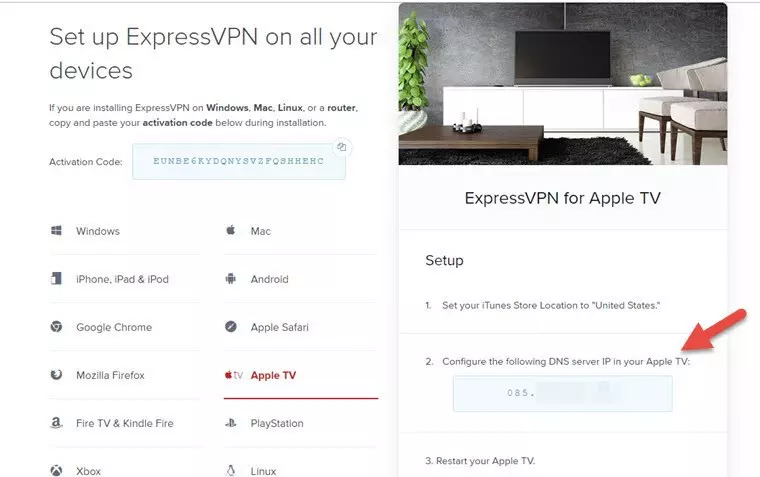
Above we can see the ExpressVPN's smart DNS instructions. As long as you have valid smart DNS server IP, pretty much every internet-capable device ever made can be configured to use it.
Can you use a VPN service on all devices?
You can! Nowadays, the best VPN services have apps for all platforms and allow for multiple simultaneous connections with a single subscription. This means that, for example, you'll be able to use the VPN on your laptop at the same time as someone else using it on their phone – and this is pretty handy for folks who want to share their VPN connection with friends or family, or who simply have a bunch of internet-enabled devices they want to secure.
However, if you're looking for real value for money, you'll want to get your hands on a VPN provider that offers unlimited simultaneous connections. Unlimited connections means that you can share your subscription with as many people as you like, or install the VPN on as many devices as you like, and this can all be done concurrently without paying a penny extra!
This kind of deal is much rarer, unfortunately, but there are two stand out services we'd recommend. Both of these VPNs offer unlimited simultaneous connections as well as all the privacy enhancing features you'll need – and you can check them out below:

From $2.19/month
The best user-friendly VPN for simultaneous connections. It has superb apps for all platforms, can unblock streaming services in a click, and comes with a wealth of features. Also offers a 30-day money-back guarantee.
- ProPrivacy TrustScore:
- 10 out of 10
- Simultaneous connections
- Unlimited
- Server locations
- 140
- Free trial
- Yes

From $3.33/month
The best secure VPN for simultaneous connections. With a stealth mode and top-notch encryption, as well as reliable access to Netflix US and other geo-restricted sites. Includes a 30-day money-back guarantee.
- ProPrivacy TrustScore:
- 9.9 out of 10
- Simultaneous connections
- Unlimited
- Server locations
- 145
- Free trial
- No
