What is OpenELEC?
OpenELEC is a Linux based Operating System (OS) that is specifically designed for media playback. Many people use OpenELEC to run Kodi - using it as the default user interface. OpenELEC is popular because it is "just enough operating system" to get the job done. It is also able to boot extremely fast. Because of its small size, it can run from a flash memory card or any minimal set-top box hardware setup. Some people install it on devices like the Raspberry Pi, which allows them to have a truly portable Kodi system.
Not as hard as it seems
Transferring files and other simple tasks can seem a bit daunting at first because OpenELEC doesn’t have a native file explorer. However, installing new repositories and addons becomes pretty easy once you have mastered a few simple Linux commands. In this guide, we will walk you through the steps to set up and use a VPN on OpenELEC - including all the commands you need to type.
Why Do I Need a VPN For Kodi?
A VPN for Kodi is useful for a number of reasons. Firstly, it provides privacy and security by encrypting all your data and concealing your real IP address. This stops your ISP from knowing what you did online, it also stops ISPs in the US from being able to sell that your web browsing habits on to third parties. The privacy that a VPN provides means Kodi users are free to access any content they want without fear of being discovered.
A VPN also permits people to pretend to be in a different country. This is awesome if you want to unblock content that is usually geo-restricted. This lets you access foreign sports competitions, tv channels, and subscription services that would otherwise be unavailable on your Kodi system.
How to Install a VPN on OpenELEC Systems
In order to connect to a VPN on an OpenELEC system, you must set up the VPN connection manually. You cannot simply download your VPN's software from the website. This doesn't mean it is very hard - it just means it takes a little more effort to do. First, you need to get the Zomboid repository. Here are the steps needed fo install Zomboid:
- To install the software you need onto your OpenELEC system it will need to be connected to another computer via Secure Shell (SSH) protocol. Start by downloading PuTTY onto that computer. This is the interface needed for you to communicate between your computer and your OpenELEC system.
- Once PuTTY has installed, run the program and set the Connection Type to SSH.
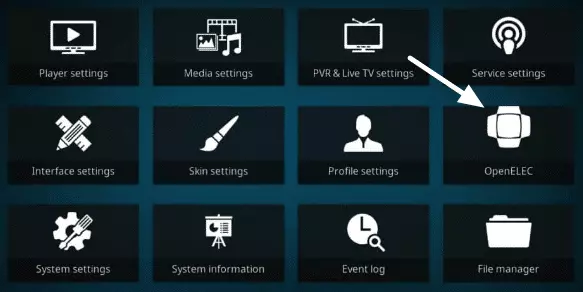
- Now you need to change some setting on your OpenELEC system. From Kodi’s main page, click the gear icon. Now click the OpenELECoptionon the right.
![Install a VPN on OpenELEC]()
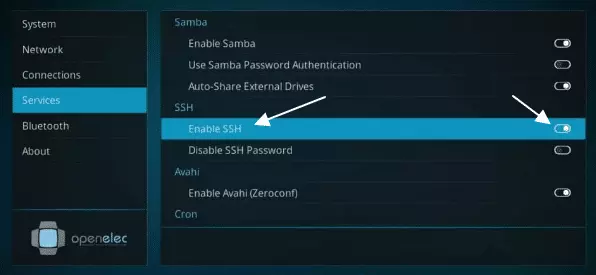
- Now click the Services tab from the list on the left-hand side. Locate SSH in the list and click the Enable SSH option. The slider will turn white when it is activated - if it is grey please click it again.
![Setup a VPN on OpenELEC]()
- Now head back the settings page. Select the System Settings option. Click on the Add-ons tab and then Unknown sources. When it tells you that using software from third parties can be risky click Yes. The VPN Manager you need is trustworthy, so so you don't need to worry. However, once you have finished setting up your VPN you may want to come back and turn this back off to ensure you don't install untrusted software in the future.
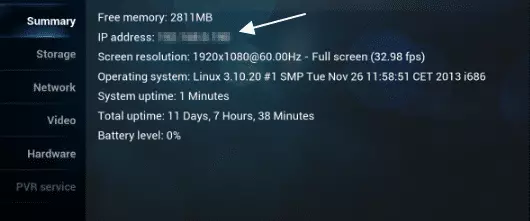
- Go back to the settings page and click the System information button. Look for the IP address of your OpenELEC device and make a note of it. I have blanked it out in the screenshot for privacy.
![Install a VPN on OpenELEC]()
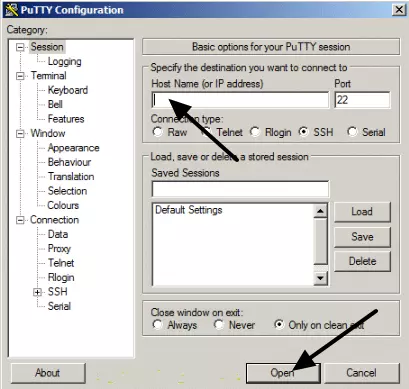
- Enter the IP address of your OpenELEC system in the Host Name field in PuTTY on your computer. Now click the Open button at the bottom of the program.
![how to Configure a VPN on OpenELEC]()
- Next, you will be prompted for your login information. The default username is root and the password is openelec. It won't show asterisks when you type, but you are entering the details correctly. When you have entered the data hit the Enter key on your keyboard. You will now be able to control your OpenELEC system.
- Once connected please type in the following text command exactly as it is written here:
wget https://github.com/Zomboided/service.vpn.manager/archive/master.zip - As soon as the file has downloaded, go back to your OpenELEC system and go on Kodi's home screen
- Click the Add-ons tab, followed by the box icon in the top-left of the next screen.
- Select Install from zip file and choose Home folder in the next screen that opens. Now select master.zip. This will install the VPN manager.
- Once the VPN Manager for OpenVPN addon has installed you will get a notification in the top-right of the screen.
How To Setup VPN Manager for OpenVPN
Now that you have installed VPN Manager for OpenVPN onto your OpenELEC system you can set up your VPN connection on it. To do so follow these simple steps:
- On the Kodi home page, hover over the Add-ons tab and right-click on VPN Manager for OpenVPN.
- Click Settings and select your VPN provider from a list. If you haven't subscribed to a VPN yet, please take a look at our 5 best VPNs for Kodi.
- Now enter your VPN login information (username and password).
- Select the VPN Connections tab and click the option to select your first preferred server.
- A popup will attempt to connect to your VPN provider. If the login details you selected are correct a list of all available servers will appear. You can select any server you like to be your primary VPN server. You can select up to 10 servers to scroll through. You can also change these server locations whenever you want.
- Now you can test your VPN connection.
Setup a VPN manually on VPN Manager for OpenVPN on OpenELEC
Many popular VPNs on the market are automatically available on VPN Manager (Private Internet Access, IPVanish, VyprVPN, Invisible Browsing VPN, NordVPN, tigerVPN, HMA!, PureVPN, LiquidVPN, AirVPN, CyberGhost, Perfect Privacy, TorGuard, HideIPVPN, LimeVPN, VPN Unlimited, BTGuard VPN, ExpressVPN, SaferVPN, Celo VPN.ht, TotalVPN, WiTopia, proXPN, Windscribe, VPN.ac, VPNSecure, IVPN (untested), SecureVPN.to (untested), RA4W (untested) and VPNArea (untested).
However, if you subscribe to a VPN that is not listed in step 2 of "How To Setup VPN Manager for OpenVPN " (above), then you can still set up your VPN connection manually. To do so follow these steps:
- First, you will need to download specific files from your VPN's website. These files will permit you to connect to your VPN’s network. Usually, these files are mentioned in the Linux installation guide provided on your VPN's website. You require a .crt file and one (or more) .ovpn file. If you can't locate these files, please contact your VPN directly for them.
- In the Kodi main menu, click the gear icon in the top-left.
- Select the File Manager option and click Add source.
- Type the location of your VPN’s configuration (URL provided by your VPN) files into the box that appears and give the source a name.
- On the Kodi addons page, right-click the VPN Manager for OpenVPN addon.
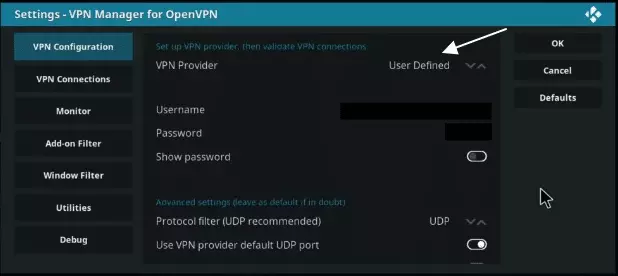
- Select Settings and then the User Defined value under VPN Provider.
![Configure a VPN to OpenELEC Configure a VPN to OpenELEC]()
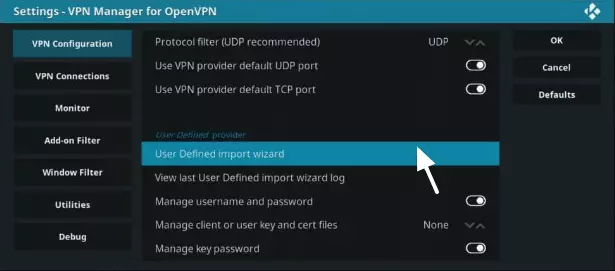
- Scroll down and click on the User Defined import wizard option.
![Install a VPN on OpenELEC Install a VPN on OpenELEC]()
- Now tell the VPN Manager where to find your provider’s files. They should have been downloaded to your Home folder, so navigate there and ensure you upload all of them.
- You will be asked if you want the VPN Manager to update the server files. This automatically fixes any broken links. Click Yes.
- Once the wizard has finished, navigate back to the VPN Manager’s settings page and select your preferred VPN servers from the VPN Connections tab.

