We recommend these VPNs for an Android device
By far the easiest way to set up a VPN on your Android device is by installing a trusted service from the Google Play store. Many, if not most, providers offer custom Android VPN apps. However, there are some circumstances where installing via the Play Store might not be the best option. In this guide we cover a variety of methods to install a VPN on your Android device - including using the OpenVPN client and side loading.
How to set up a VPN on Android - The easy way
Once you have chosen a subscribed to a VPN service, follow the steps listed below to set up a VPN on your Android phone:
-
Either use the link provided by your VPN service, or search for the service in the Google Play Store.
For a list of services we recommend, see our best VPNs for Android article.
-
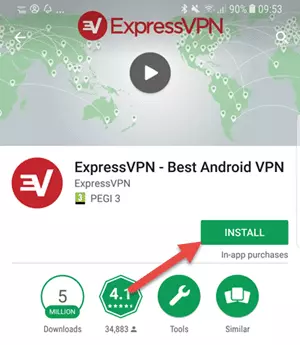
On the app’s download select "Install".
![installing a VPN service for Android]()
-
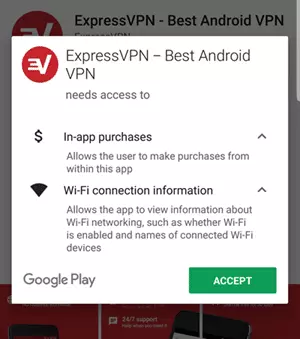
Read through and accept the app's permissions.
Please note: In-app purchases are needed to buy a subscription from within the app, and every VPN app will need access to your WiFi settings. No other permissions should be required.
If you are using a VPN outside of the ones we recommend on our best VPN for Android page, then we suggest you pay close attention to what permissions the app is requesting.
![Android Install 2]()
-
The app will then download and install to your Android device.
Once this is completed, launch the app, sign-in and select a server you wish to connect to.
OpenVPN Android setup - The advanced way
OpenVPN is now the industry standard VPN protocol. It is the one that ProPrivacy.com recommends you use in almost all circumstances.
The main third-party OpenVPN apps for Android are OpenVPN Connect and the more fully featured and open source OpenVPN for Android (F-Droid version available). Follow the instructions below to configure OpenVPN on Android:
-
Download the OpenVPN configuration files from your VPN provider’s website.
Unzip them (if required) and transfer to a folder on your Android device. Alternatively, download them directly to your Android device and unzip them.
Please note: If you cannot find the OpenVPN config files on your provider's site, just ask. All the services we recommend on this page offer live chat uspport on their site for a quick answer.
-
Download, install and run OpenVPN for Android.
-
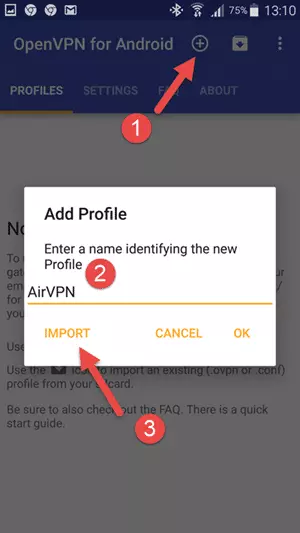
Once installed touch the + icon to the top right of the screen to Add Profile.
Give the profile a suitable name, then hit "Import.”
![Android Ovpn import profile]()
-
Navigate to the folder where you saved the unzipped OpenVPN config file(s), and choose a server (.ovpn file).
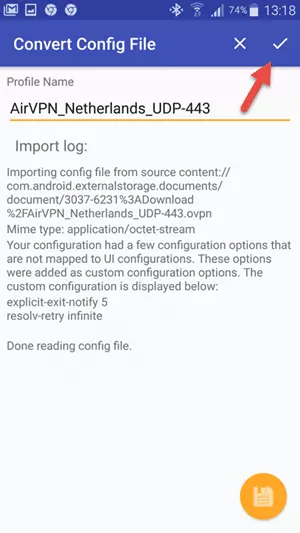
Once imported, touch the tick ✔ icon to continue.
![Android Ovpn confirm config files]()
-
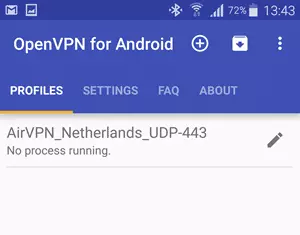
Once done, you’ll see the server name under the Profiles tab. To start the VPN, just touch it.
Please note: You can import .ovpn files for as many servers as you like, and they will show up here.
![Android Ovpn profile list]()
Please note
Many providers include all necessary keys and account information in customized .ovpn files, so no further configuration is needed. Others may require that you enter your account information and other details. Please see your provider’s documentation for specific instructions
Additional OpenVPN for Android settings (Optional but Recommended)
Once of the benefits of installing your VPN through the OpenVPN for Android client is that you can tweak your setup to suit you. Below we cover some additional recommended steps that you should take once your VPN is installed.
Enable IPv6 Routing
You can prevent IPv6 DNS leaks by configuring OpenVPN on Android to properly route all IPv6 traffic over the VPN. To ensure this is enabled follow the steps listed below:
-
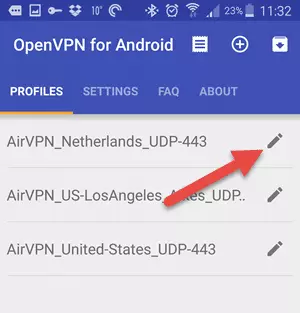
Edit the specific VPN connection in the "Profiles” tab.
![Ovpn Android edit connection profiles tab]()
-
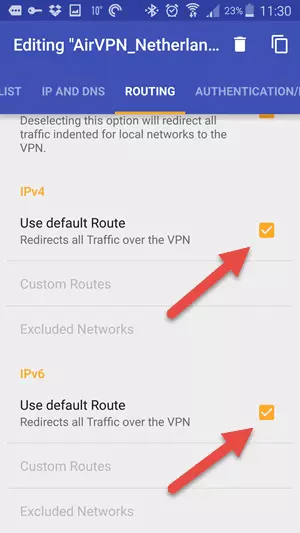
Check IPv6 > Use default Route.
While you are here, also check that IPv4 leak protection is enabled (it should be by default).
![Ovpn Android Dns Leak Protection]()
Install an Android VPN with the .apk file
In some circumstances, installing a VPN via an .apk file is the only option available to you - for example, if you're based in China, or you have de-Googled your Android device (for which there are many pros and cons). If you need to go down this route, then most VPNs will be provide you with an .apk file of their software that you can side load to Android.
Before we start, please note that side loading files from outside the Play Store presents a security risk. So be sure to obtain the .apk from a reputable source - such a from your provider. It can’t hurt to run a malware scan on it either.
Providing you are sure that you have an official VPN .apk, follow the steps below to install it on your device.
-
Start by downloading an Android file manager app.
There are many options available, but we recommend ES File Manager.
-
Download the VPNs .apk file to your device.
You can download it directly from the web using your web browser, send it to your Android device as an email attachment, transfer it from a desktop computer via USB lead or USB stick, access it from your Dropbox account, or whatever….
![Android Install Ipv Apk2]()
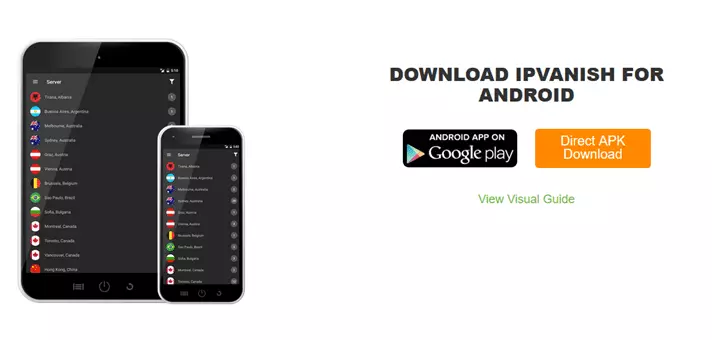
Top tip: IPVanish allows you to download the .apk direct from its website.
-
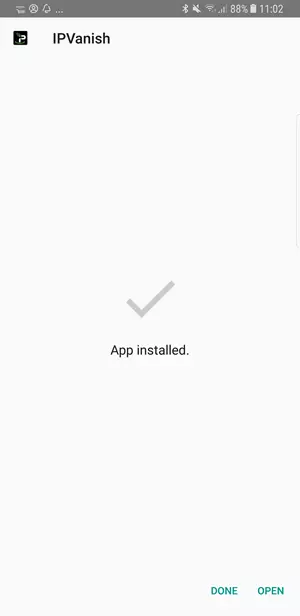
Find the downloaded file using your chosen file explorer and select "Install”.
- Once the app is installed simply open it.
![Android Install Ipv Apk]()
How to set up a VPN with Android's VPN client: PPTP or L2TP/IPsec VPN settings
Android phones comes with a VPN client baked-in which supports the PPTP and L2TP/IPsec protocols. For reasons discussed in detail in VPN Encryption: The Complete Guide, I always recommend using an OpenVPN app instead (via either a custom app or the OpenVPN for apps mentioned above).
Some users, however, like the fact that a PPTP or L2TP/IPsec connection can be without the need to download a third party app.
Please note: Setup details may differ a little from the instructions below depending on what device and version of Android you are using.
-
Go to your VPN Settings page.
This is usually found at: Settings > Connections > More connection settings > VPN.
-
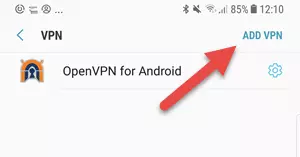
Select "Add VPN.”
![Android Install 3]()
-
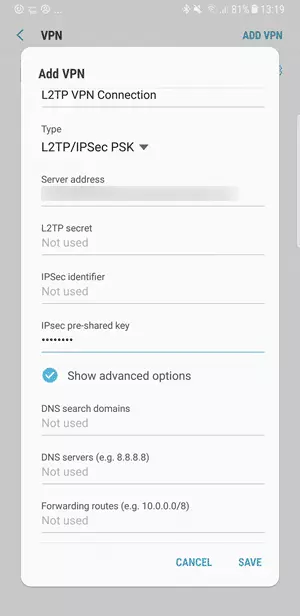
Enter the PPTP or L2TP/IPsec settings given to you by your provider.
These settings are usually available on the setup pages of its website, or you can ask live chat support. Touch "Save” when you are done.
![Android Install 4]()
Please note: The use of pre-shared keys is strongly frowned upon from a security perspective, although this is mitigated somewhat if accounts are secured using a unique username and password.
-
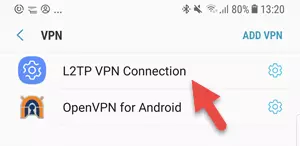
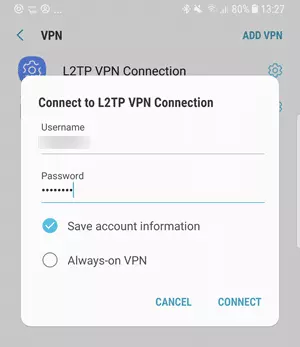
On the VPN Settings page select the newly created connection.
![Android Install 6]()
-
Sign into your VPN account and hit "Connect”.
![Android Install 7]()
How to test your VPN is working
No matter what kind of VPN you use, Android will display a small key icon in the notification bar whenever it is connected. This lets you know at-a-glance that you are protected.

For additional confirmation, you can run an IP leak test…
Check for VPN for IP leaks
Android is much less susceptible to DNS and WebRTC leaks than other desktop platforms. Once connected, however, you should nevertheless check for VPN leaks. Just in case.
Final thoughts
Using a dedicated VPN app from the Google Play Store is the easiest way to install a VPN on your phone. Other methods, however, are hardly difficult.
Image credit: By .elcic/Shutterstock.

