For any newbie to the world of VPNs, it can seem like there is a lot of jargon involved. In reality, however, the VPN terms that are used regularly aren’t unnecessary tech talk: they are essential to understanding whether a VPN service is any good. In addition, that terminology must be comprehended (at least a bit) in order to ensure that a VPN is set up securely.
Don’t get me wrong you don’t need to become a VPN expert - in fact - the level of knowledge needed to successfully set up a VPN is pretty minor. What’s more, if you decide to go with a reputable, well-established VPN (that has its own VPN software), you won’t need to know much at all. The reason? The very best VPNs - like ExpressVPN - have all of the necessary options native within their software. As such, all a subscriber needs to do is install the software and then select their preferences in the VPN’s menu.
People that decide not to sign up for a VPN with a custom client (VPN software), will at times need to set up OpenVPN encryption using third party OpenVPN software. This isn’t as easy as just downloading a world-class VPN’s custom VPN software - but it isn’t that hard either.
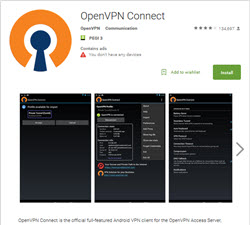
OpenVPN Encryption
OpenVPN is the name of the most secure VPN encryption on the market. Due to the fact that it provides unrivaled levels of security and privacy, this is the VPN encryption that our team here at ProPrivacy.com always recommends that you use.
For that reason, this guide includes Android and Windows setup guides for the third party OpenVPN software. As such, this guide will help anybody (no matter their level of expertise) to set up OpenVPN on any VPN that provides it. As such, this guide is comprehensive.
DNS Settings - Manual Setup
To be absolutely thorough, we have even included a guide for manually setting up DNS settings. DNS requests are an important part of your web traffic that can give away your location and identity. In order for a VPN to keep you secure, it is important that you have no "DNS leaks”.
Selecting a VPN and Installing It
The first thing you need to do after asking how to set up a home VPN is think about what you want the VPN for. And how much do you want to spend on the VPN? Obviously, everybody wants to pay the least possible, however, paying less can result in extra setup steps (namely sections 4 and 5 of this guide).
The very best VPNs make the entire experience a walk in the park. In addition, the VPNs that at the top of their game also provide the best of everything. It is for this reason that some VPNs might feature in a 5 best VPNs for sport, 5 best VPNs for Windows, best VPN for macbook, and 5 best VPNs for streaming article. Only you know what you want your VPN service for, and it is to make your life easier that here at ProPrivacy.com we have five best lists for every possibility imaginable (and if you think we have missed anything please don’t hesitate to contact us). To find the best VPN for you, simply use the navigation at the top of any page to find the best five VPN list for your purpose. Or, if you just want the best all round service see our best VPN services article.
Click Through and Subscribe
Now that you have decided, all you need to do is head on over to their website by clicking on the link in our guide and sign up for the VPN. A good VPN only requires an email address and payment method in order to sign up. Payment can usually be made in a number of ways including with a credit or debit card, PayPal, or even Bitcoins for those that want to.
Once you have successfully subscribed and have a password you can log into the VPN provider’s website to get access to the VPN software. If you are an Android or iOS user, you can also usually get the app on the Google Play store or iTunes. Once it is installed on your smartphone or tablet, simply log in using your credentials from when you signed up to the service.
Deciding on Encryption
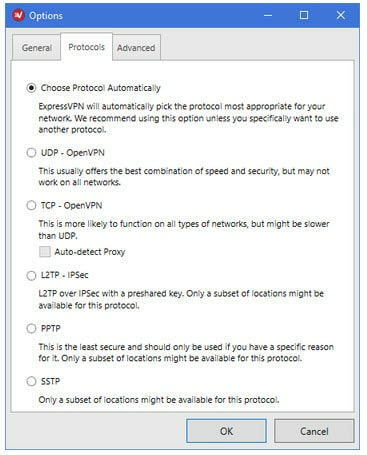
Now that you have installed your VPN, you must make a decision on encryption. PPTP is available on most VPNs, but it is an out of date encryption protocol that will not keep you secure - so please don’t use it.
The best VPN protocol available is OpenVPN, so if your VPN has it in the menu please select it. In addition, some VPNs provide both Transmission Control Protocol (TCP) and User Datagram Protocol (UDP). TCP is more reliable, but UDP is faster - so if you plan to stream select UDP.
To do so, follow these steps:
- Click on Settings in your VPN (it might look like a cog). Some VPNs also have a menu called "advanced settings.”
- Once in the settings menu, click on "encryption options”.
- Select OpenVPN (TCP for reliability and UDP for streaming).
ExpressVPN example screen shot:
L2TP/IPsec (How to Set up a VPN in Windows 10)
At times, some people decide to use L2TP/IPsec because it works natively in Windows without the need for third-party software. It isn’t as secure as OpenVPN, but it is secure (unlike PPTP). If you decide to use L2TP IPsec just follow the steps above in your VPN software, but select L2TP IPsec instead.
If for some reason your VPN doesn’t have a custom client that has L2TP IPsec in the options you can set it up manually by following these steps:
1. First add a new VPN connection by clicking the Internet access icon in your system tray.
2. Select Network Settings
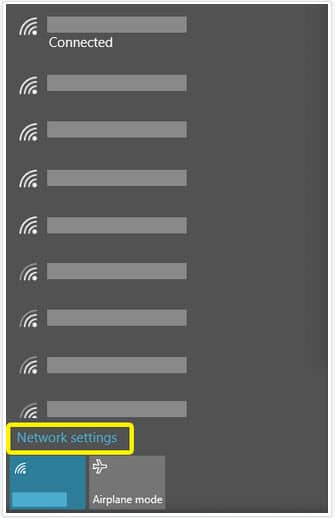
3. Now that you are in the Network & Internet settings panel, click on VPN > Add a VPN connection.
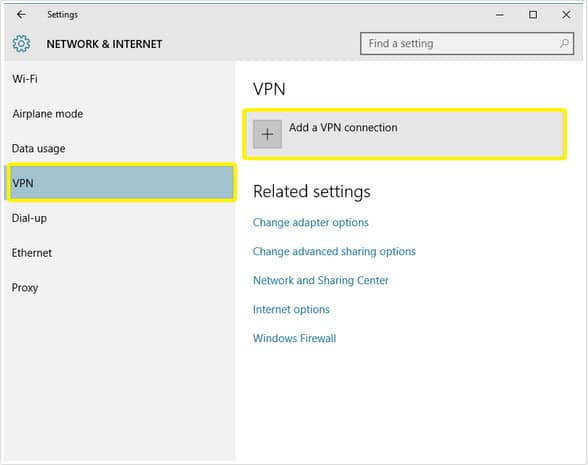
4. At this stage, you will need your VPN's server address to setup the VPN connection. In addition, you will require your username and password from when you signed up to your VPN service.
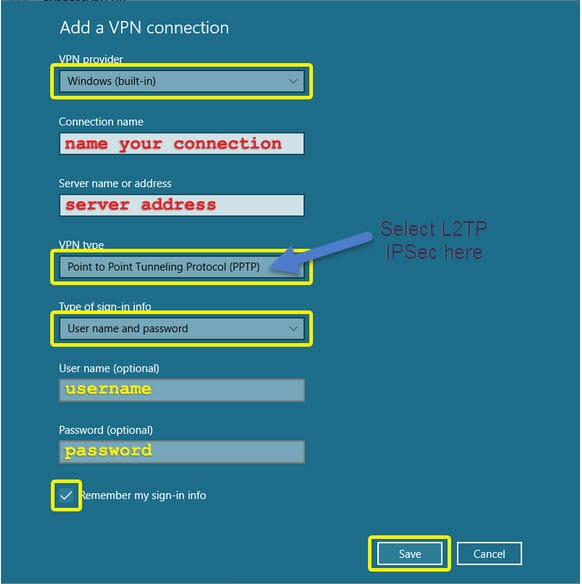
5. In the "Add a VPN Connection” menu, enter the following settings:
VPN provider: Windows (built-in)
Connection name: [give your VPN connection a name]
Server name or address: [Your VPNs server address - get this from the VPN]
VPN type: L2TP IPsec
Type of sign-in info: Username and password
Username: Get this from your VPN provider
Password: Get this from your VPN provider
Put a tick in the box for Remember my sign-in info.
Click Save.
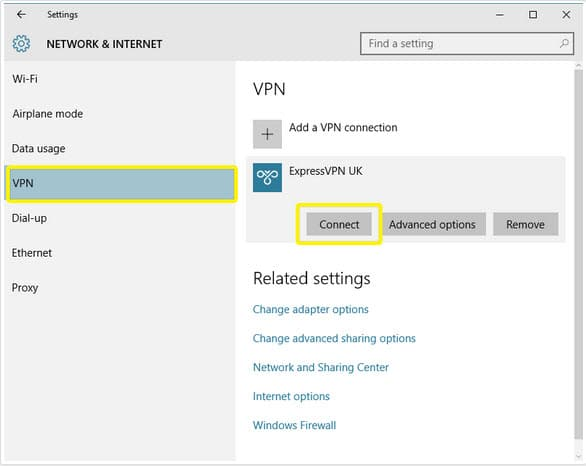
6. Now that you have successfully created an L2TP IPsec connection all you need to do is connect. To do so, go to the Network & Internet settings panel. To connect to the VPN server, click the name of the connection, then click Connect.
Setting up the Custom Client’s Preferences and Features
If you subscribed to a recommended VPN provider then you will be able to select pro features like a kill switch and DNS leak protection. In addition, you may be able to toggle on an "Auto Connect” feature. A firewall based kill switch forces all traffic to go through the VPN tunnel. This guarantees that you don’t leak any unencrypted traffic to your ISP. Auto connect will also reconnect your VPN to a selected server should the VPN connection be lost for any reason (so that you don’t have to manually). To turn these features on, follow these steps:
- Click on settings in your VPN’s software.
- Turn on the features that you wish to use. If you are doing anything online that you wish to remain completely private then we recommend turning on the kill switch feature.
How to Set up OpenVPN Software
OpenVPN: How to Set up a VPN on Android
- Download the OpenVPN for Android app here. Please bear in mind that OpenVPN for Android is a better (much more fully featured) app than OpenVPN Connect.
- Download the .ovpn files from your VPN provider’s website
- Extract the .OVPN files to your desktop or a folder that you will remember eg: "OpenVPN files"
- If you do not know how to extract a zip file, download WinRAR here. Put the zip file in the folder you want to unzip it in and right click the file and click "extract here".
- After extracting, email yourself the .ovpn files.
- Open the OpenVPN connect app, import the .OVPN files that you emailed yourself (this can be done directly from the mail app) or by clicking the import button in the OpenVPN connect app.
- You will need to give the connection a name of your choice.
- Now all you need to do is connect to one of the servers in the app. It will ask you for your username and password (you sometimes have to get a unique key from your VPN provider so check with them).
OpenVPN: How to Set up a VPN in Windows
- Download OpenVPN here
- Download the .ovpn files from your VPN provider’s website
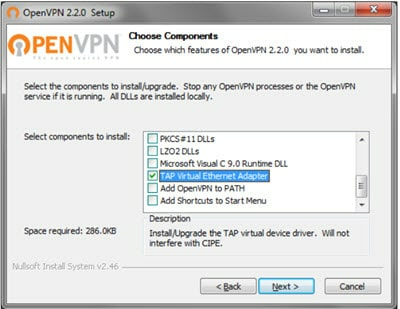
- Follow the installation instructions until OpenVPN is successfully installed on your PC. If you get a message asking if you want to install TAP drivers, please select yes because you need them.
- Unzip and extract the .OVPN (you get these from your VPN) files to the following folder: C:Program FilesOpenVPNconfig
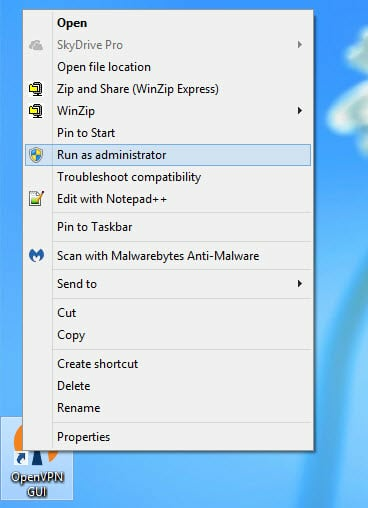
- Now you are ready to connect. To do so, right-click the OpenVPN icon on your desktop and click on "Run as administrator”. Please don’t run it by double clicking: you must run it as administrator. You will be asked if you are sure, click yes.
- Now right click on the OpenVPN icon in your system tray (bottom right of the screen) and select the server you wish to connect to. You will be prompted for your username and password. Click remember my password so that you don’t have to re-enter it next time (you will need to ask it to remember your password for each server the first time you connect).
How to Set up DNS Settings Manually in Windows
At times, people may need to setup their DNS request settings manually. In addition, people who accidentally sign up to a VPN that they later find out is using insecure DNS servers (such as GoogleDNS or OpenDNS, which both keep logs), can change their DNS settings so that their requests are handled by OpenNIC or DNS.WATCH. Both DNS.WATCH, and OpenNIC, provide free access to fast, log-less DNS request servers.
In the guide below, I have used DNS.WATCH as the example addresses, but it is worth bearing in mind that OpenNIC is actually considered even safer.
Remember that if your VPN has secure DNS servers, it is far better to use those. So please get in touch with your VPN to get the preferred and alternative DNS addresses from your VPN and use those in instead of the VPN.WATCH examples that I have used below. To change your DNS settings in Windows follow these simple steps:
1. In the system tray (bottom right of the screen) right click on your Internet connection and click on "Open Network and Sharing Center”
2. Right-click your active network connection and select Properties in the menu

3. In the Connection Properties window, select IPv4, then click Properties.
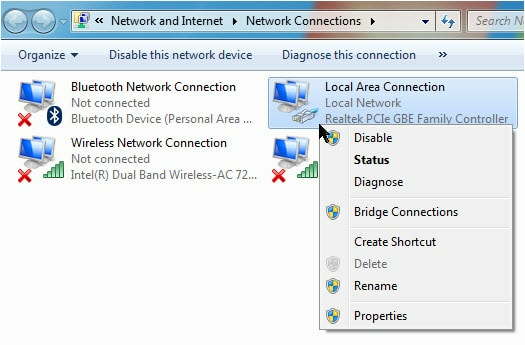
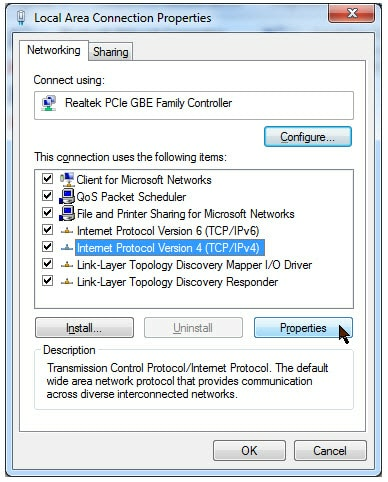
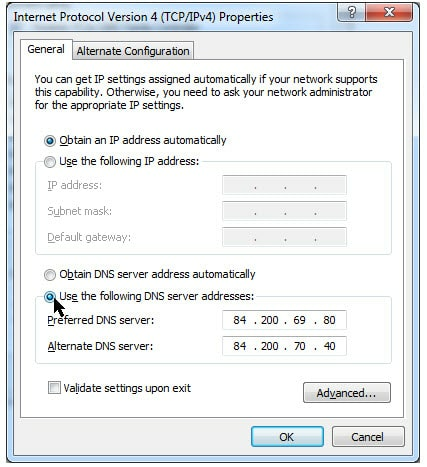
4. In IPv4 Properties, choose "Use the following DNS server..." and enter the Preferred and Alternate IPv4 DNS servers. Preferred DNS server: 84.200.69.80 Alternate DNS server: 84.200.70.40
5. Now go back to the connection properties window and set up IPv6. Select IPv6 and hit properties.
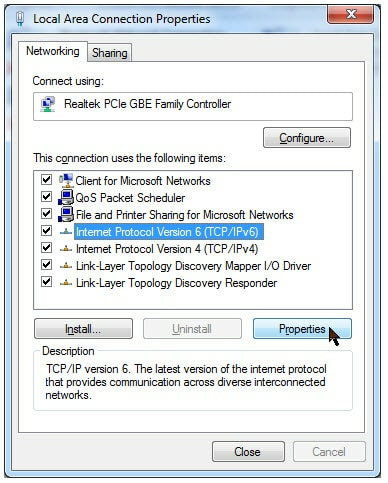
6. In IPv6 Properties, select "Use the following DNS server..." and enter the Preferred and Alternate IPv4 DNS servers. Preferred DNS server: 2001:1608:10:25::1c04:b12f Alternate DNS server: 2001:1608:10:25::9249:d69b
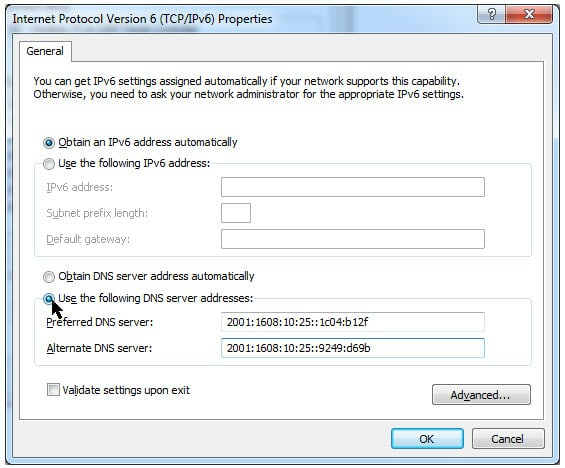
7. Now that you have changed your DNS settings, it is a good idea to make sure that you have no DNS leaks by going to our IP leak testing page.
Create your own VPN server on Linux
If you are a Linux user and you want to set up your own VPN, check out our how to set up a VPN serve on Linux pager. In this guide, we list the steps you need to take in order to create your own Linux VPN server.
Conclusion
In this guide, I have provided easy to follow steps for setting up a new VPN. In addition, don’t forget that all the recommended VPNs in our best five lists tend to have their own setup guides too. Thus, if you would like to see pictures of how to set up your particular VPN, simply go to their website and check out their guides. Finally, if you have any questions whatsoever, then please don’t hesitate to leave us a question below.
Title image credit: BeautyLine/Shutterstock.com
Image credit: Omelchenko/Shutterstock.com
Image credit: Nobelus/Shutterstock.com
