At ProPrivacy we always recommend using OpenVPN protocol, as by far it is always the most secure tunneling method. While a number of providers create their own VPN software, these are usually based on the standard OpenVPN Client. Though we usually prefer open source software, we also like to see proprietary software with plenty of added features built in. In the latter case you have to trust the provider that they do not put anything malicious into their software, but since you never know what happens server side, you'll need to trust your service provider anyway.
With OpenVPN there are plenty of configurations that can be achieved and this means that the .ovpn files can vary to some extent between providers. There are two big differences, compared to proprietary software, that are directly noticeable to the user - both of which we will provide solutions to within this article, as well as an issue that affects a smaller number of users:
- The OpenVPN client does not automatically launch when you start your computer / log in
- Some companies rely on the slightly weaker username and password authentication method (unlike secure companies such as VikingVPN and Buffered) and you're required to input this every time you connect/ change server
- How to run OpenVPN without needing an administrator account/password (after the initial setup) so that if you have others people using the same computer they can use the VPN without being able to modify anything else [or if like me you use a standard account for your daily activities to increase security].
To be able to override all of these issues, you will need to have Administrator privileges. We are using a Windows 7 for our demonstrations but the steps will be very similar for Windows Vista and 8.
How to Autorun OpenVPN
When most programmes launch at start up, this is usually done through the registry which can be changed using the regedit tool. However, we have found that using the Task Scheduler is not only more customisable, but also easier to work with. So with the preamble out of the way, let's start:
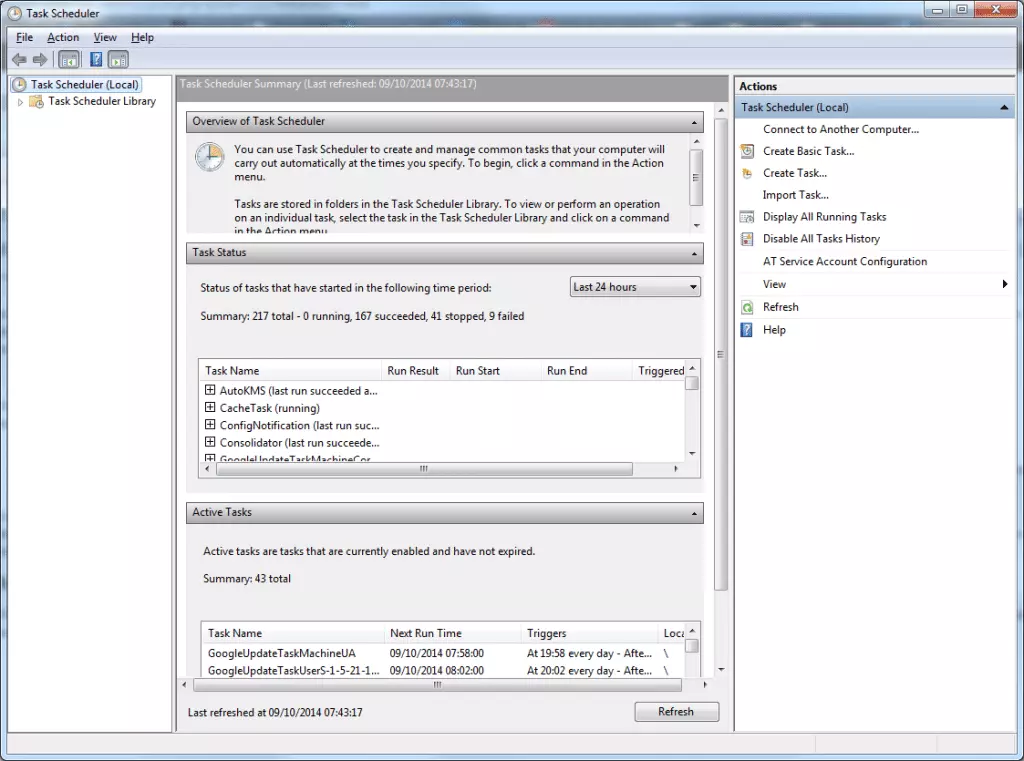
- Click the Windows button, type 'Task Scheduler' and start it. (Make sure you're doing this as an administrator)
- Click 'Create Task' in the right hand column
![OpenVPN_AutoRun_SchTasks1 OpenVPN_AutoRun_SchTasks1]()
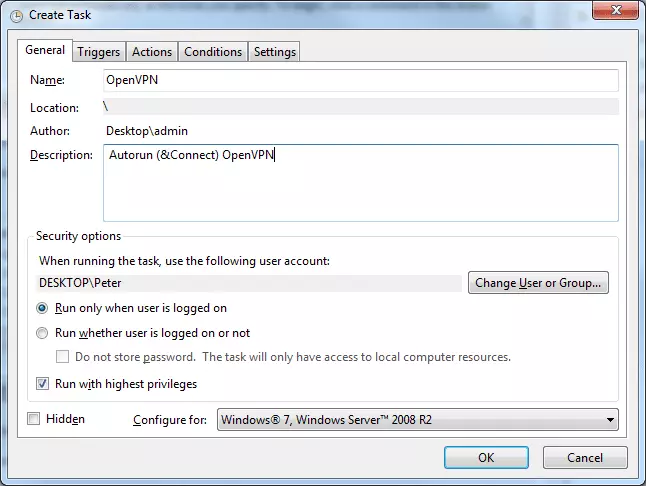
- In the General tab, do the following:
- Enter a suitable name and description
- Select the user you wish for it to work on
- Enable 'Run with highest privileges'
- Configure for your system.
![OpenVPN_AutoRun_SchTasks2 OpenVPN_AutoRun_SchTasks2]()
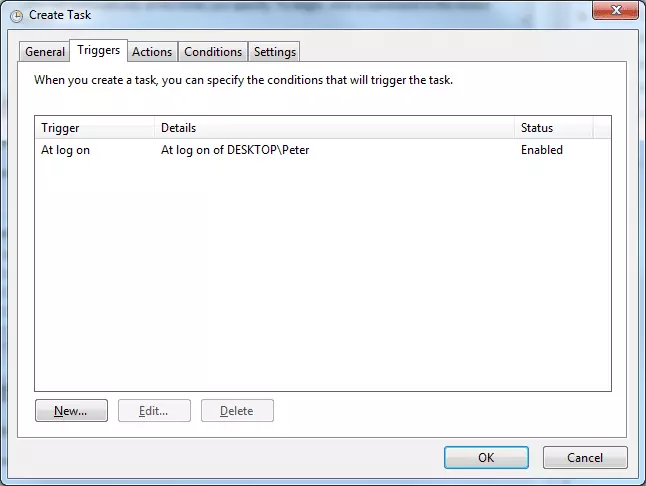
- In the Triggers tab
- Click New to define when to launch OpenVPN
- The simplest method is to launch it when the selected user logs in
![OpenVPN_AutoRun_SchTasks3 OpenVPN_AutoRun_SchTasks3]()
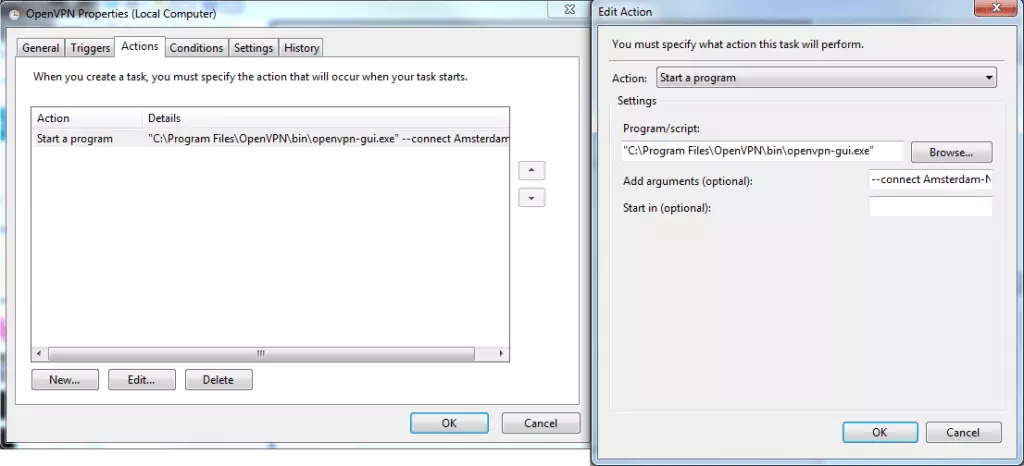
- In the Actions tab
- Click New
- Select Start a program as the action
- Browse for the OpenVPN GUI client and set it as the program
- If you want it to automatically connect to a server enter –connect xxxxxxx.ovpn into Add arguments (where xxx is the name of the .ovpn file)
![OpenVPN_AutoRun_SchTasks4 OpenVPN_AutoRun_SchTasks4]()
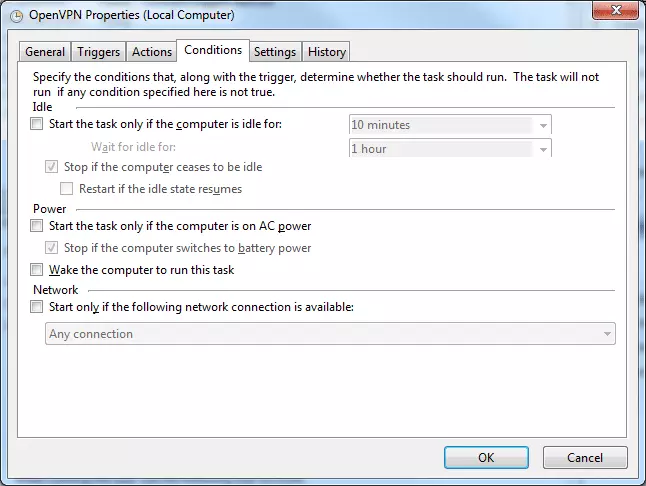
- In the Conditions tab you can set some extra settings. We always like to have VPN running so we have disabled all of it, the Network option is the one that could be very useful for some people
![OpenVPN_AutoRun_SchTasks5 OpenVPN_AutoRun_SchTasks5]()
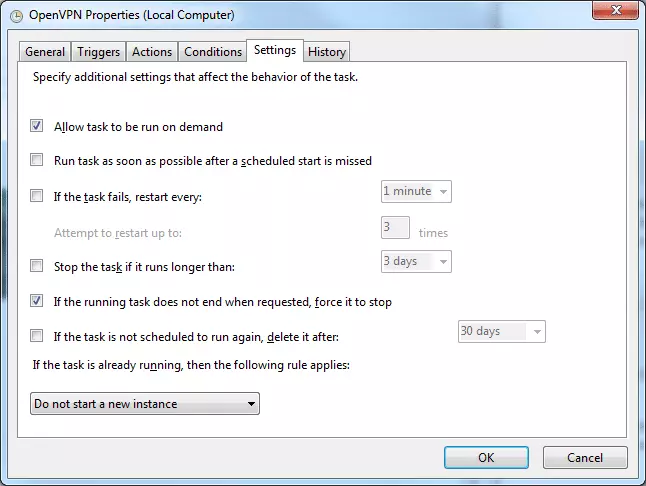
- In the Settings tab you can specify additional behaviors.
![OpenVPN_AutoRun_SchTasks6 OpenVPN_AutoRun_SchTasks6]()
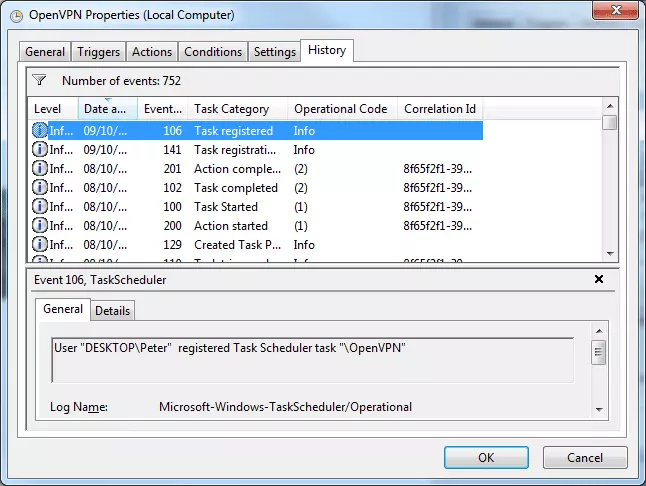
- In the History tab you can view any errors/ problems (as long as you have History tracking enabled)
![OpenVPN_AutoRun_SchTasks7 OpenVPN_AutoRun_SchTasks7]()
- Once you have done everything, click OK and your Task will be created
- To check that it is running you need to do the following.
- Make sure OpenVPN GUI is closed
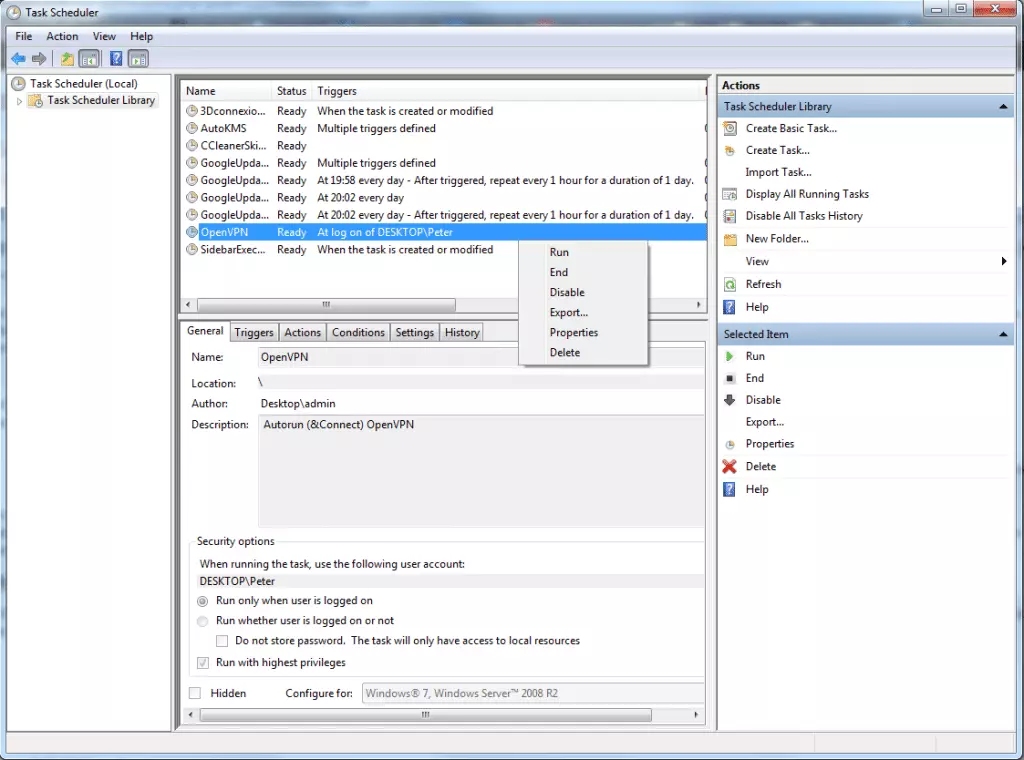
- In Task Scheduler right click on the Task you just created and click Run
- OpenVPN should now launch and if automatically connect if you have set it up.
![OpenVPN_AutoRun_SchTasks8 OpenVPN_AutoRun_SchTasks8]()
Connect without requiring VPN login details
The default folder for .ovpn files is "C:\Program Files\OpenVPN\config". You will need to carry out step 1 for every OpenVPN file that you use. We do not recommend this method very much as you will be storing your login name and password in a plain text file, but some people might find it useful. HMA does provide a log-in tool to help with this to some extent, but as mentioned it is a lot more secure if key authentication is used instead of user/pass.
- Open the .ovpn file using a text editor. In the line that says auth-user-pass, add password.txt to the end of it.
![OpenVPN_AutoLogin_1 OpenVPN_AutoLogin_1]()
- In the same folder create a text file called password.txt. In the first line enter your username and on the second line your password
![OpenVPN_AutoLogin_2 OpenVPN_AutoLogin_2]()
Allow normal users to access OpenVPN
While there is a minimal security compromise with the method we will present, it does mean that normal users can use the VPN connection [thereby allowing a constant secure internet connection] without having to give them admin rights. The backbone on the method relies on the fact that the OpenVPN client requires administrator rights to be able to change the network connection. Therefore, by giving administrator rights to the network connection, and nothing else, the need for this will be removed.
In order to do this follow these steps:
- Click the Windows button, type 'mmc' and start it. (Make sure you're doing this as an administrator)
![OpenVPN_NoAdmin_1 OpenVPN_NoAdmin_1]()
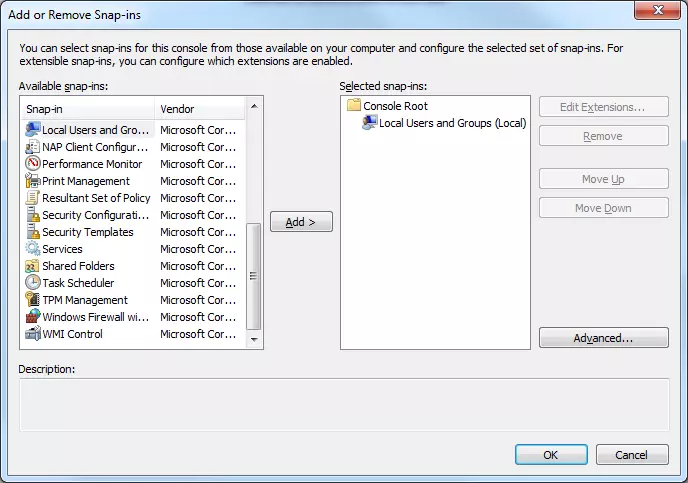
- Go to File -> Add/Remove Plugins
- Under Snap-ins locate Local Users and Groups and add it
- Click OK
![OpenVPN_NoAdmin_2 OpenVPN_NoAdmin_2]()
- Next you will give the network access
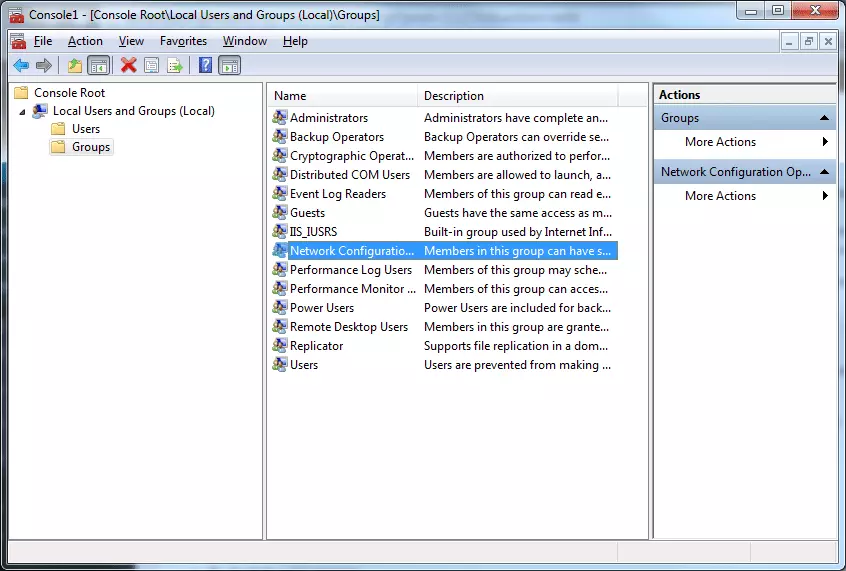
- In the left hand column expand Local User and Groups
- Click Groups
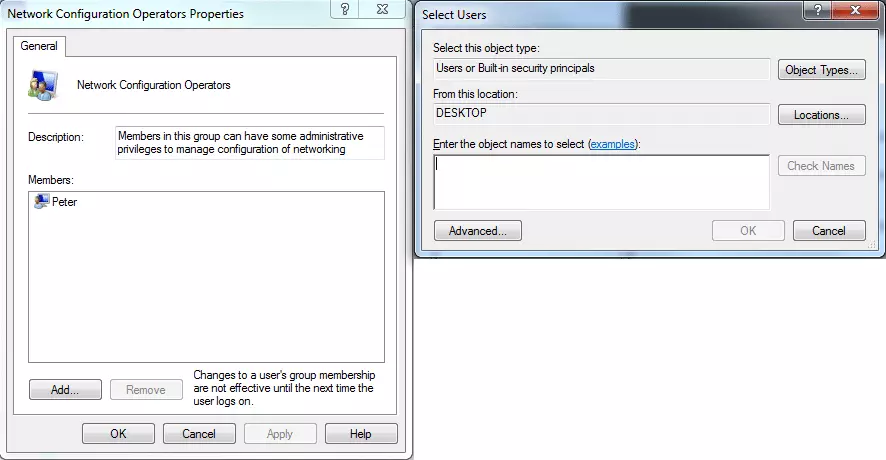
- Right click Network Configuration Operators
![OpenVPN_NoAdmin_3 OpenVPN_NoAdmin_3]()
- Click the Add button and add the users that you'd like to be able to run OpenVPN without requiring an administrator password
![OpenVPN_NoAdmin_4 OpenVPN_NoAdmin_4]()
For more information about staying secure online, take a look at our best vpn software for windows guide.

