gpuShack is a company that is dedicated to helping the average folk enter the world of GPU mining, specifically ZCash, Monero, and Ethereum mining. To do so, it provides everything from hardware to software, and I will cover all of these in this review. However, its key selling points are their GPU mining rigs and their unique operating system - ethOS. Since ethOS is such a fantastic piece of firmware, I have mainly made this an ethOS review. Don't get me wrong, the other aspects of gpuShack are also great, but ethOS is their flagship, and rightly so.
gpuShack Products and Pricing
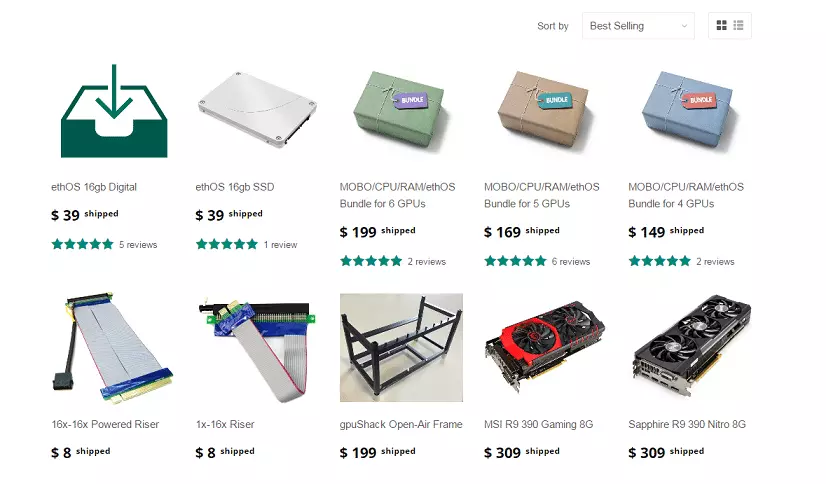
gpuShack offers many items for sale to help out with ZCash, Monero, and Ethereum mining. As mentioned, ethOS is its primary selling point and what I focus on in this review. However, alongside this, it also sells an Open-Air Frame, starter bundles, refurbished GPUs, and some smaller accessories.
The mining packages, ethOS, refurbished GPUs, and accessories are all great value for money, and I honestly have nothing bad to say about them. Though I'm not sure why ethOS digital download and the SSD version are the same prices, so if you're able to wait a few days for delivery then you might as well get a "free" SSD while purchasing ethOS. The open-air frame, however, is another matter. While it is a fantastic piece of gear, I do think it's somewhat expensive for what it is, but I shall cover its pros and cons slightly later on.

All purchases come with a warranty, so you can feel safe that you're not getting a bad deal. Alongside this, gpuShack also offers a price drop guarantee. Should you find the same make and model for cheaper, within 30 days, you'll get the difference and $5 refunded to you! Furthermore, US residents get free shipping. Worldwide it can go up to $50 + customs, so make sure you crunch some numbers, or you might end up overpaying. On top of all of this, they provide a $25 discount if you pay by Bitcoin and you can even trade in your old GPUs for a discount!
On the whole, gpuShack gets its pricing spot on, and I'm glad to see that they even donate 1-2% of the profits to charity!
How to build an Ethereum mining rig
No Ethereum mining rig setup would be complete without a demonstration of everything in action. So enjoy our video of what it's like assembling a mining rig using the gpuShack open-air frame, setting up ethOS and then getting mining.

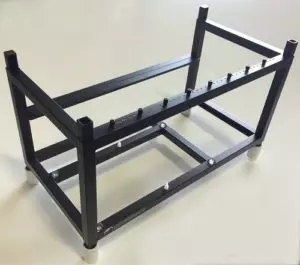
So let's start with what it is. It's a frame that allows you to assemble a mining rig quickly. It has a seat for your PSU, a quick and secure mount for your motherboard and placement for your GPUs with a backrest to stop it from dangling (a typical situation with homemade rigs). Truth be told, you can assemble the full rig within 30 minutes if you have all the components. Furthermore, if you're using ethOS, you can be mining in just 60 minutes extra. On top of this, it's stackable so if you can easily create an Ethereum / GPU mining tower.
Unfortunately, as you can see by our first ever rig in the image above, you can easily create something similar with components from any average hardware store. If you did some further research, you could even find very similar elements and still keep costs low. Granted, this will take more time, but for me, it took approximately 4-5 hours to do so. On mine, I even added fans on the back to help airflow and therefore have the GPU fans run slower and quieter. Granted, I had the standard issue of having the GPUs hanging by cable ties.
However, if gpuShack made the following improvements, it would be worth the $200 asking price.
- Built -in cable management. These are very easy to source and implement, and the excess cabling due to the GPUs is always an issue.
- Fan mounting places would be great. Not only does mounting fans help airflow, but if you have AIO water cooling (custom built or like the R9 Fury) then you wouldn't need to figure out a mounting solution.
- Slightly more depth to the frame so that it can accommodate even the largest PSUs
- More height, as depending on your PSU, it can be a bit fiddly mounting a GPU above the PSU when using ribbon risers.
gpuShack Support
gpuShack is evidently a small company. Therefore, it should come as no surprise that their support is limited to emails and Twitter. However, whenever I've messaged them with a problem, they always replied within 24-48 hours, even on the weekends! Its support was knowledgeable, helpful and never pushy. So much so, that in fact, I learned plenty of new information from them and happily carried on the conversation even when the business was concluded.
You can also find the gpuShack / ethOS team on plenty of mining communities, such as the main Ethereum Mining Forum. Therefore, if you're having problems with ethOS, looking for optimization tips or just want to have a general discussion, then you can feel right at home in the community.
On top of this, if you're using ethOS, then they have an IRC channel to which you can connect, and the friendly members in there will try and assist you, should you have any issues, or would like some tips for improving the performance of your rig.
How to Install ethOS
Signing Up and Downloading
Signing up with gpuShack is incredibly easy and works just like any e-commerce shop. Once you've purchased your ethOS, you'll get an email with the download instructions, and that's it.
Install and setup
Once you have ethOS downloaded, you will need to write it to an SSD. There are clear instructions in the Knowledgebase, and again, this was completed within a few minutes.
Initially, you will need to start the rig with just a single GPU mounted and connected to your primary x16 slot on full speed. I'd recommend using an x16 - x16 PCIe riser for this. Once it posts and you're in, you'll see that it automatically starts mining.

Set up your local and global config files as you see fit and then start adding your GPUs one-by-one, ensuring that you run it for a while each time to make sure it's working fine. If you're brave or silly, you can add all GPUs straight away, but this might lead to more troubleshooting issues down the line.
Monitoring your ethereum mining rig
Once you've set up your rig, you'll need to monitor it. Especially if it's offsite. Unfortunately, unlike with Windows, you can't install Team Viewer to monitor your rig. However, there are two other methods available: SSH and website monitoring.
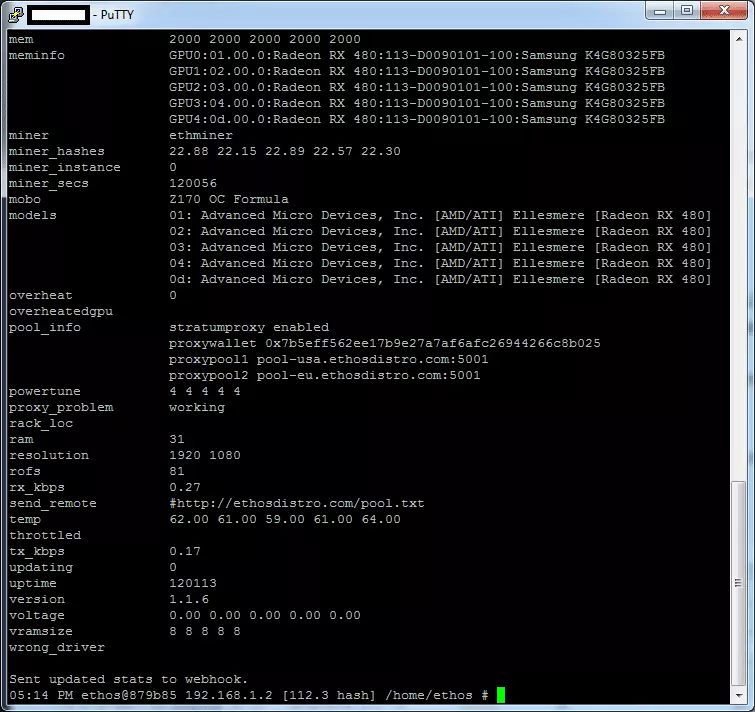
With SSH you can directly log into your rig and manage all of your settings from there and carry out commands as if you were using it regularly. Full instructions for how to set this up are available in their knowledge base.

You will also be provided with a link that allows you to view all of your rigs online and monitor their core stats. A great example is Virosas', who is a core member of the ethOS community.

Optimizing your rig
Once you have your rig set up and running, it's now time to optimize. While I cover a lot more tips, tricks, and optimizations in our Ethereum Mining guide, the ethOS operating system has a very handy overclocking command built in.
- Open a new terminal instance
- Type update to find the core and memory clocks of your GPUs. If all your GPUs are the same model, then your task will be easier as you can use the global commands to set the variables, and you'll have to run fewer stability tests as well.
For example, our RX480s have a core clock of 1266Mhz and a memory clock of 2000Mhz. - Increase your Core clock by 10Mhz by entering the below line into your config file (with the MHz number replace by what is relevant for your rig):
globalcore: 1276 - In your terminal run putconf && ethos-overclock to apply the changes. Use show miner to watch the results. If the setup runs for a good period without stability or heat issues, then move to the next step
- Increase your memory clock by 10Mhz by entering the below line into your config file:
globalmem: 2010 - Again, watch for stability. Repeat steps 3 through 5, until your system crashes.
- If you crash, reset to original clocks and watch for stability for 24 hours to ensure no hardware errors have occurred.
- If there are no hardware errors, set the last clock numbers that you were happy with as the target.
- During the process make sure to set the globalfan and maxgputemp settings as well.
ethOS vs PiMP OS
There is also another OS, dedicated to quick and easy mining - PiMP. That is Portable Instant Mining Platform - before you get any funny thoughts into your head. PiMP is cheaper by a few dollars but is meant as an all-purpose mining platform. While they also have example configs, since you can mine anything with it, it can take a bit more time and hassle to set up. Unless you're planning on mining a wide variety of coins (or at least testing), I'd recommend sticking with ethOS.
Conclusion
I liked
- Quick and easy setup
- Does what it says on the tin
- High-quality support and instructions
- Fantastic monitoring tools
- No-fee mining pool thanks to Alpereum!
I wasn’t so sure about
- The frame could do with some improvements to be worth its price
I hated
- Nothing
On the whole, gpuShack is a fantastic little company, and we have nothing but praise for ethOS. If you're thinking about starting your own mining rig or GPU mining farm, then you shouldn't go without it!
If you have your own gpuShack review, then let us know in the comments.
