Stock routers are limited, and getting the best setup and performance out of them can be very difficult.
Custom firmware, such as DD-WRT makes the process easier, and provides you with a lot of additional options as well; thereby turning a standard $100 router into a super router that is suitable for any home or office.
With this DD-WRT router guide you’ll be increasing your wireless range, data transfer rates, creating NAS solutions, setting up a VPN Service, and so much more in no time at all. Some of these, you can even implement without having DD-WRT.
Don’t have the time to read all of this today? I’d recommend at least reading the introduction so you can find out what this "DD-WRT” business is all about.
What are DD-WRT Routers?
The name DD-WRT originates from two sources. WRT stands for Wireless Router and was first coined by the infamous Linksys WRT54G. This was the first router used for the development of DD-WRT and has become an iconic success since. DD comes from the German town code for Dresden where BrainSlayers, the initial development team, lived.
In its essence, DD-WRT is a piece of firmware that you can install on your router to increase its capabilities. It’s comparable to installing a different operating system on your computer to improve its functionality and purpose. As I will show you in this guide, you’ll be able to increase your wireless range, be provided with improved quality of service tools, and much more. Take a look at the contents below to see just how adaptable it can be.
The below settings are what I would recommend for different environments. Don’t worry if you’re not sure what some of these are, they are explained in much more detail further one.
Why DD-WRT?
Many of you might be thinking: why do I need DD-WRT, won't my standard router firmware solve all my needs?
Unfortunately not.
While firmware provided by router companies has improved over the years, they generally lack an extensive range of features. This is because the majority of users do not need this functionality, and therefore, it doesn't make financial sense for them to develop it.
Over time though, as computer users such as yourself have become more tech-savvy and better informed, they decided that they do want more and a DD-WRT router was always the first step. In this aspect, the router companies have lagged behind. It is for this reason that many of them (Buffalo router, Linksys router, etc.) have now actually started selling DD-WRT flashed routers! There are also several companies, such as FlashRouters, sell routers pre-flashed with DD-WRT firmware.
DD-WRT comes in many flavors and sizes, ranging from DD-WRT micro to DD-WRT mega, but no matter which size you use, the additional tools will no doubt turn your standard router into a superhub.
Some advantages of DD-WRT
Here are some features that prove that an upgrade to DD-WRT will greatly help improve your internet WiFi and device capabilities, whether you live alone or run a business. These are just a small snippet of everything that's possible, and even this whole guide doesn't cover all the possibilities and setups.
- Advanced Quality of Service (DD-WRT QoS) controls– allows you to control your bandwidth allocation. You can easily split your traffic between networks, dedicate it to specific software, devices, and more.
- Universal Plug and Play (UPnP) - a protocol that easily allows the sharing of devices within a network for quick and easy sharing of files, media, printers, etc.
- Network attached storage (NAS) – By connecting USB disks and hard drives you can use your DD-WRT router as a NAS storage hub, allowing everyone on the network to access importance files.
- Network printers – As with hard drives, you can attach printers to your DD-WRT router which then can be accessed from across the network.
- DNS caching/DNSmasq – speeds up the hostname lookup and resolution to improve connection speeds to your favorite websites.
- Wireless bridging– turns the router into a wireless repeater to extend the range of your WiFi signal.
- Advanced performance graphs– DD-WRT provides advanced network tracking and display for better troubleshooting and analysis.
- Adjust antenna power– one of the many ways you can increase your wireless range.
- VPN– you can use your DD-WRT router as a VPN client so that all the devices in your WiFi network are protected. Using a VPN router allows you to unblock websites and services on devices that don't support VPN clients (e.g. Roku Sticks and AppleTV).
So in summary, why DD-WRT? Because even the router manufacturers themselves recommend it if you want to get the most out of your router!
DD-WRT Compatible Routers
Once you've decided that you want to get more out of your router, it's time to get down to business.
The first hurdle is choosing your router.
If you've got an old one lying around in the house, then you can look at their router database page to find out if it's possible to install DD-WRT on it. You can also use the DD-WRT router list to find a router for yourself. While very similar, we'd recommend the later as it's kept more up to date with information.
You'll see many websites that use the iconic Linksys WRT54G / WRT54GL for creating a super router, however, it's extremely outdated, lacks any USB ports, and so it's nowhere near the best DD-WRT router anymore.
Instead, for my demonstrations, I will be using an Asus RT-AC56U. It has a great processor, lots of RAM and Flash memory, and 2 USB ports which help increase its practicality exponentially, and you can grab it off Amazon for a mere $100. It's also a dual-band (2.4GHz and 5GHz router networks) which allows for better transfer speeds and network connectivity.
If you have a lower (or higher) budget, then take a look at our best routers for DD-WRT list for routers that we recommend.
DD-WRT vs. OpenWRT vs. Tomato
DD-WRT isn't the only open-source router firmware on the market, and technically it isn't the best in all aspects. However, it is the one that has the largest community support, most updates, and, and is therefore the most beginner-friendly.
Personally, I find Tomato router firmware better, but you do need more technical knowledge to deal with it, and you won't always find the answers on the internet. An OpenWRT router is the most powerful but also requires excellent computer skills. For these reasons, DD-WRT wins the day.
DD-WRT Guide - Notation
To help make navigating and understanding the instructions in this guide easier, I have used the following notations.
Menu Items - menu items are in italics and arrows -> are used for sub-menu denotation
Buttons - anything you will need to click is in bold
'Single Quotes' will be used to indicate the sections on a page
Italics are used for pieces of code you need to enter.
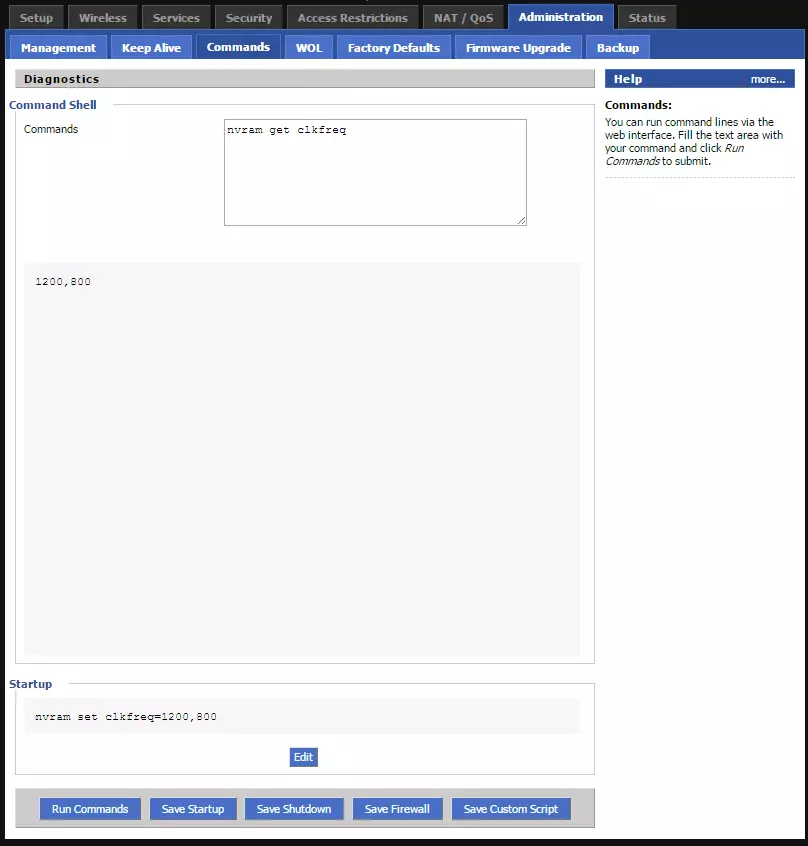
Here is an example that will tell you the CPU and Flash speeds of your router
- Go to Administration -> Commands
- Enter the following in the 'Commands' box: nvram get clkfreq
- Click Run Commands
Here is what you should see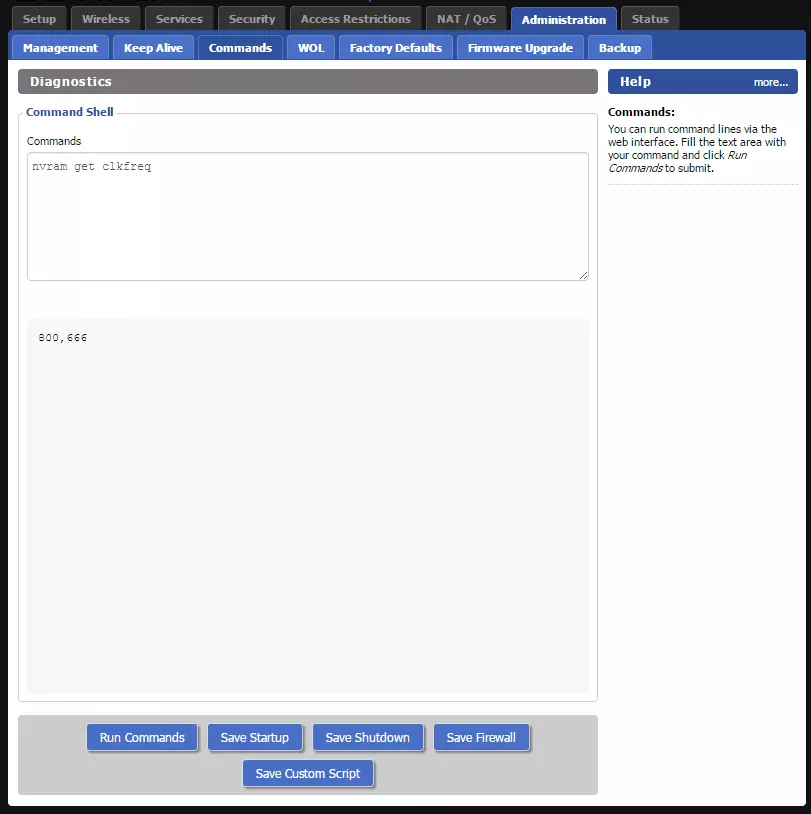
Getting Started with DD-WRT
How to Install DD-WRT
Installing DD-WRT on your router is the first and riskiest step.
I have to warn you that installing DD-WRT will void your warranty, and you could also "brick" it, a.k.a. make it into a sexy paperweight.
Luckily you can also buy a router with DD-WRT preinstalled on Amazon if you don't fancy taking the risk. Alternatively, you can use companies such as FlashRouters and Sabai, which will install it for you and also provide you with a guarantee and support.
Where to download DD-WRT
You'd be surprised, but even the DD-WRT firmware download can be a bit problematic. While on the DD-WRT website there is a DD-WRT database which helps you the find the firmware for your router, it's usually very outdated and sometimes doesn't include everything that's listed on their supported device page.
For the AC56U, we got FlashRouters to provide us with the best stable build, but you can also search the DD-WRT Wiki and forums, and the FTP beta builds page. The latest stable build recommend by FlashRouters is the R28493M (12/10/15), and you can download it from here. Once downloaded, follow the steps below.
- Do a 30-30-30 reset. Press the reset button for 30 seconds (you'll probably need a pen for this). Without letting it go, disconnect the power for 30 seconds. Plug the power back in, and keep pressing the button for a further 30 seconds. This helps erase the memory of the router for a clean install.
- Connect your router to your computer with an Ethernet cable.
- Open your browser and type 192.168.1.1 into the address bar
- If requested, the router login details will be the default details (generally username: admin, password: admin)
- If the above IP address doesn't work, consult your router manual
- In the left-hand menu navigate to Administration and then click the Firmware Upgrade tab at the top.
- For the 'New Firmware File', choose the file you have downloaded at the start. Click Upload and wait for your router to reboot itself. You'll be able to tell, as the lights start flashing on the front, and you'll be able to access it using the router IP address mentioned above.
- Do another 30-30-30 reset.
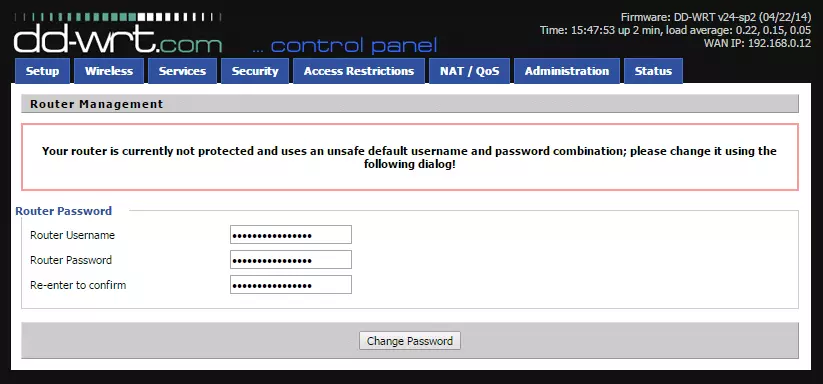
- Now go to 192.168.1.1 (the DD-WRT default IP address) and you'll see the following. The DD-WRT default login details tend to match that of the router, but not only should you, but you will need to change this.
![DD-WRT Welcome DD-WRT Welcome]()
- That's it you're done with the DD-WRT firmware upgrade.
If at any point you need to do a DD-WRT reset because you've made a mistake and the router is not responding, then do a 30-30-30 reset.
Changing the Basic Settings
Now that you've installed the firmware, the primary task will be to change all the core and important settings, including the wireless access point configuration.
- As detailed in the previous instructions, you'll be prompted to change your DD-WRT username and password immediately. I recommend you write this down somewhere, such as in a password manager, so you don't get locked out by accident. If you wish, you can change this at a later date under the Administration -> Management tab.
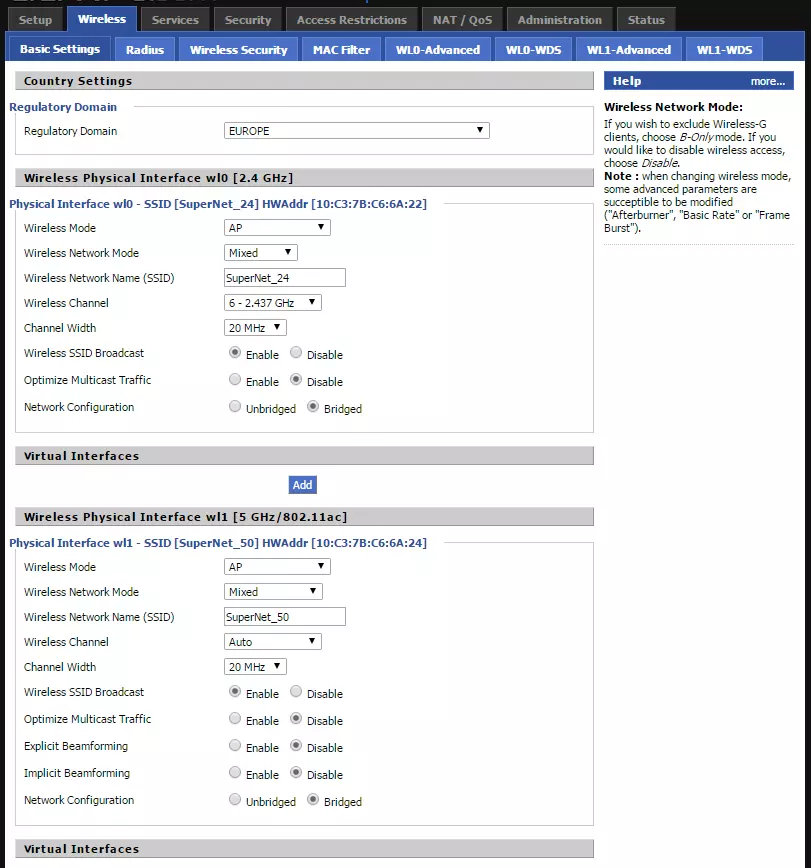
- Change your 'Wireless Network Name (SSID)' in the Wireless menu under the Basic Settings Tab. If you have more than one wireless network (which you will with the AC56U) then give them different names so you can easily differentiate between them. Apply Settings once done.
![DD-WRT Basic Wireless Settings DD-WRT Basic Wireless Settings]()
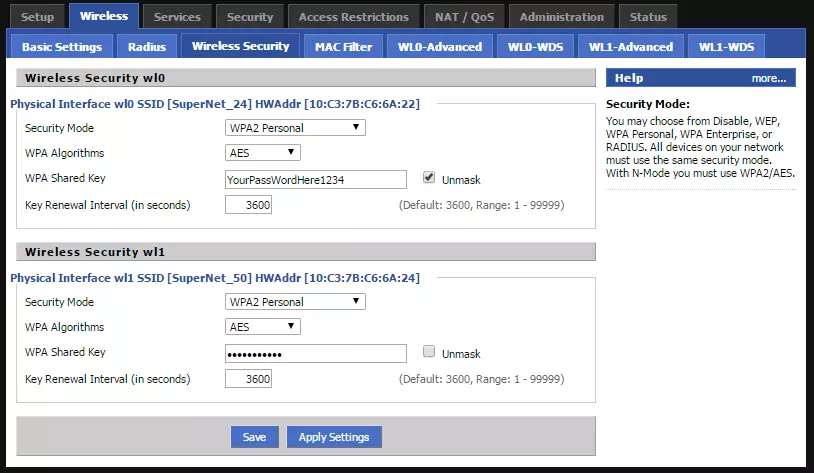
- Under the Wireless Security tab, apply a password for both networks. I recommend using the WPA2 Personal Security Mode, with an AES WPA Algorithm.
![DD-WRT Wireless Security Settings DD-WRT Wireless Security Settings]()
- In Setup, I'd also recommend setting up the optional 'Router Name' and 'Hostname', but this is not essential.
- You should now have a functional router that you can use just like any other router on the market. Before we start the router configuration and adding bells and whistles, I'd recommend having a look around in the menus and getting a feel for the firmware.
Backing up and Restoring your DD-WRT
Playing around with your router, improving the settings and enhancing its capabilities is always a lot of fun. However, somewhere along the line you're likely to make a mistake, and you'll want to have a backup so that you can just restore the system, and not have to go through all the settings again. While writing this guide, and doing all the settings, I've had to do two of these restores myself - both due to stupid mistakes!
To create a backup, go to Administration -> Backup, and click Backup. Then just download the file to a secure place on your computer.
To restore the DD-WRT to a backup point, go to the same location. Under 'Restore Settings' find your backed up file and click Restore.
As with backing up your DD-WRT firmware, I'd also recommend that you have a backup of your computer system, as losing all your files is a lot more devastating than losing a few DD-WRT settings.
Increasing your Wireless Range
There are some principal methods for increasing your wireless range and transfer speeds. Below, I cover the most popular options. Of these, some are firmware related, while a few require some additional hardware.
Locating your Router
The ideal way of getting optimum coverage in your home or office is by locating your router in the epicenter of the action. Find the physical center of your property, and see how that affects your coverage. Walls, especially concrete ones, can be a large hindrance, so try moving your router around.
Unfortunately, your Internet Service Provider (ISP) might not have located your modem in an ideal location for this. If you want to keep your modem and your router in the same location, you can buy a coaxial cable extender (or ask your ISP to do this for you). If you don't mind the two being in different places (or want them to be in different places), you can buy an extra long Ethernet cable.
If you're completely unable or reluctant to move your router, then the next steps should help you out.
Use an Empty Channel
While wireless frequencies are referred to as 2.4Ghz and 5Ghz, they actually vary a little from these frequencies on purpose. This is because for each main frequency a number of channels exist. These channels can be envisioned as the number of lanes on a highway. The more cars there are in a lane, the slower it tends to be. Finding an empty (or at least the emptiest one) is extremely easy, and it can help increase your range and your transfer rates.
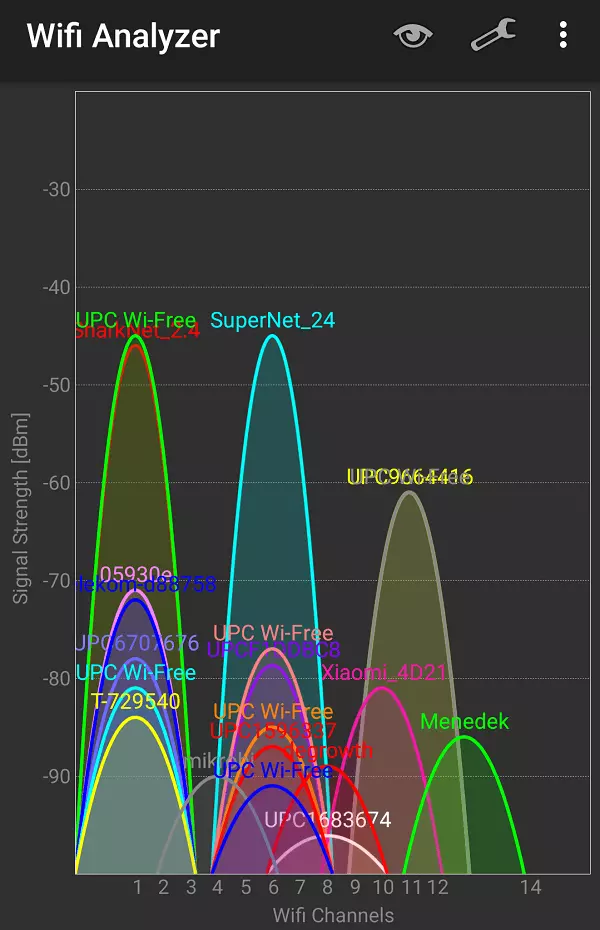
- Download a Wifi Analyzer app for your device. I recommend the following; Wifi Analyzer for Android, AcrylicWiFi for Windows, WiFi Scanner for Mac. Unfortunately, as of yet there are no good options for iOS.
- Use the app or software to scan your neighborhood. I found that the 5GHz channels were nearly unused, so I had my choice of options. As you can see in the image below, the 2.4GHz channels had a lot more traffic. I was clearly using a very congested channel (SuperNet) and I would be better off with a higher channel number.
![WiFi Analyzer WiFi Analyzer]()
- I changed my network's channel number in Wireless -> Basic Settings to Channel 13.
- You can also select Auto, but personally I've found that people hardly ever change their channels so this isn't required.
Advanced Wireless Settings
Changing the channel, as described previously, is one of the easiest and most sure-fire ways to get a better signal. However, there are a lot of advanced settings that can be experimented with. These depend situation to situation, and some of them, such as increasing TX Power, can reduce the lifetime of your router. For this reason, you will not only need to perform some careful testing on each configuration you try, but should also bear in mind that other, more minor, consequences may result.
Bandwidth vs. Throughput
Before I explain how to test your bandwidth and throughput, it's imperative that I explain the difference between the two. Bandwidth is the fixed speed that you pay for and receive from your ISP: in my case, this is 30Mbps download and 3Mbps upload. Throughput is the actual amount of data that your router can handle. On the RT-AC56U we're testing with, the theoretical maximum is 867Mbps.
Therefore, if you're only interested in using the router for accessing the internet, then I'd advise against playing around with the Advanced Settings (unless you have a very fast internet connection). However, if you are planning on using it for storage, printing, streaming movies or other internal purposes, then it might be worth it.
Testing your Bandwidth and Throughput
Testing your bandwidth is the easiest of the two. Head over to TestMy.net. You should see speeds in the region of what you're paying for. If this isn't the case, you might want to consider having a word with your ISP. It's a well-known fact that speeds can vary, but in many cases (especially in America) there have been reports of internet providers just not delivering on their promises. Check out our guide on how to bypass throttling for some quick tips on improving your internet speeds.
For testing throughput, you'll need to download the TamoSoft Throughput Test. You'll need to run the server on a computer that is hard-wired to your router with an Ethernet cable. Then on a laptop, you will need to run the client software. Enter the IP address provided by the server, then execute the router test. This will give you the throughput speeds of your router.
TX Power, Transmission, etc
If after testing your settings you decided that you need a larger throughput, then you will likely start looking at changing the advanced wireless settings. As mentioned these are complicated and can cause issues. Since with the default settings we're seeing 500Mbps on our computer and 100Mbps on our phone (which is the limit due to its hardware) we don't think this is necessary and unlikely that you will either.
However, if you do wish to do this, then the best recommendation is heading over to the DD-WRT forum and asking the friendly people there. When you do so make sure you list all your devices and needs so that they can tailor the specifications to you.
When discussing the extension of wireless network ranges and speeds, you'll often come across Afterburner. Afterburner is a unique piece of technology, supported by select devices and it is recommended that you have it turned off by default.
Antennas and WiFi Extenders
One of the quickest and easiest ways of getting better reception on your devices is by using wireless antennas.
If you're using the router we've recommended then, unfortunately, you won't be able to attach an additional antenna to it. However, you can still connect one to your desktop computer, as long as you already have a WiFi card inserted into it. While easy to do, connecting an antenna to your computer is probably the least practical and cost-effective solution as it will only help one device.
Therefore, if you're still struggling with getting good wireless coverage, and you've tried the above two steps, then it's worth getting a replacement antenna for your router. You can get these fairly cheap from Amazon. There are three things to consider if you're going to get one:
- Technical Specifications. Make sure that you get one that has better technical specifications than the existing antenna.
- Directionality. Some antennas such as the Asus WL-ANT-157 provide increased range, but they focus the signal so this only goes in one direction.
- Connect by wire. Some antennas connect to your antenna with a wire, this means that you can move it around a little. Some even have a magnetic base to make placing it elsewhere easier.
The other way you can extend your signal is by using WiFi Range Extenders. With the best WiFi range extender, you will just have to plug it into a power socket, do five minutes of setting up and you'll be done. Many people prefer this option as it takes up very little space and is extremely quick and easy to set up.
Use a spare router as a DD-WRT Repeater
If you already have an existing router, but plan on getting a new one as well, then as long as your existing one supports DD-WRT, you can use it as a DD-WRT repeater. What this means, is that you can place it in a completely different location to your main router and it will relay the wireless signal.
To set up the weaker router as the repeater follow these steps:
- Install DD-WRT on the router, as per the previous steps
- Navigate to Setup -> Basic Setup. There, Disable your 'Connection Type', as the router will not be plugged into your main router or modem.
- Change the 'Router' and 'Host Name' as we showed in Setting up DD-WRT. We recommend using the same name with a '-2' appended to it.
- Change the last digit of the 'Local Router IP Address'. Generally IPs get assigned to devices automatically, and you wish to avoid having a collision and cause two devices not to have a wireless signal so we'd recommend choosing a relatively high number such as 50.
- Change DHCP Type to ‘DHCP Forwarder’.
- Enter the IP address of your primary router (usually also your modem) under 'DHCP Server'. Generally speaking, this should be 192.168.1.1. To find out exactly which one, consult your manual for this device. Save the changes.
- Go to the Security tab and turn off all the security settings (uncheck everything), as your main router will handle all security. Hit Save.
- Go to the Wireless tab, and change 'Wireless Mode' to either ‘Repeater’ or ‘Repeater Bridge’. Once done, click Save.
- 'Repeater' will only help relay your wireless signal, this is the best option if you only connect to your devices wirelessly
- Selecting ‘Repeater Bridge’ allows you to use its Ethernet ports. This means that you can plug your Smart TV, games console, or other devices to it. This will allow these devices to have a faster internet connection. This will also allow these devices to see other devices on the network such as network attached storage solutions.
- Change your 'Wireless Network Name (SSID)' to exactly match the settings on your main router. If your main router has both a 2.4Ghz and 5Ghz then network, then make sure you do this for both. Hit Save again.
- Go to the Wireless -> Wireless Security Tab and change the setting to match those of your networks primary router. Hit ‘Save’ and, finally, ‘Apply settings’.
If after experimenting with all of these settings, you still haven't been able to achieve the best wireless router range that you'd like, then you can always build your own.
DD-WRT Overclocking (Increasing your Power)
Like with a computer, it is possible to overclock the router so that it can perform more operations per second, and give you a better performance. However, unlike with a computer, unless you're very hands-on, you can't apply any cooling to the system. So you will need to watch out for overheating and stability.
I've set my router to a CPU frequency of 1200Mhz and memory frequency of 800Mhz, compared to the 800/600 standard defaults. The standby temperature this way is 67C, compared to the standard 63C. This is a good stable temperature, and while it's possible to overclock even more, I didn't see a need for it. A stable temperature of 70C and above is likely to cause problems or a reduced lifetime.
To overclock, don't use the built-in overclocking tool found under Administration -> Management! Every professional in the industry swears against this, and aren't even sure why it's not implemented better or removed. Instead, follow these steps.
- Go to Administration -> Commands
- Into the box enter the below, which will show you the current settings (800Mhz CPU /600Mhz memory by default)
nvram get clkfreq
- Enter the following command
nvram set clkfreq=1200,800
and click Save Startup
- Go to Administration -> Management and at the bottom click Reboot Router.
- Once your router has rebooted, repeat step 2 you should see 1200/800
![DD-WRT Overclocking DD-WRT Overclocking]()
- If you'd like something lower, then I recommend going for 1000/666 when you set your frequencies
Attaching External Devices
By using a router with a USB port, or two, you can connect devices to it that allow you to make it even more useful at home, and in your office.
Using DD-WRT for NAS
NAS is defined as Network Attached Storage. In essence, this means that by attaching an external hard-drive or USB stick to it, you'll be able to access all the files on it as long as your device is connected to the WiFi network. What's even better is if you set up FTP, which we demonstrate later on, then you'll be able to access it anywhere worldwide as long as you're connected to the internet.
Here is how to set it up.
- Attach your USB storage to the router and switch it on (if it isn't already). Use the USB3.0 port for this.
- Navigate to your routers WebGUI by entering 192.168.1.1 into the address bar of your browser (unless you changed it).
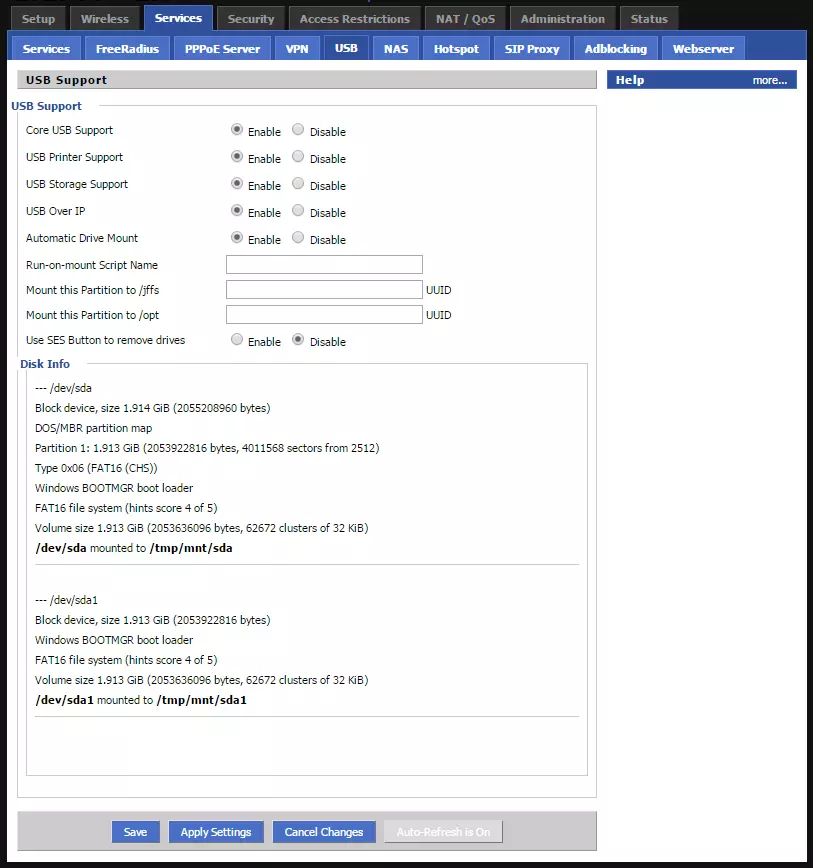
- Go to Services -> USB
- Enable ‘Core USB Support’, ‘USB Storage Support’ and ‘Automatic Drive Mount’. If you have a spare USB port and want to connect a printer for wireless printing, you can enable ‘USB Printer support’ as well. Click Save and then Apply Settings.
- Details about your USB storage device should appear in the ‘Disk Info’ section. If they don’t, then re-start the router and reload the page
![DD-WRT Services USB DD-WRT Services USB]()
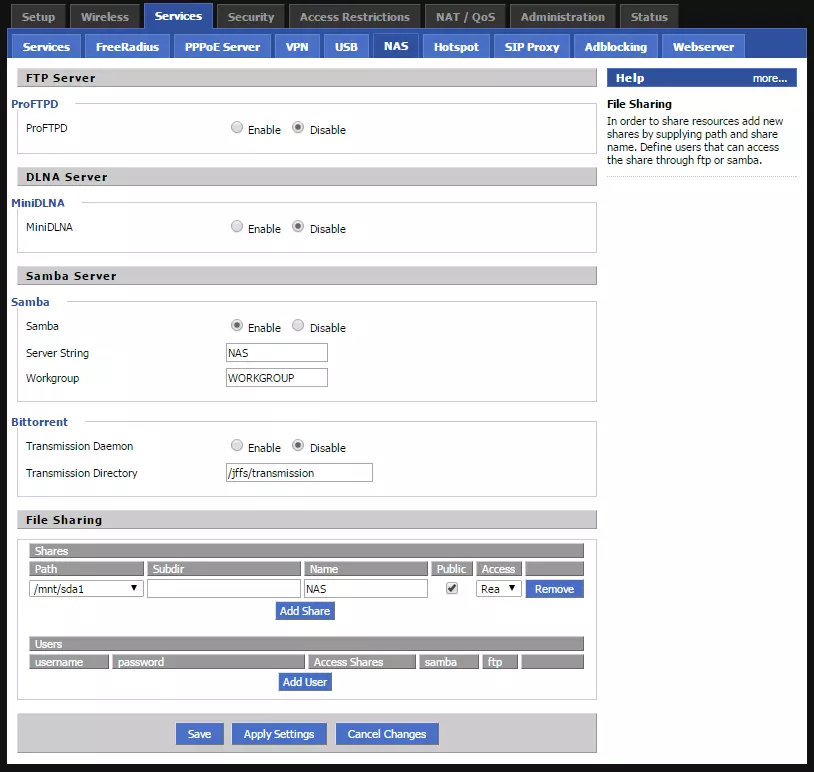
- Click on the NAStab. Enable SAMBA, choose a Server String (name), and add your Workgroup. To find out or change your workgroup you can do so in the following locations:
- In Windows go to Control Panel -> System
- In OSX go to System Preferences -> Network -> AirPort -> Advanced -> WINS
- In Linux / Ubuntu to install Samba, open up a terminal window and issue the command:
sudo apt-get install samba smbfs
(you will need to enter your sudo password).
Go to the /etc/samba/smb.config file and look for the line ‘workgroup = WORKGROUP’.
- Under ‘File Sharing’, click Add Share, select a storage device or device partition from the ‘Path’ drop-down menu, and choose a name for the storage. If you want everyone who joins the network to be able to access the NAS storage then check ‘Public’, and decide whether permission is Read/Write or Read Only.
- If you prefer to restrict access to named users, then click Add User and fill in the details, ensuring that ‘Samba’ is checked. Repeat for each authorized user (or less securely, directly share a single User account details with all authorized users).
- Save and Apply Settings
![DD-WRT Services NAS DD-WRT Services NAS]()
- Your NAS drive should now be accessible over your Network:
- In Windows go to Start -> Network -> [Router name] -> [drive or partition name]
- In OSX go to File Manager -> Shared pane or Network folder -> [Router name] -> [drive or partition name]
- In Linux / Ubuntu follow these instructions.
As mentioned previously, this NAS system can be set up with any external storage drive or USB flash stick. In some cases, after you've applied the settings and the router reboots, you might get the warning "Unsupported Filesystem". If this happens you will need to reformat your drive to be one of the following file systems: ext2, ext3, NTFS or VFAT.
Some DD-WRT builds also support attaching of multibay drives, if you're looking to have a RAID enabled setup. Unfortunately, you can't connect a USB drive per USB port and run these in a RAID 1 configuration. However, if you're looking to primarily use your DD-WRT as a NAS system, then it's a better idea to get a dedicated NAS system.
Attaching a Printer to your DD-WRT
Attaching a printer to your DD-WRT router is only slightly more complicated than the previous NAS setup. You'll need to make sure that your printer is USB2.0+ supported or it will not work.
Some modern printers allow you to share them using WiFi, but I want to keep my WiFi networks as clear as possible. Some also allow for you to use it via the ethernet port, but I feel that a USB port is more convenient.
- Plug the printer cable into the USB port of the router. I suggest the USB2.0 port as it's better for compatibility and it doesn't need a large throughput either.
- Open the DD-WRT panel at 192.168.1.1
- Go to Services -> USB. If you haven't yet, enable 'Core USB support' and also 'USB printer support'. Then Apply Settings.
- Your printer is now ready, but we will also need to set up your computer so that it can access it
DD-WRT Shared Printer with Windows 7 onwards
- Click the Start Menu and then Devices and Printers
- Click Add a network, wireless or Bluetooth printer.
- Click on Add a printer using a TCP/IP address or hostname
- Enter 192.168.1.1 as the hostname, unless you have changed this. Deselect the ‘Query the printer and automatically select the driver to use’ checkbox.
- Have a coffee while Windows tries to detect your printer. 90% of the time it will still fail, but don't worry, click Next.
- Select your printer make and model from the list.
- Give your printer a name
- If the printer has worked so far without problems, do not worry about replacing the driver if a new version is detected.
- ‘Print a test page’ to make sure everything is working correctly, then click ‘Finish’ and you are done!
3G and 4G Receiver / Modem
If you move around a lot for work, then most likely you will have a 3G (or even 4G) USB receiver or WiFI hotspot. If for some reason you want something more capable than your hotspot or just more functionality then you can plug your 3G USB dongle into your router. While this will mean that you need to carry the router, and it's power source around, we've heard that contractors like to do this due to the versatility that it provides. In essence, they create a mobile WiFI router.
However, since this is a very rare and complicated process, that only a few people are looking for, I won't delve into it myself. If you're interested, have a look at following links. DD-WRT Supported 3G Modems, Cellular Phone/USB Modem as WAN and if you're on GiffGaff they have tailored the process to you.
Personally, if this is something you're interested in, then I much rather recommend that you get a 4G USB Dongle and then use the DD-WRT as a repeater as described previously.
Accessing your DD-WRT Router
Accessing DD-WRT through the WebGUI, as I have done for most of this tutorial, is the simplest and easiest way. Unfortunately, a WebGUI does have its limitations, and sometimes you will need to get into the deeper workings of the system. Both SSH and Telnet are perfect for this and SCP and FTP and ideal for accessing the files on the router remotely. To decide between which protocol to use for remote file access, I'd recommend reading this great article by CodeGuru.
SSH and Telnet
Both SSH (Secure SHell) and Telnet access are enabled in the same way. Hence, I've grouped the two together. Telnet is used for accessing the router locally, while SSH is suitable for remote access and more convenient for file transfers as well. Of course, the easiest method for local file transfer is setting up a NAS, as described previously.
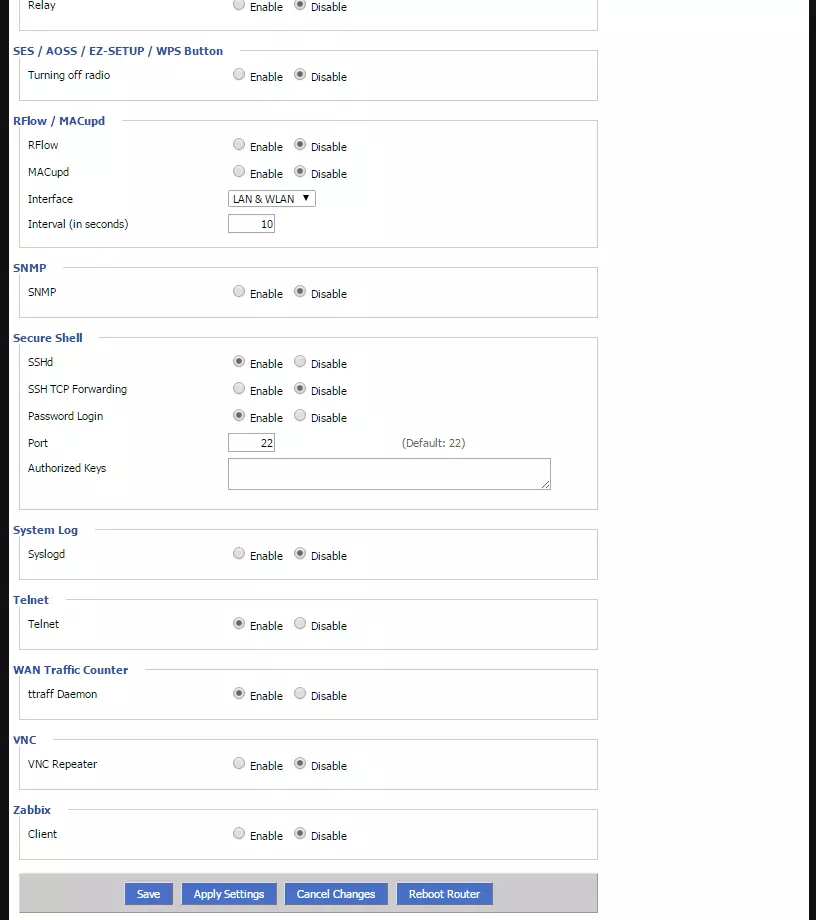
- Go to Services -> Services and scroll down near the bottom
- Here you can enable both SSH and Telnet
- For SSH, you have the option of defining the port as well as creating Authorization Keys. I have personally stuck with the username and password login, however, for the highest level of security I'd also recommend assigning an Authorization Key. Once that's done click Save and Apply Settings.
![DD-WRT SSH and Telnet DD-WRT SSH and Telnet]()
- Go to Administration -> Management, and there you can enable both SSH and Telnet Management now.
- If you would like to access your DD-WRT externally, you will need to set up port-forwarding on your modem for the port you have selected to use for SSH. While port 22 and 23 is usually used, I'd recommend using something above 1024 to make it harder for anyone trying to access your network.
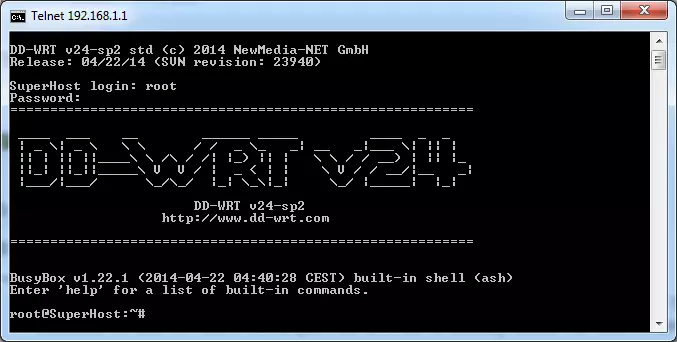
In Windows, you can use the command prompt to access via Telnet. You will also need to make sure that you have the Telnet Client enabled. To do this go to Control Panel -> Programs -> Turn Windows features on and off. Wait for the list to load, select 'Telnet Client' and click OK.
- Start Command Prompt by clicking the Windows button, type the below, and hit enter.
cmd
- Type
telnet
- Initiate the connection to your router by typing open 192.168.1.1 [23], change the IP address and port accordingly if you've chosen other values
- The login details are username: root and password: as defined at the start. Don't worry if your password doesn't appear as you're typing it; this is a security software feature.
- That's it, your in.
![Accessing DD-WRT Through Telnet in Windows Accessing DD-WRT Through Telnet in Windows]()
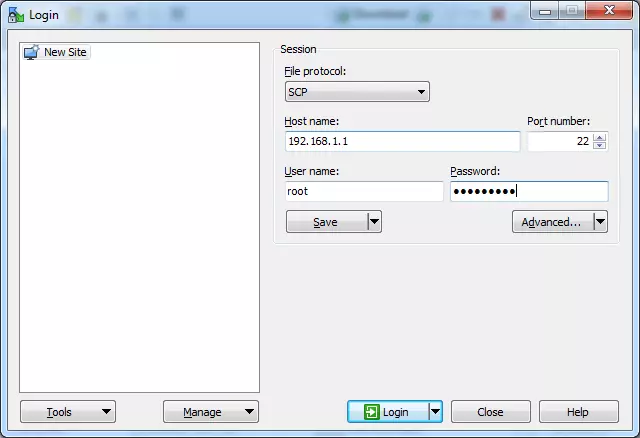
You can also use PuTTY to Telnet or SSH into the router. SSH also comes with SCP (Secure Copy), this means you can use a program such as WinSCP to access the file systems on your router.
- To access your router via WinSCP just enter the details as above, in the correct section and click Login.
- If this is your first time, you might get a security key warning, in this case just accept it.
![Accessing DD-WRT Through WinSCP Accessing DD-WRT Through WinSCP]()
FTP
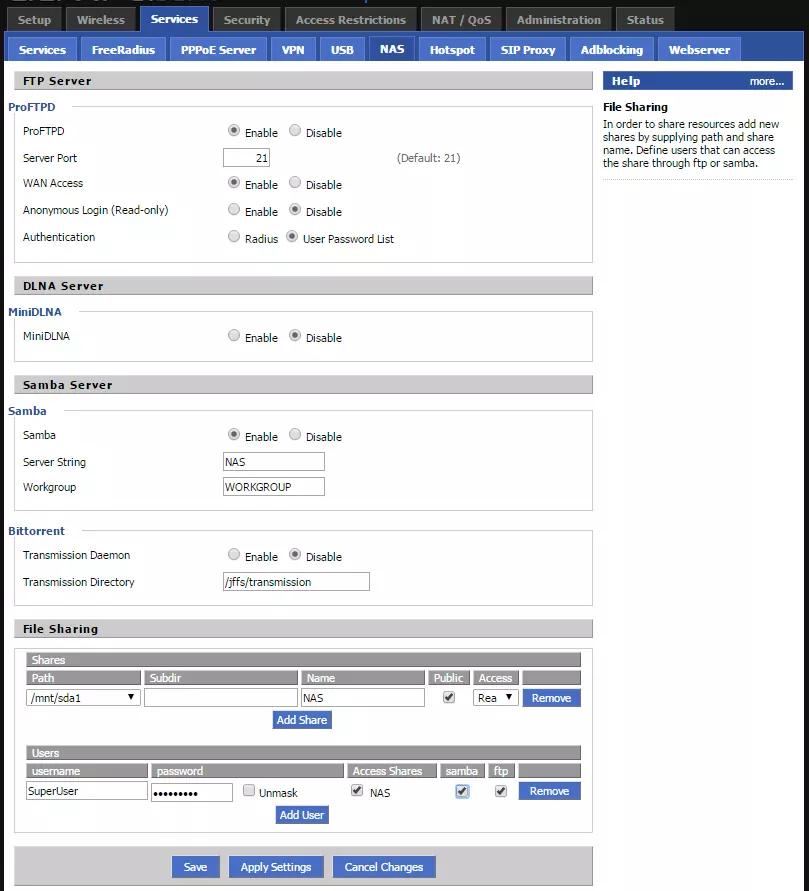
To enable FTP on your DD-WRT router, you need the following steps once your USB storage device is plugged into your router.
- Carry out Steps 1 to 6 of setting up a NAS storage system
- Under Services -> NASdo the following settings
- Enable ProFTPD (change port as you see fit) and Enable WAN Access
- Enable WAN Access
- I recommend not allowing Anonymous Login. For Authentication using a password list is more convenient, but the Radius method provides the most security.
- Under Users enter a Username, a secure Password, and select which drives you’d like to share as well as FTP.
- Click Save then Apply Settings.
![DD-WRT FTP Setup DD-WRT FTP Setup]()
- Go to Administration-> Commandsand enter the following
wanf=`nvram get wan_iface` iptables -I INPUT 2 -i $wanf -p tcp --dport 21 -j logdrop iptables -I INPUT 2 -i $wanf -p tcp -m state --state NEW --dport 21 -m limit --limit A/minute --limit-burst B -j logaccept
Change the values as you deem suitable:
- A(2) – the number of guesses allowed per minute after B (3) the number of unsuccessful initial tries – this will slow down and limit anyone trying to break in
- You can also use the following code instead, but this will be less secure
iptables -I INPUT 1 -p tcp --dport 21 -j logaccept
- Save as Startup, Apply Settings, and Reboot Router
- Your FTP Server should now be running on your DD-WRT
Accessing the drive using FTP
- Download an FTP Client. WinSCP for Windows, FileZilla for Mac, ES File Explorer for Android and FTP Manager for iOS are all very suitable – but you may have your own preferences.
- When prompted, enter the router settings as you have defined them previously
- If you want to access it externally, you will need to know your IP address (beforehand) which you can find by visiting our what is my IP address page.
- If you are using a modem before your router you will also need to set up a port forward these vary by ISP & Modem so look at the documentation they gave you.
- If you wish to do this while using a VPN, you will need to choose a VPN that allows port forwarding.
- That’s it your connected
Advanced Access Settings
Access Restrictions / Parental Control
At home, you may wish to set up some access restrictions to limit what content your family members can access, especially your children. While I believe that educating them is more important, there are inherently a good number of topics which no lecturing can stop someone from stumbling upon.
In an office, you may wish to setup filtering so that employees aren't using work time to access Facebook, Twitter, and other social media unless it is their job to do so.
Personally, I have access restrictions set up as a method of self-censorship. I know that there are some websites that I visit, such as 9GAG, that aren't productive, and I shouldn't access them during the day.
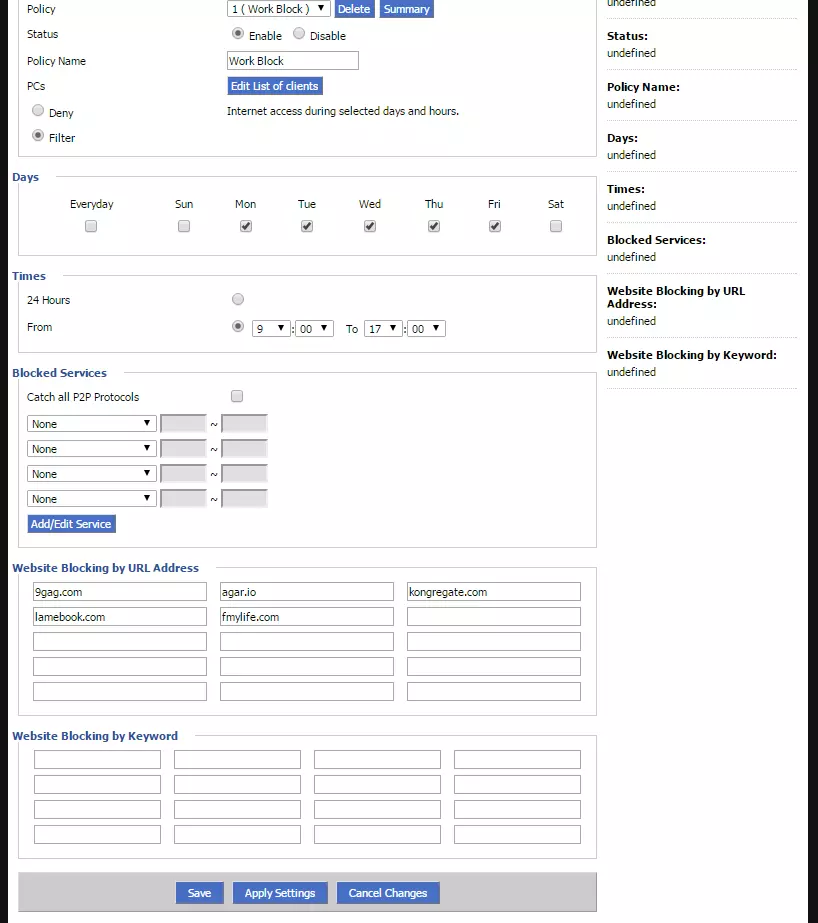
- Go to Access Restrictions -> WAN Access
- You can have up to 8 policies set up
- Set up the access policy. For the list of clients, you can use MAC address, IP Address or IP-range specification. I'd recommend using the MAC setting as this is the hardest to overcome. You can find out the MAC addresses of the connected devices by navigating to Administration -> WOL.
![DD-WRT Administration WOL DD-WRT Administration WOL]()
- For Days and Times, define when you'd like the access restriction to be active
- With the 'Blocked Services' section, you can determine whether there are any specific services you want to block such as gaming, or Yahoo.
- In the last two sections, you can block websites by keyword or by specific URL. I'd recommend using the URL blocking as it's more accurate and avoids accidental blocking of websites that might be required for work or education.
![DD-WRT Access Restrictions DD-WRT Access Restrictions]()
Guest WiFi
If you often have friends, visitors or business partners visiting then most likely you'll want to provide them with WiFi access. The advantage of creating a guest network is that you can tailor it to suit your needs. For example, you can have different access restrictions and privacy settings. Since the two networks are separate, you'll also be more secure, and you can even tailor the bandwidth usage so your friends don't start hogging all your download speeds.
You can create a guest network for both 2.4Ghz and 5Ghz networks.
- Go to Wireless -> Basic Settings
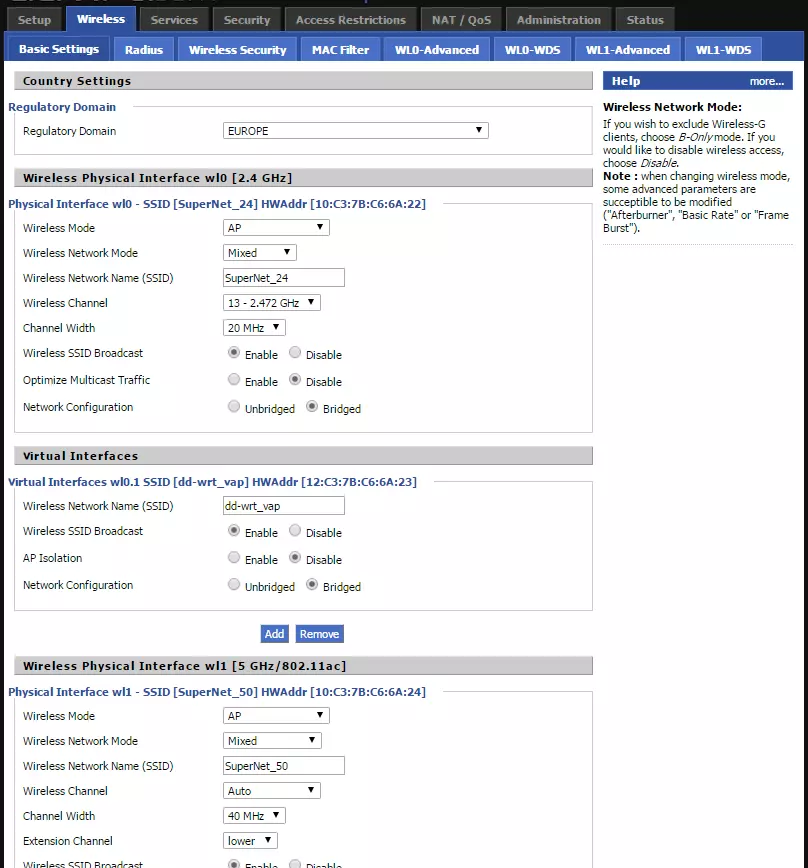
- For the frequency that you'd like guests to be able to access click Addunder 'Virtual Interfaces'. Personally, I only have a 2.4Ghz guest network as I find this more than adequate. You can also add more than one virtual network for each frequency, but I haven't been able to think of a good reason this might be useful. Click
Save
![DD-WRT Guest Network and Virutal Interfaces DD-WRT Guest Network and Virutal Interfaces]()
- Go to Wireless -> Wireless Security and give the guest network a password, this is optional, but I always try to limit who can access the network so I know that my neighbors won't be freeloading or customers of the coffee shop next door won't be using it either. Click Apply Settings.
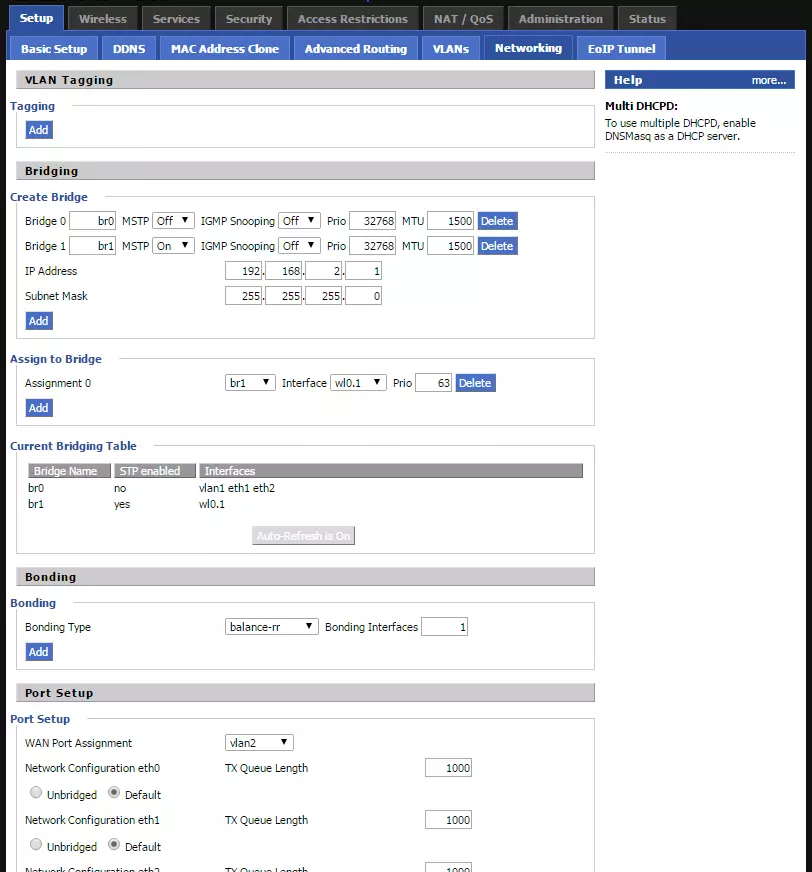
- Now you will want to create a bridge. What a bridge does, is it allows you to separate the two networks so you can control them separately. I will also show how you can give the non-guest wireless networks bandwidth priority.
- Go to Setup -> Networking
- Create a new DD-WRT bridge by clicking Add and call it br1, click Save
- For the IP define it as 192.168.2.1 and the Subnet Mask should be 255.255.255.0, click Save then Apply Settings
- Click Add under 'Assign to Bridge'
- Select br1, that you just created as the client bridge and wl0.1 as the network. Leave Prio as is and then
Apply Settings
![DD-WRT Setup Networking DD-WRT Setup Networking]()
- At the bottom for 'DHCPD', Add a new DHCP Server. Select br1 in the drop down, and leave the other settings as default. Apply Settings again.
![DD-WRT Setup Networking 2 DD-WRT Setup Networking 2]()
- You now have two separate networks. However, you still want to give the primary network priority as it's more important.
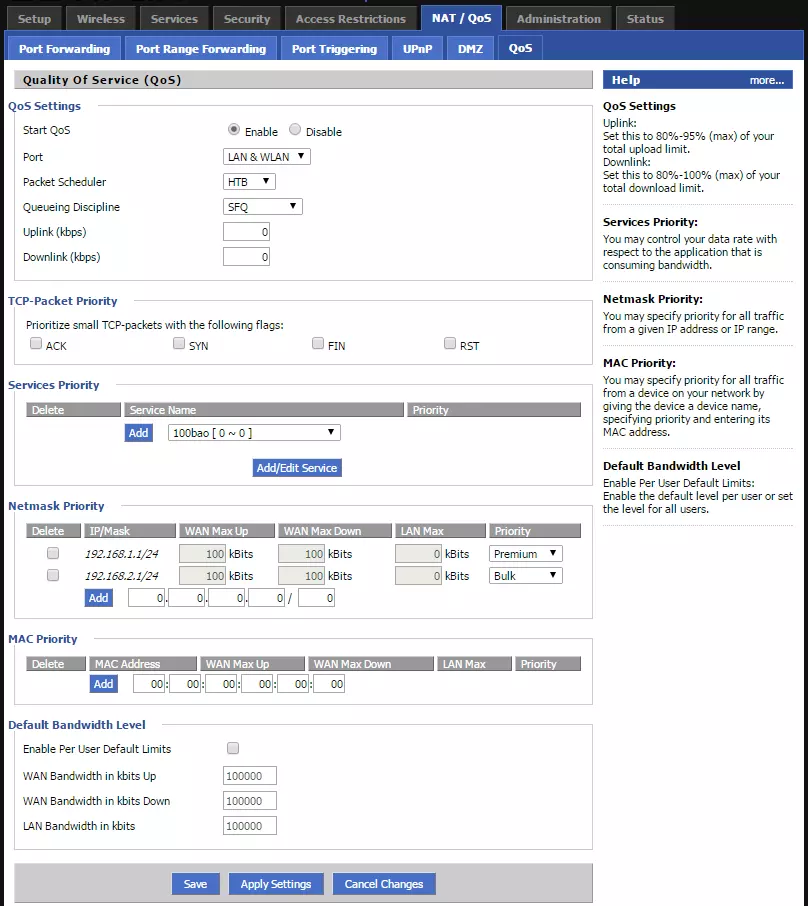
- Go to NAT/ QoS -> QoS (Quality of Service).
- In QoS Enable it and for Port select LAN & WLAN from the drop-down menu.
- Under Netmask Priority, enter 192.168.1.1/24 and 192.168.2.1/24 (or the IPs you have defined accordingly).
- For the 192.168.1.1 primary network select premium priority and for the secondary select bulk priority.
-
Apply settings
![DD-WRT NAT QoS DD-WRT NAT QoS]()
- Go to Administration -> Commands and enter the following
-
iptables -t nat -I POSTROUTING -o `get_wanface` -j SNAT --to `nvram get wan_ipaddr` iptables -I FORWARD -i br1 -m state --state NEW -j ACCEPT iptables -I FORWARD -p tcp --tcp-flags SYN,RST SYN -j TCPMSS --clamp-mss-to-pmtu iptables -I FORWARD 1 -i br0 -o br1 -j DROP iptables -I FORWARD 1 -i br1 -o br0 -j DROP
- Click Save Firewall and you're done
If you would like the guest network to have a fixed bandwidth, for example, you need to have a baseline when testing a product, then you can do so in the following way after you've done the above:
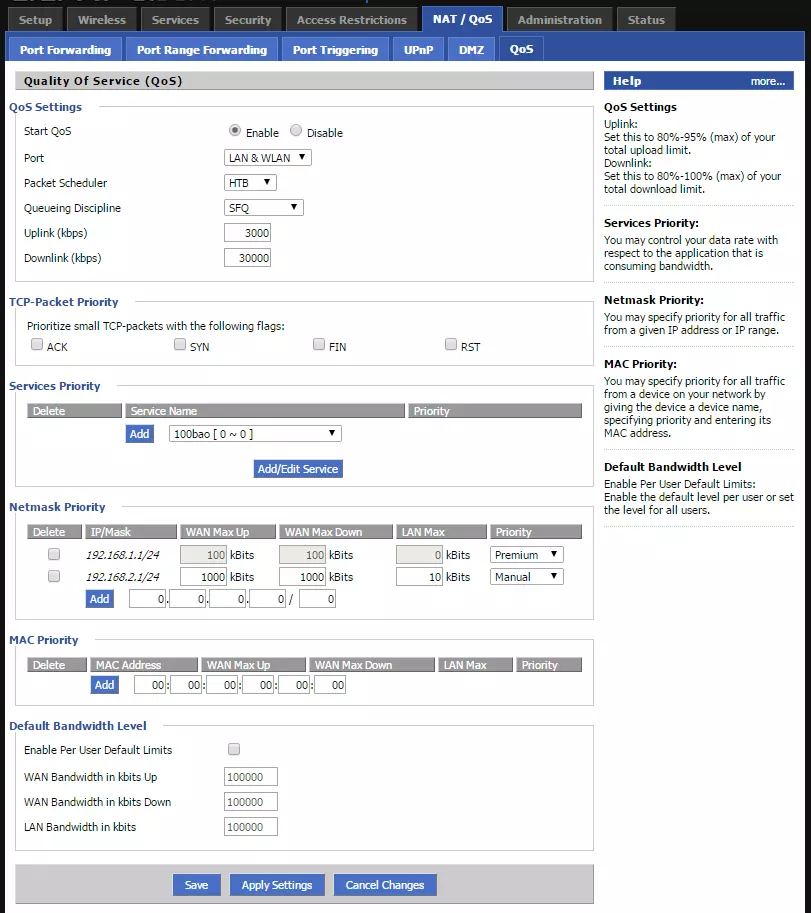
- Go to NAT/ QoS -> QoS
- In the 'QoS Settings' section enter the maximum up- and download speed provided by your ISP
- In 'Network Priority', for the network, you'd like to have a limited speed, set the priority to Manual
- Enter the Up and Downlink speed you'd like to achieve.
- Click Apply Settings and you're done.
![DD-WRT Bandwidth Limiting DD-WRT Bandwidth Limiting]()
Guest HotSpot
DD-WRT allows you to use four different hub-spots which are extremely convenient and useful for commercial environments. These are Sputnik, Hotspot System, Wifidog, and Chilispot. You can find this under Services -> HotSpot. I will go into a bit of detail for each one of these, however, I will only go into the setup of HotSpot System as I found this one the easiest to use and implement.
Sputnik
Sputnik i, like HotSpot system, and in some cases Chilispot work as a paid management provider. This means that they will handle your splash screen, different locations, and more for a monthly or per purchase fee.
We found Sputnik to be somewhat annoying to setup, but it does provide you with some good settings and will limit all WiFi use to the Sputnik splash screen. This does mean that to change your DD-WRT settings you will need to be connected to it with an Ethernet cable.
HotSpot System
I found HotSpot system to be the easiest to setup and use. The service allows you to charge customers for WiFi in which case the company takes a small percentage of the payment. You can also provide users with free WiFi connection and have a splash screen which asks them to follow you on your social networks, you have to pay a small monthly price for this.
- Register for an account at hotspotsystem.com, make sure you make note down your Operator Username and your location ID
- In DD-WRT go to Services -> Hotspot
- Enable HotSpotSystem
- Enter your details and click Apply Settings
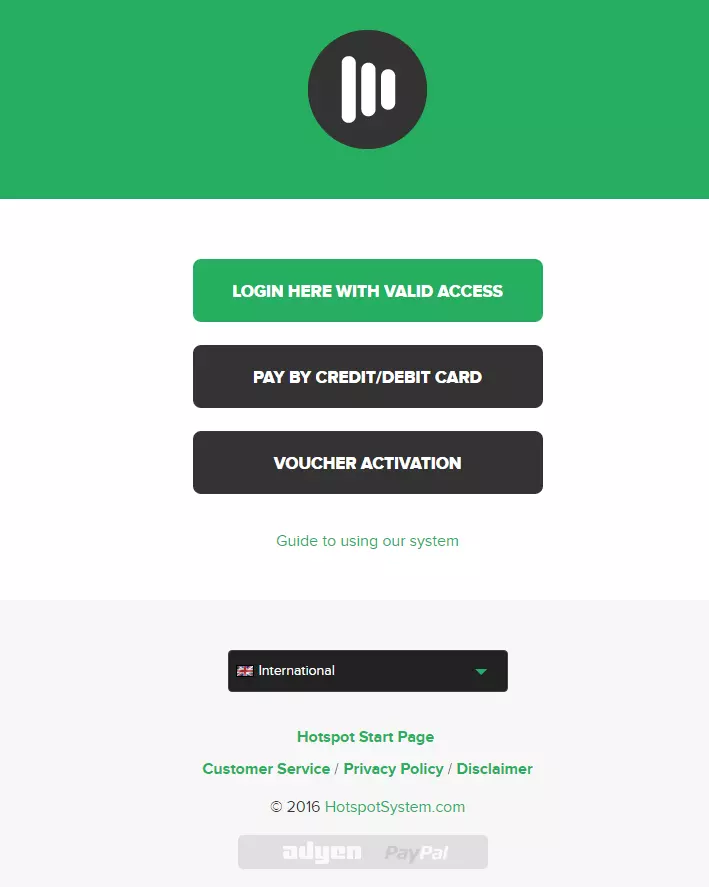
- This will create an automatic guest network and you will also be presented with a splash screen when logging in. If you wish to change this splash screen you can do so through the HotSpot System website. You can change everything from the colors, the images, the buttons to pretty much anything you wish.
![DD-WRT Hotspot System DD-WRT Hotspot System]()
Wifidog
Wifidog and Chilispot are both open source, which means that if you wish, you can set up the server for this yourself, meaning you don't even need an internet connection. Wifidog is the most complicated, and the least talked about option, so I'd recommend avoiding it and choosing Chilispot instead.
Chilispot
Chilispot is the most adaptable DD-WRT hotspot service out there. Firstly, you can use services such as Wi-Fiplanet and EngageHotspot to have a web-based splash page and system. These work similar to HotSpot system, but they are less commercial and hence it will take a bit more work to get it set up nicely, and to your needs. It also means that these services are a lot cheaper than HotSpot System. You can learn more about setting up, by watching this YouTube video.
Secondly, you can set up Chilispot with your own Debian server, thereby keeping everything within your control as well. This setup does require a lot of technical experience, and goes outside the scope of this guide as well.
Mac Filtering
If you want, you can also limit access to your network by device. All modern devices have something called a MAC (Media Access Control) address, which is like a house address and is unique to each device. Once you know a device's MAC address, you can restrict its access to your network.
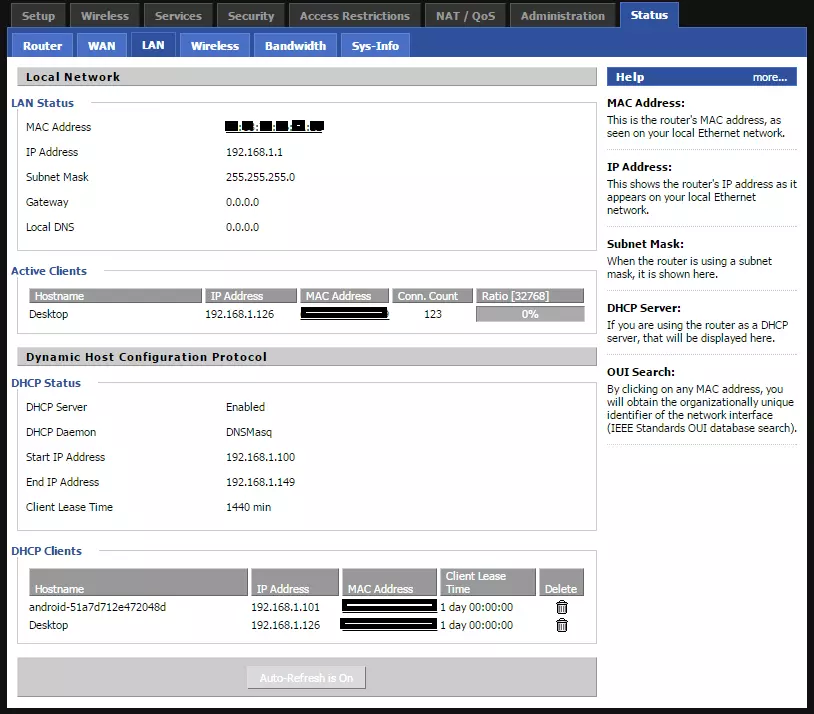
First, you need to find the MAC address of the device you wish to allow or block. Below, I will show you how you can do this using DD-WRT, but you can also Google how to find it in your device settings.
- Go to Status -> LAN
- There at the bottom of the page, you'll be able to see the connected devices and their names
![DD-WRT Wireless LAN DD-WRT Wireless LAN]()
Now that you have determined the MAC address of a device, you can block it or allow it. For example, I'm going to block the Android device shown in the previous image.
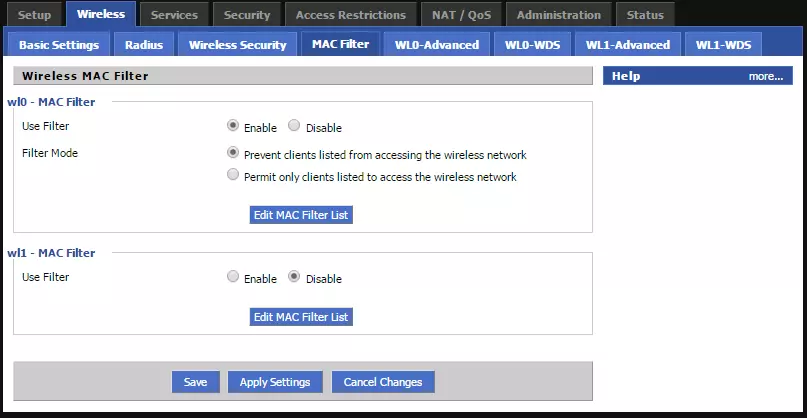
- Go to Wireless -> MAC Filter
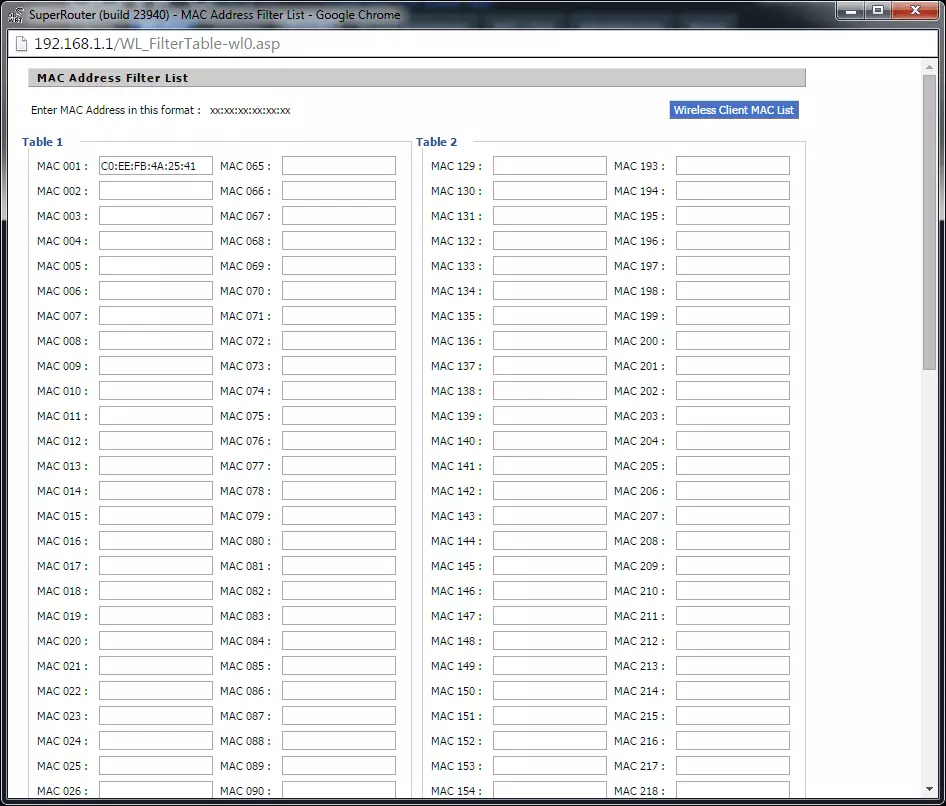
- Edit MAC filter list for the wireless network you'd like to limit access to. You can only do this for real networks and not for virtual networks.
![MAC Address Filter List MAC Address Filter List]()
- Enter the MAC addresses of the devices, and click Save. You can also select the Wireless Client MAC List button to select quickly multiple devices.
- Select Enable, then decide whether you want to permit only these devices, or block these devices
- Click Apply Settings and you're done
![DD-WRT MAC Filter DD-WRT MAC Filter]()
Additional Applications and Settings
As stated at the start of this guide, one of the biggest advantages of DD-WRT is the additional settings and setups they allow you to do. While I have explained most options previously, this section is dedicated to some more unique setups.
VPN Client
As our branding might have given it away already, we love VPNs. So it's not a surprise that we'll show you how you can install the DD-WRT OpenVPN client on your router. You can set up either a PPTP or an OpenVPN client, however, because OpenVPN is a lot safer, and what we always recommend, this is what I'll show the set up of. Should you wish to, you can also set up DD-WRT VPN server. However, I will not be covering this.
Before starting, you will, of course, need a VPN account. I've chosen to use ExpressVPN for this demonstration, as it has been voted as one of the best VPN for DD-WRT. However, most VPN providers do support setup on DD-WRT. I must mention, that an OpenVPN router can be set up in some ways, so consult your VPN provider before starting as their instructions might vary, and it that case you should follow those.
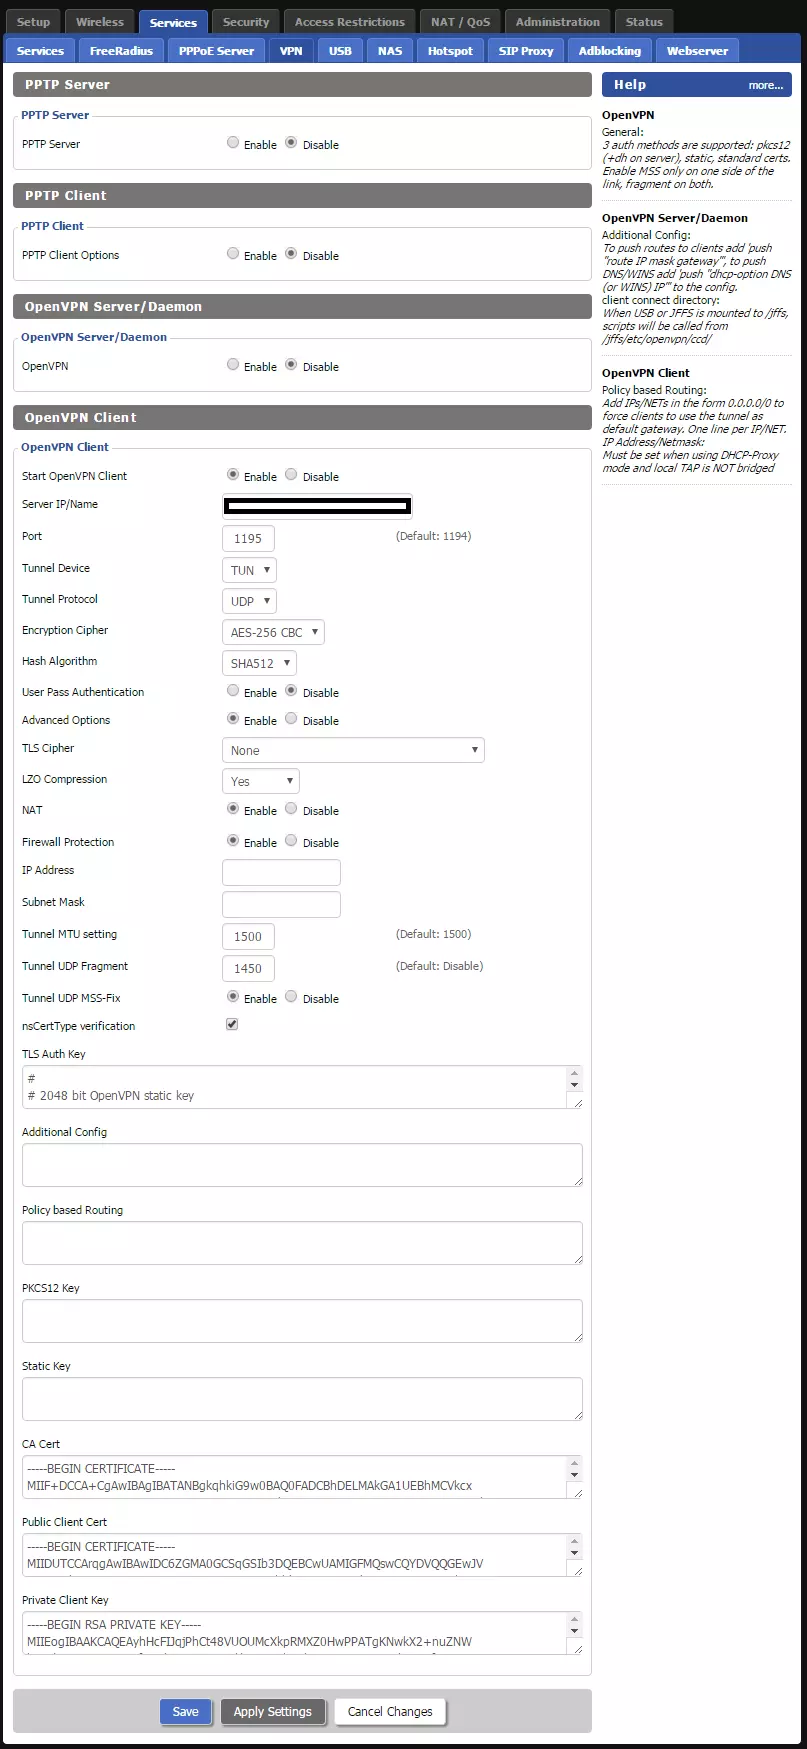
- Download the .ovpn setup file for the server you wish to connect to from your VPN provider, and open it in Notepad or Notepad++
- In DD-WRT go to Services -> VPN and enable OpenVPN Client
- Copy the settings from the .ovpn file to the DD-WRT console as per your VPN providers recommendations.
- Click Apply Settings.
![DD-WRT VPN DD-WRT VPN]()
- Go to Setup -> Basic Setup and scroll down to the Network Address Server Settings (DHCP) section.
- For Static DNS 1 and 2, enter Google DNS settings: 8.8.8.8, and 8.8.4.4 respectively. If your VPN provider has their own server settings, then enter the address for these instead.
- For security reasons you may alternatively wish to use OpenDNS or OpenNIC.
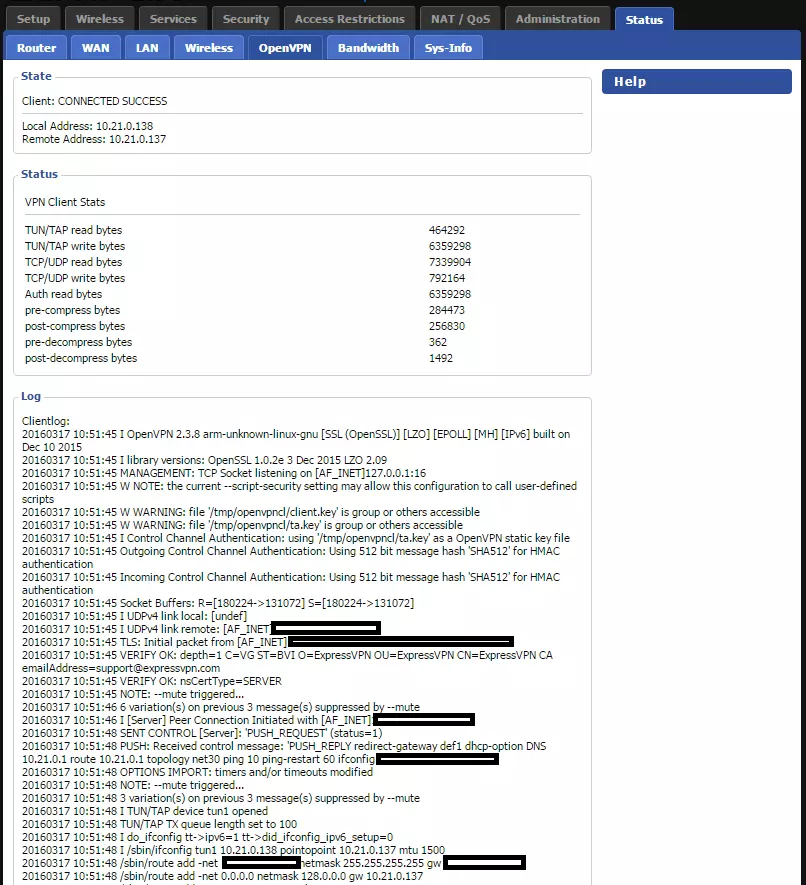
- Go to Status -> OpenVPN
- You should see a successful connection status screen, as well as statistics about your connection, and a data log for troubleshooting.
![DD-WRT VPN Status DD-WRT VPN Status]()
If running a VPN client on your router is one of your primary concerns, then I'd recommend getting something more powerful as the best VPN router will need a lot of processing power.
VPN Client: Dual Gateway/ Policy-Based Routing
If you'd like to, it's possible to set up your router as a Dual Gateway. This uses policy-based routing, and it allows some of your devices to use the VPN connection, while others use your normal connection. This can be really useful if you want to unblock Hulu, changing Netflix region or watching BBC iPlayer outside the UK on your media device (as these are now blocking VPNs) and want to access local services at the same time. We do, however, recommend that you connect to a VPN as often as possible to ensure your connection is encrypted.
- Make sure you have set up a VPN connection as per the previous section, and checked that it works
- Go to Status -> LANand find out the local IP addresses of the devices you'd like to use the VPN connection
- In my case, I will want my Android phone with the IP 192.168.1.123 to use the VPN connection
- Setting up policy-based routing can only be done inclusively and you'll need to know the IP address of all the devices that you would like to have their connection to go through the VPN
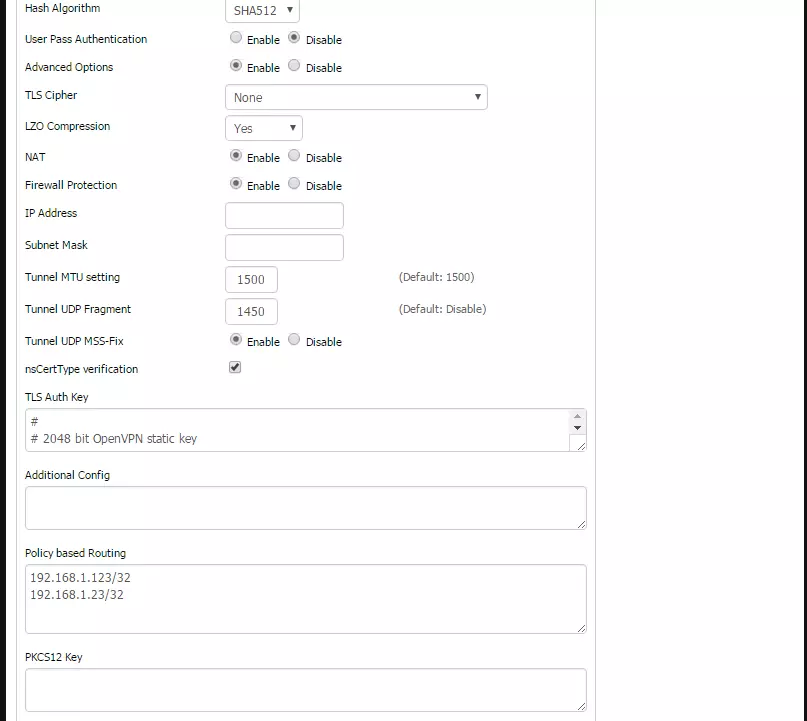
- Go to Services -> VPN
- Into Policy Based routing enter "192.168.1.123/32", make sure you use your respective IP(s). If you need to set up multiple devices, enter each IP on a new line. Click Apply Settings
![DD-WRT Policy Based Routing DD-WRT Policy Based Routing]()
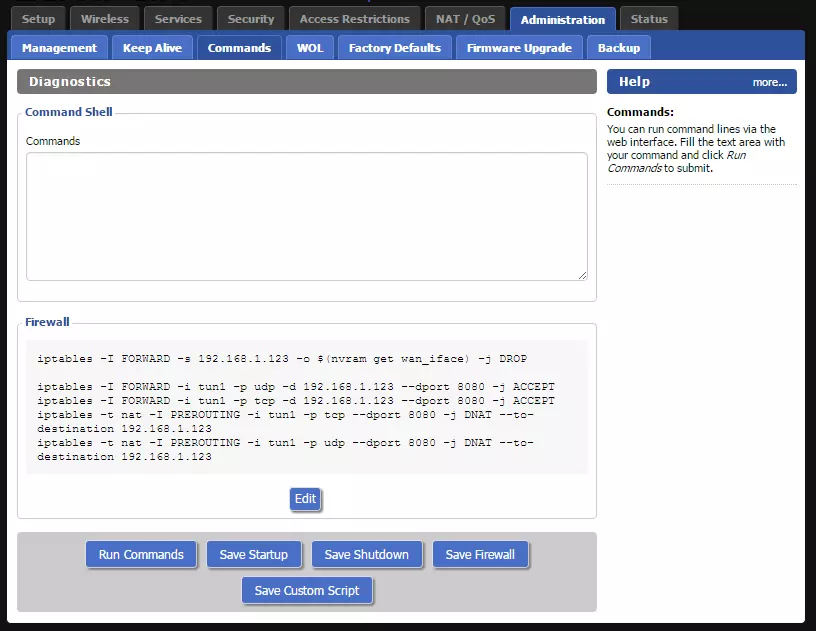
- Go to Administration -> Commands
- Enter the following and click Save Firewall. You will need to enter this for each IP address that you want to use the dual gateway with
iptables -I FORWARD -s 192.168.1.123 -o $(nvram get wan_iface) -j DROP
- If you need to forward a specific port through the VPN as well, then you will also need to enter the following into the 'Firewall Commands':
iptables -I FORWARD -i tun1 -p udp -d 192.168.1.123 --dport 8080 -j ACCEPT iptables -I FORWARD -i tun1 -p tcp -d 192.168.1.123 --dport 8080 -j ACCEPT iptables -t nat -I PREROUTING -i tun1 -p tcp --dport 8080 -j DNAT --to-destination 192.168.1.123 iptables -t nat -I PREROUTING -i tun1 -p udp --dport 8080 -j DNAT --to-destination 192.168.1.123
- You will need to enter the above three lines for all IPs and ports that you wish to use and forward, replacing the IP and port numbers and necessary
![DD-WRT Dual Routing Firwall Rules DD-WRT Dual Routing Firwall Rules]()
- Once you have saved the firewall reboot your router. On each device go to our IP leak test to make sure that they have the external IP address that you're expecting
SmartDNS
Like a VPN, a Smart DNS service allows you to overcome geographically restricted content. Despite the fact that it doesn't work with Netflix that well anymore, there is still plenty of restricted websites it allows you to access. I recommend Blockless as it has a great price, and provides a well-rounded overall service. Unfortunately, at the moment, I'm not aware of any free Smart DNS services that are legitimate and will not sell your data. There are, however, some free VPN services that have good privacy policies and will keep your data secure.
Once you have signed up to Blockless, setting up the Smart DNS service on DD-WRT, is very simple, and is as follows.
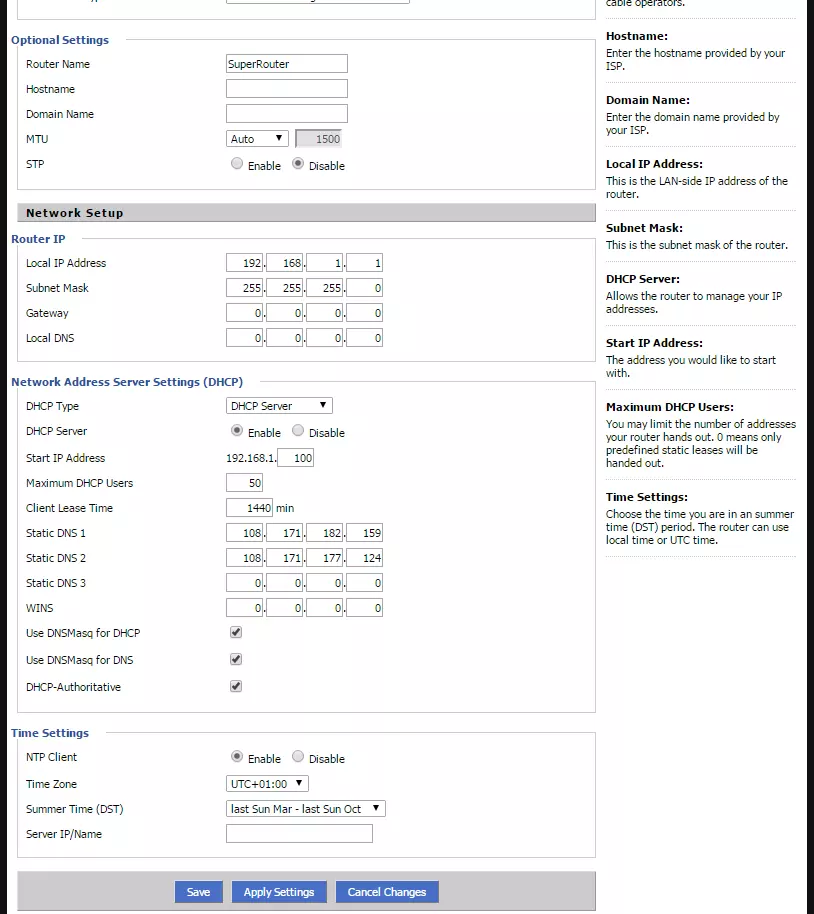
- Get the Primary and Secondary DNS values from Blockless (108.171.182.159 and 108.171.177.124 at the time of writing)
- Go to Setup -> Basic Setup
- Under Network Address Server Settings (DHCP), enter the DNS settings in 'Static DNS 1' and 'Static DNS 2'
- Click
Apply Settings
![DD-WRT Static DNS Settings DD-WRT Static DNS Settings]()
- Go to the Blockless website and validate your IP address
If you wish to use OpenDNS or OpenNIC for safety and security purposes, then you can set this up in the same way, just use the relevant DNS IP in the Static DNS fields.
Transmission - Torrents
If you're a fan of torrenting, then you can install a torrent client called Transmission on your router. This means that you can download torrents without having to leave your computer switched on and, of course, allows you to have a better seeding ratio as well. I must mention that here at ProPrivacy we do not condone the use of torrenting for illegal purposes. However, there are plenty of legitimate reasons to use torrent clients. We recommend that you use a VPN for transmission in order to keep your real IP address hidden.
To be able to get Transmission up and running, you will need to have carried out a few of the previous steps, but don't worry I have referenced these accordingly. You will also need a USB stick, or external hard drive, ideally formatted to FAT32.
- Enable USB Support as per the NAS section.
- Go to Services -> NAS
- Enable Transmission Daemon in the 'Bittorrent' section
- For the directory, enter the route for the drive you'd like to use. Generally speaking, this will be /mnt/sda1
- Click Apply Settings and you're done
Now that you have transmission up and running you will also need to be able to access it quickly, to make the process simple.
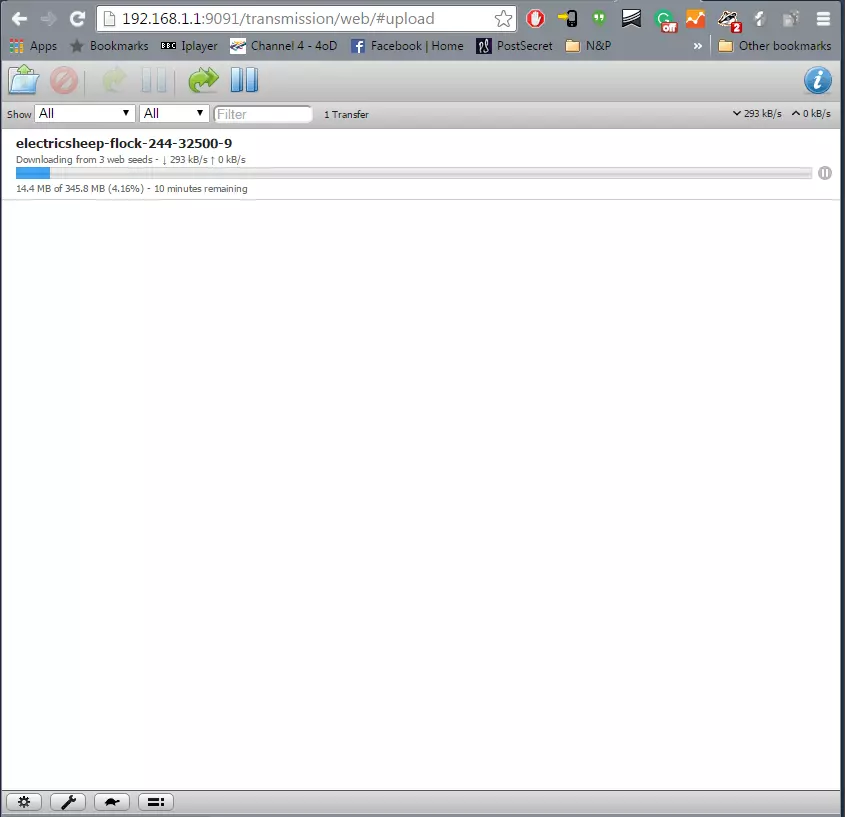
- To access Transmission from your Computer go to 192.168.1.1:9091
![Transmission Client Transmission Client]()
- To use it, click the folder button where you can either enter the URL of the torrent location or upload the torrent file.
- For the destination, you will want to set it to /mnt/sda1/Downloads.
- You can make the above destination folder the default by clicking the spanner settings button at the bottom of the page
- That's it your download will now begin. The page only updates itself periodically, so you will need to wait a few seconds before it appears and progress occurs.
- If you have NAS enabled, once the download has finished you can easily transfer the file to your computer when you need it.
- On Android you can use Remote Transmission to access the system, for iOS phones, you will need to use the web access or BarMagnet if it's jailbroken. On the official transmission website, you can also download apps for many other services such as XMBC (now Kodi), Blackberry, RSS, etc.
For information about staying secure when torrenting, see our best VPN for torrent sites guide.
DLNA
DLNA, or the Digital Living Network Alliance as it's called, is a digital standard that makes it easier to stream media content across devices on a network. The standard has many advocates, but there are many people that do not find it useful. The reason is, that with modern technology it can be easy to access the NAS drive on your router and stream the content easily. However, in my experience, I found DLNA practical, especially when I wanted to stream movies on my Xbox or older touchpad.
For DD-WRT DLNA set-up follow the below steps, after which, I will show you how to access it from various devices.
- Go to Services -> NAS
- Enable miniDLNA
- Select the options you'd like, and set the path to /mnt/sda1
- Click Apply Settings, and you're done
With DLNA set up you can now access it from most devices that are connected to your WiFi network. Click through to the relevant links below for more a guide on how to setup DLNA with your device.
- Windows
- OSX
- iOS devices
- Xbox one
- For you will just need to use your Media Player
Cloud Storage
Unfortunately, one of the downsides of DD-WRT over traditional router firmware, is the lack of a dedicated cloud storage system. As well as a set of unified apps and easy set-up, both Linksys and AsusWRT firmware provide this capability. While, yes it's possible to use an FTP system and set up a bunch of code, this just isn't the real deal.
WebServer
If you would like, you're also able to set up a DD-WRT Webserver, which allows you to host a web page, share files with colleagues, and carry out a number of other website-related activities. I will show you the basics of getting set up with Pydio, however, you may wish to check their administration guides to see what else you can use it for.
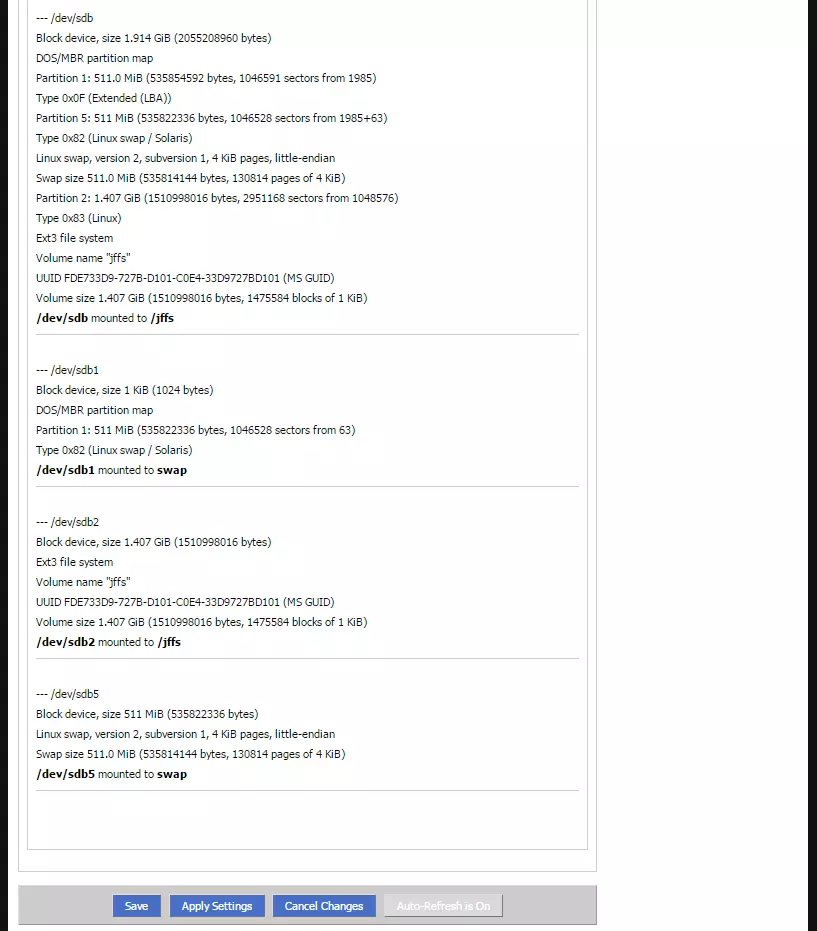
- First, you will need to format your external hard drive or USB disk. Since you'll need to create two partitions, I'd recommend using MiniTool Partition wizard for doing this (Gnome for Mac). Create the following two partitions, after formatting it:
- Partition Label: leave empty, Partition Size: 512MB, File System: Linux Swap, ClusterSize: Default
- Partition Label: JFFS, Partition Size: the remainder of the drive, File System: Ext3, ClusterSize: Default
- Set up a NAS system as previously described.
- When you plug the USB drive into your router. It should automatically mount the swap and /jffs partitions. Make one of the "File shares" under the Nas tab the /jffs path and name it JFFS
![DD-WRT JFFS and Swap Mounted]()
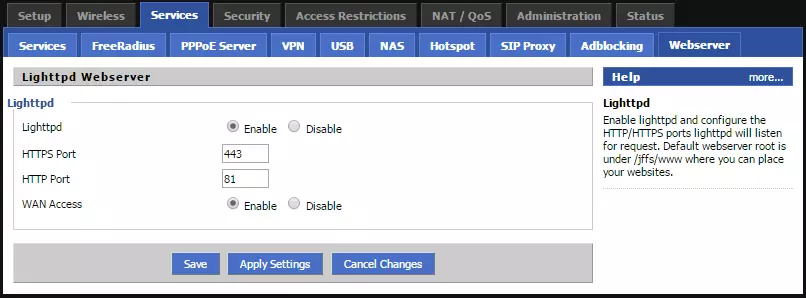
- Go to Services -> Webserver. Enable Lighttpd. You can leave the settings as they are. If you'd only like to be able to access the webserver locally, then Disable WAN Access.
![DD-WRT Services Webserver DD-WRT Services Webserver]()
- Download the latest version of Pydio in .zip format
- After extracting, copy the file system to the jffs/www folder on the USB stick attached to the router.
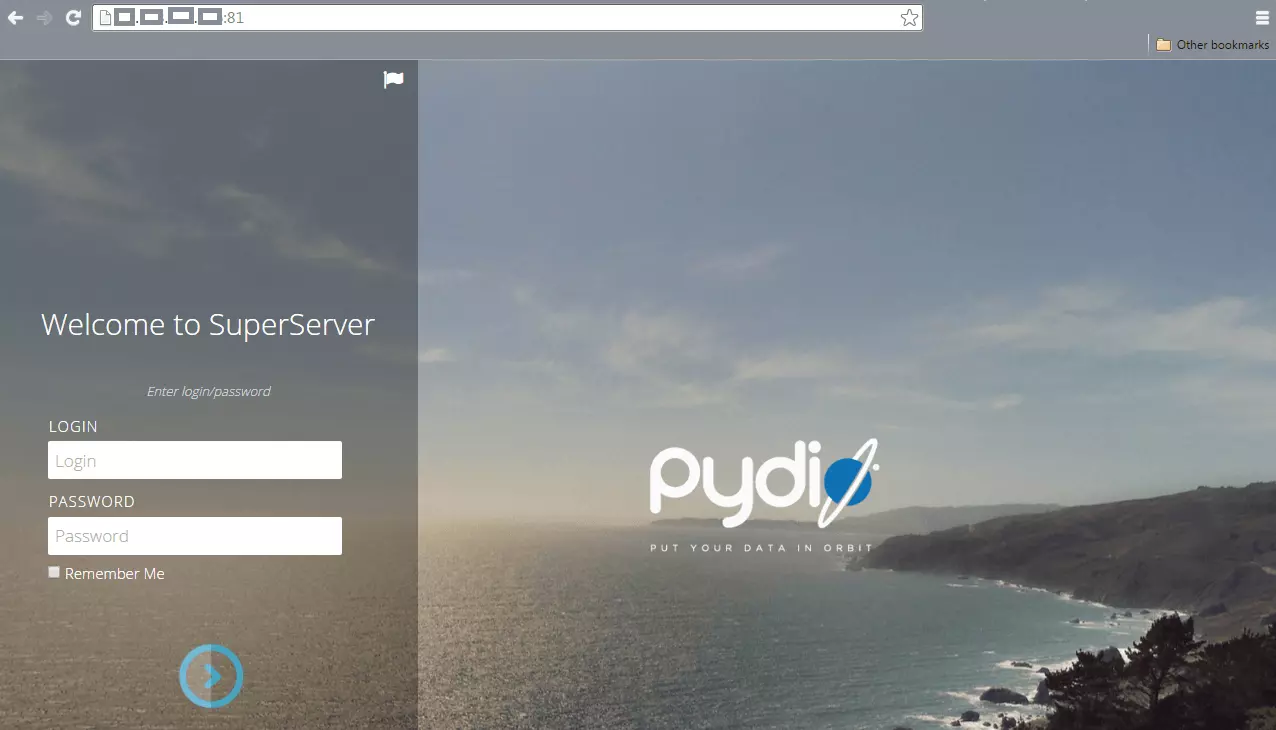
- Go to 192.168.1.1:81 to access the webserver.
- Click "Click here to continue" to start your setup. Follow the three simple steps, the only setting that you have to be aware of is that for the Database configuration you will have to use SQLite 3.
![Pydio Pydio]()
You now have an accessible webserver, which multiple people can access. If you would like it to be available from anywhere around the world, you will need to have WAN enabled in the Webserver setup. If you have your router connected to a modem, you will also need to set up port forwarding for port 81, to your DD-WRT router. You can then find your IP by visiting our what is my IP page. Unless you have a static IP (likely you don't), you will also need to set up DDNS.
As with FTP and SSH access, if you would like to do this while running a VPN, you will need to choose one that allows for port forwarding.
DDNS
Your computer and other devices on your network are identified on the internet by what is called an IP (Internet Protocol) address. Your ISP provides this to you automatically so most of the time you don't have to worry about it. However, because of the way that ISPs work, they might assign you a new IP address now and then. The frequency varies by provider, but unless you have a static IP, it will change at some point in time.
When your IP does change, you won't notice any difference because it doesn't have a significant effect on the inner workings of your system. However, when you're trying to access your router from an external location then you will always need to know your IP, or you won't be able to connect to it. This goes for FTP, WebServer, Smart DNS setups, and a few other scenarios.
To overcome this, you will need to set up a DDNS (Dynamic DNS) system. A DDNS system will give you a web address such as thisismyrouter.noip.me and by running a small program on your computer (or DD-WRT in this case), the provided web address will always redirect you to the correct IP address.
If you have already purchased (or planning to) a domain from NameCheap, then you'll be able to set up DDNS using their system. However, I am going under the assumption that you do not have a domain you can use right now, and I'll be using the free DDNS service by NoIP.
- Create an account with NoIP. If you're going to use the free plan, make sure you renew it every 30 days
- Go to Hosts/ Redirect and click Add A Host
- Give yourself a hostname, choose Host Type DNS Host (A), your IP address will automatically be filled in, and Assign to Group is optional
- Click Add Host
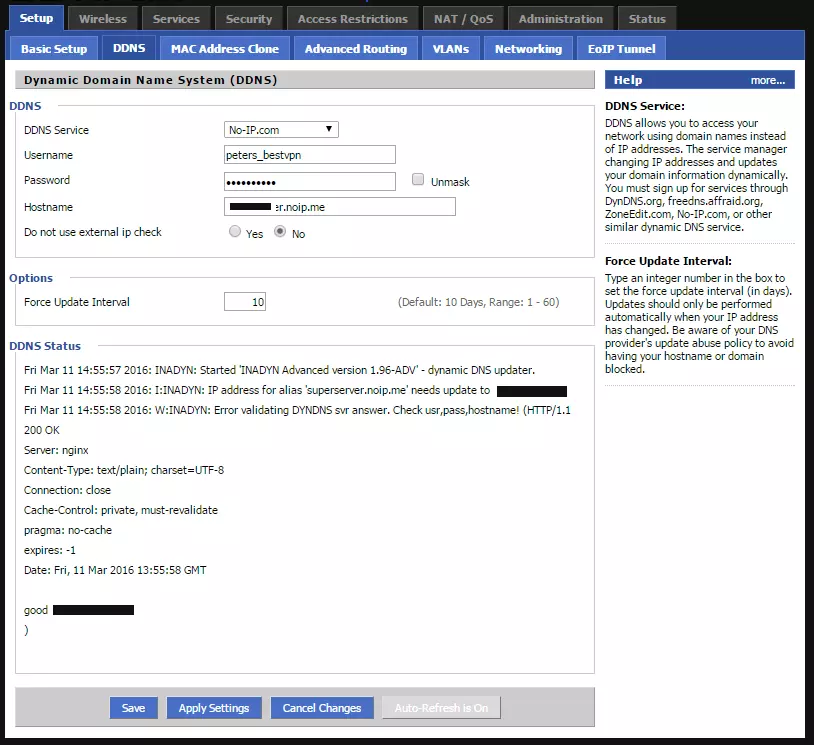
- In DD-WRT go to Setup -> DDNS
- Choose No-IP from the drop-down list and enter your details from No-IP
- Do not use external IP check should be changed to No if you're router is not directly connected to the internet (i.e. behind another router or modem)
- Click
Apply Settings
![DD-WRT DDNS DD-WRT DDNS]()
- When you now go to yourddns.noip.me (the DDNS domain you have chosen) you will be able to access your router. Make sure that you add any relevant ports for accessing, e.g. for the webserver I would use yourddns.noip.me:81
Other services that you could use instead of NoIP are Dynu and ChangeIP.
Privoxy Adblocking
We already recommend using adblockers on your computer and installing some plugins on your browser (Chrome, Firefox), however, sometimes it might be more practical to run an adblocking service on your router. Unfortunately, plugins and such can be a problem on mobile devices, especially on iOS. This gives another good reason to run an Adblocker on your router directly, all devices connected to it will have advertisements blocked on it. I am going to give you the quick and easy way of setting up Privoxy (the built-in DD-WRT Adblocker) and if you'd like more help you can leave a comment or visit the Privoxy websites for more details.
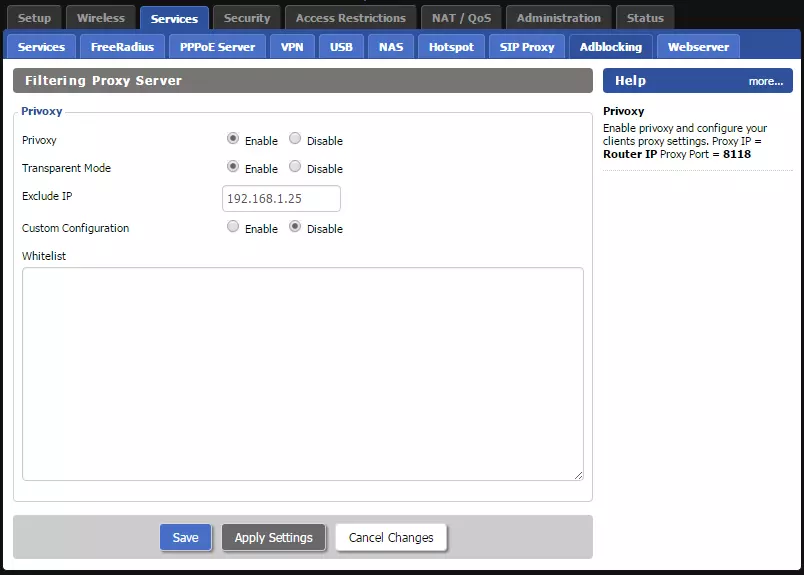
- Go to Services -> Adblocking
- Enable Privoxy
- Enable Transparent mode. If there are any devices that you don't want it to run for, enter their local IP address. For example, when I'm doing quality testing on some websites I need to have advertising visible, therefore, for I have entered my laptops local IP, which I've set to a static 192.168.1.25
- You can leave the other settings as they are
- Click Apply Settings and you're done
![Privoxy DD-WRT Adblocking Privoxy DD-WRT Adblocking]()
Network Monitoring
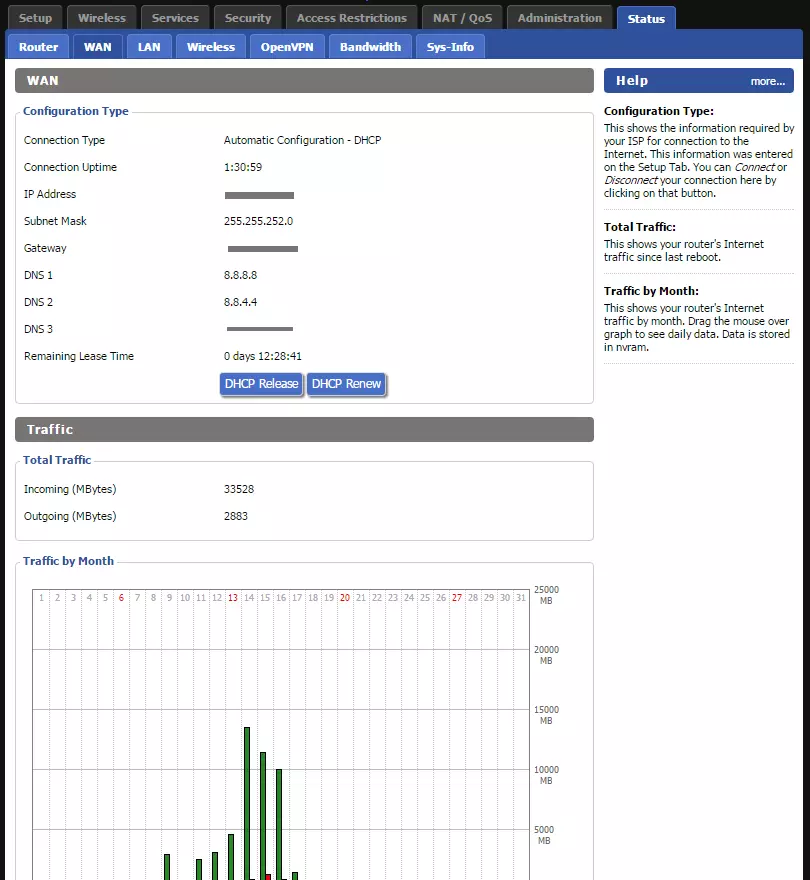
If you have a monthly download, or upload limit assigned to you by your ISP, or would just like to know how much internet you are using, then you can analyze your data statistics using DD-WRT. Using the Status bar, you're also able to analyze a number of other factors, and find out if there are any other problems with your network as well, or improvements that could be made.
- If you wish to see how much Bandwidth is being used you can use the Status - Bandwidth Tab.
- In Services -> Services if you enable the WAN Traffic Counter (ttraff Daemon) you'll also be able to see the monthly breakdown under the Status -> WAN tab.
![DD-WRT Traffic Monitoring DD-WRT Traffic Monitoring]()
- In Services -> Services if you enable the WAN Traffic Counter (ttraff Daemon) you'll also be able to see the monthly breakdown under the Status -> WAN tab.
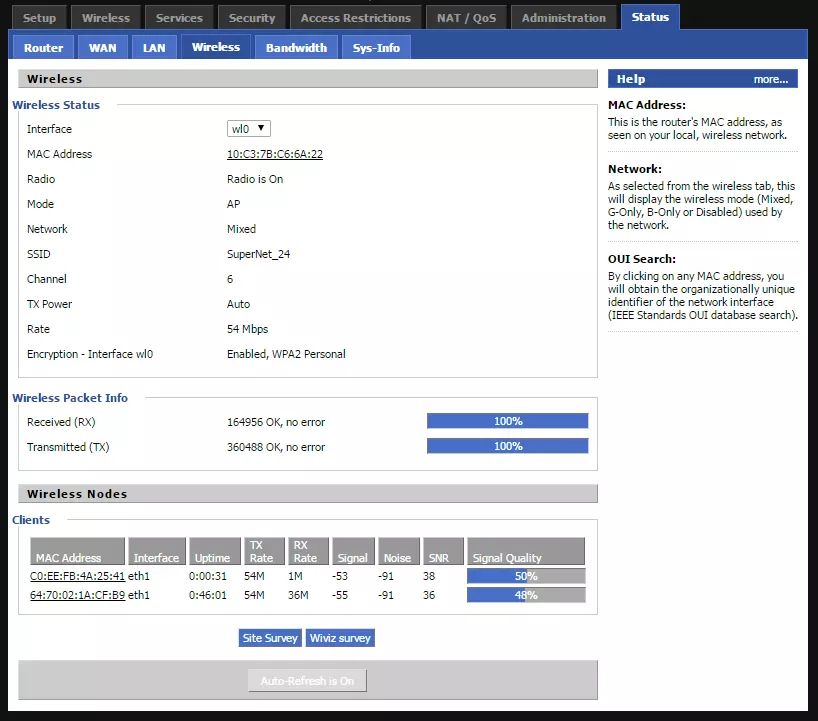
- In Status -> Wireless you can see what devices are connected to each wireless network, so if there are more devices showing then you're expecting, then you might have some problems
![DD-WRT Wireless Status DD-WRT Wireless Status]()
You can also use YAMon to get better statistics and groupings on your network traffic usage.
If you wish to have more in-depth network monitoring, and also see a break down of data usage by software, then I'd recommend downloading Glasswire, which will do just that and more.
WiFi Protected Setup (WPS)
WPS refers to a system which allows you to easily connect a device to your router. You might have seen it before that when you are connecting to a wireless network, it permits the option for a quick connection by pressing the WPS button on the router. Unfortunately, generally speaking these systems are horrible for the security of your router. Luckily, DD-WRT WPS is not implemented in most builds so you don't have to worry about this.
However, there are some commercial builds, such as on Buffalo routers, where the option for it does exist. If you do get one of these, I'd recommend disabling it instantaneously.
Definitive DD-WRT Guide Conclusion
I sincerely hope that you have enjoyed reading my guide and have found something useful to implement and help you create the best WiFi router possible.
If you've never played around with DD-WRT before it's a great way to spend a few hours and improve your home with. For those of you who already have DD-WRT, I hope that some of my instructions have helped to improve your setup. If you have found
If you have found this guide helpful, I'd appreciate a share on your favorite social network. And if you're having problems, feel free to leave a comment, and I'll try and help as much as possible.

